Sub issues and issue relations » History » Revision 3
« Previous |
Revision 3/4
(diff)
| Next »
Holger Just, 01/09/2025 03:01 PM
Remove "easily" filler word
Sub issues and issue relations
Organize your work by creating structures and hierarchies for your tasks using sub-issues and issue relationships. With Planio, you can map out your projects more efficiently - whether you're building a detailed family tree of tasks or setting a clear sequence of events. Keep your issues in perfect chronological and logical order to ensure smooth project execution every time.
Although issue dependencies and sub-issues can seem similar at first glance, we will show you how to use them so you can make the right decisions from the beginning.
- Table of contents
- Sub issues and issue relations
When to use sub-issues or issue relations
Although both sub-issues and issue relations link issues together they have different uses and functions.
Sub-issues create a tree or a vertical hierarchy of issues. They are often used to break down a large activity into smaller tasks.
Issue relationships allow you to link tasks without requiring a hierarchy. Use them to define the order in which tasks should be completed, provide additional context, or connect related email threads. With this flexibility, you can ensure all aspects of your project stay connected and well organized.
How to create a sub-issue
There is more than one way to create issue hierarchies in Planio. For all of them, you will first need at least one issue in your project.
Creating a sub-issue from scratch
For this option, navigate to the issue tab and click New issue or the green ➕ button on the left.

Fill out the issue as you need and when you get to the field "Parent issue" you can enter the issue number or subject of the intended parent issue.
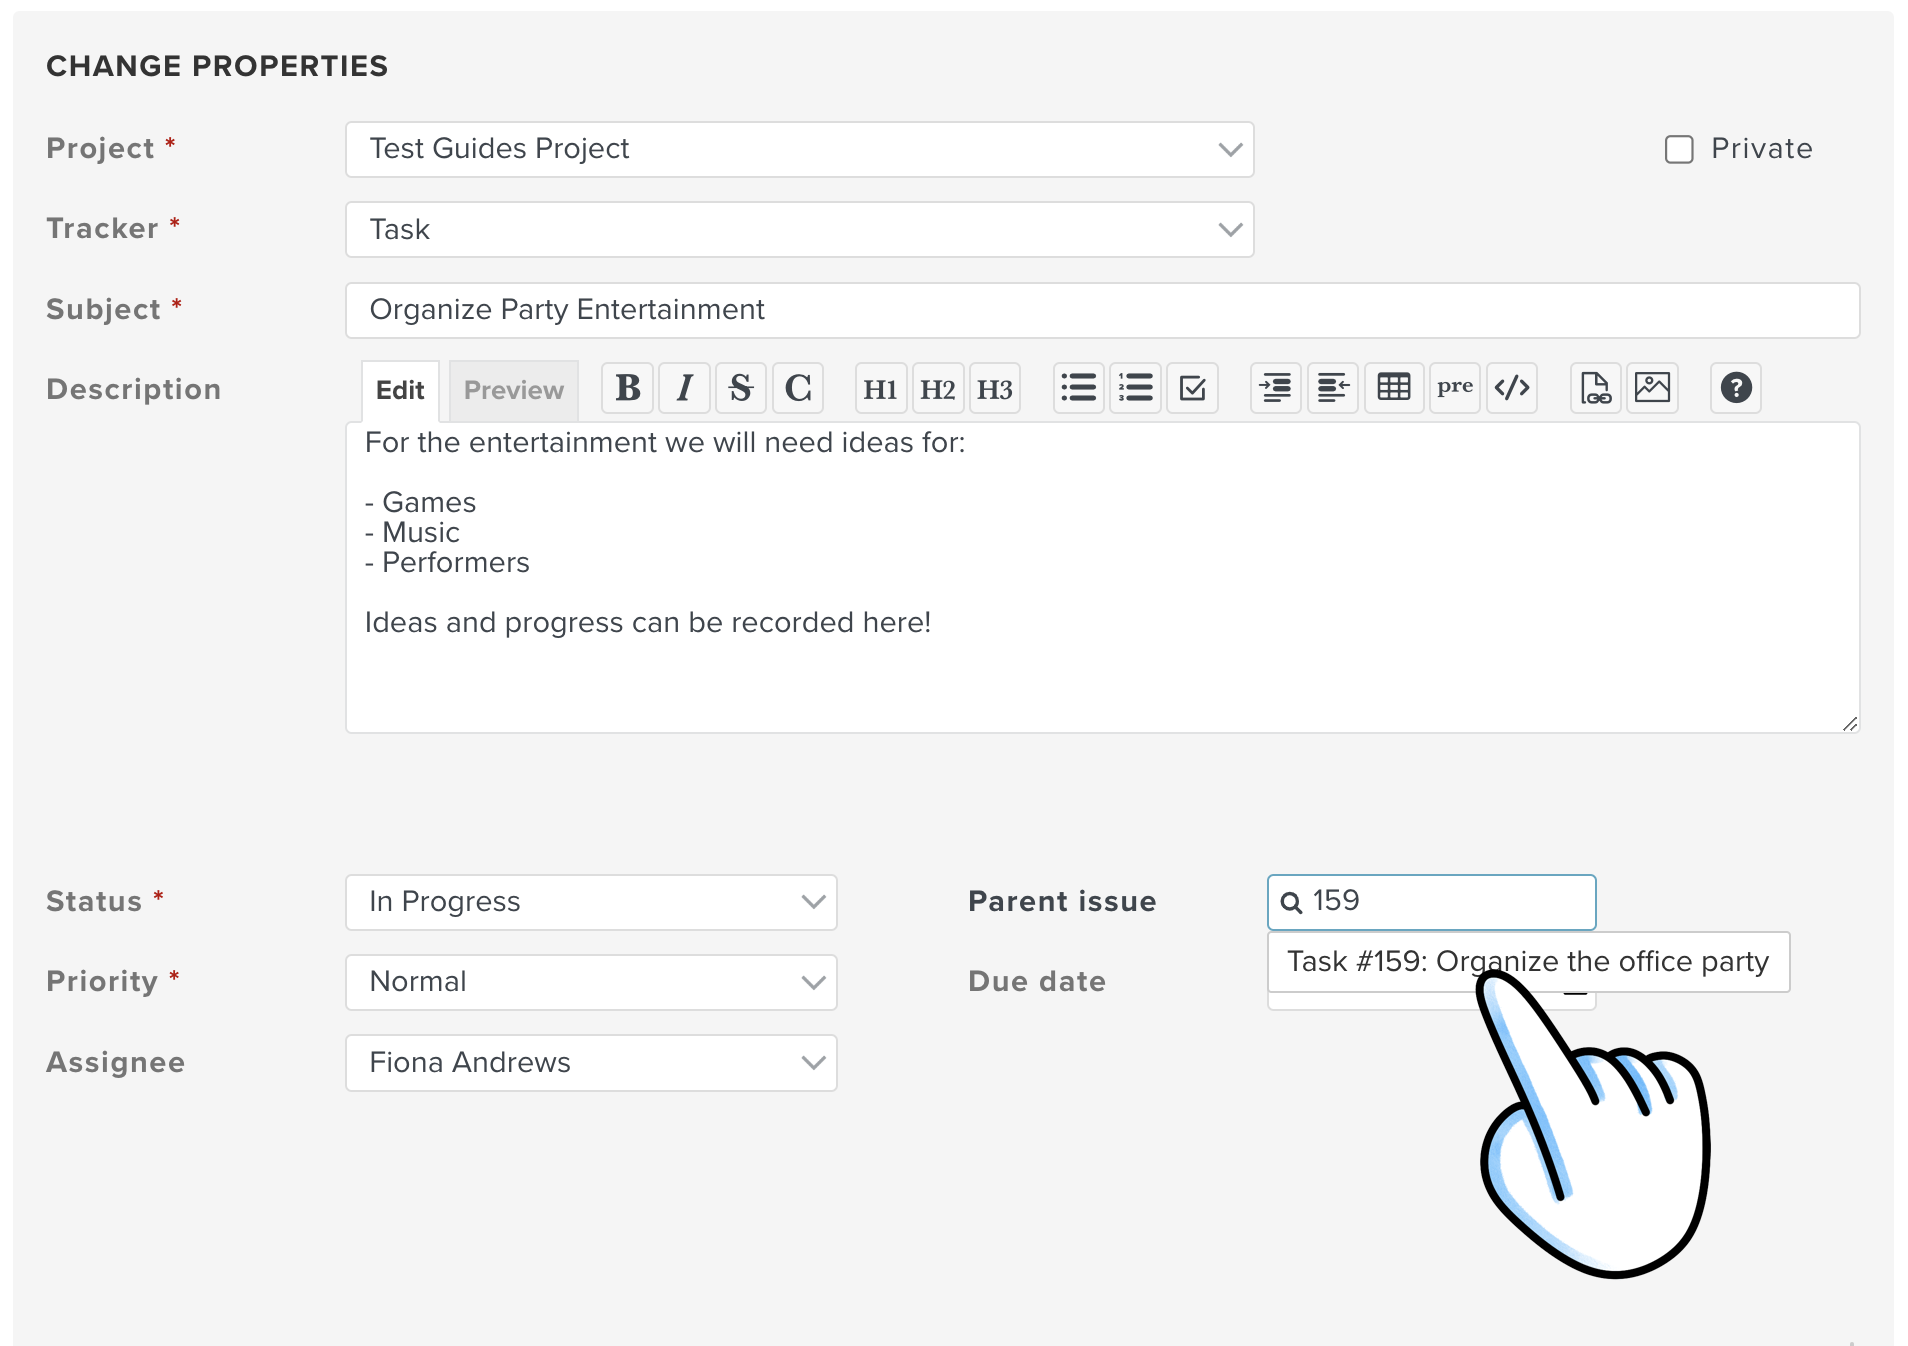
Finish setting up your issue as you need it and then click Create
That's it, you created your first sub-issue!
You'll notice that there is a link to the parent issue, above the issue title. This way you can always navigate to the parent issue when needed.
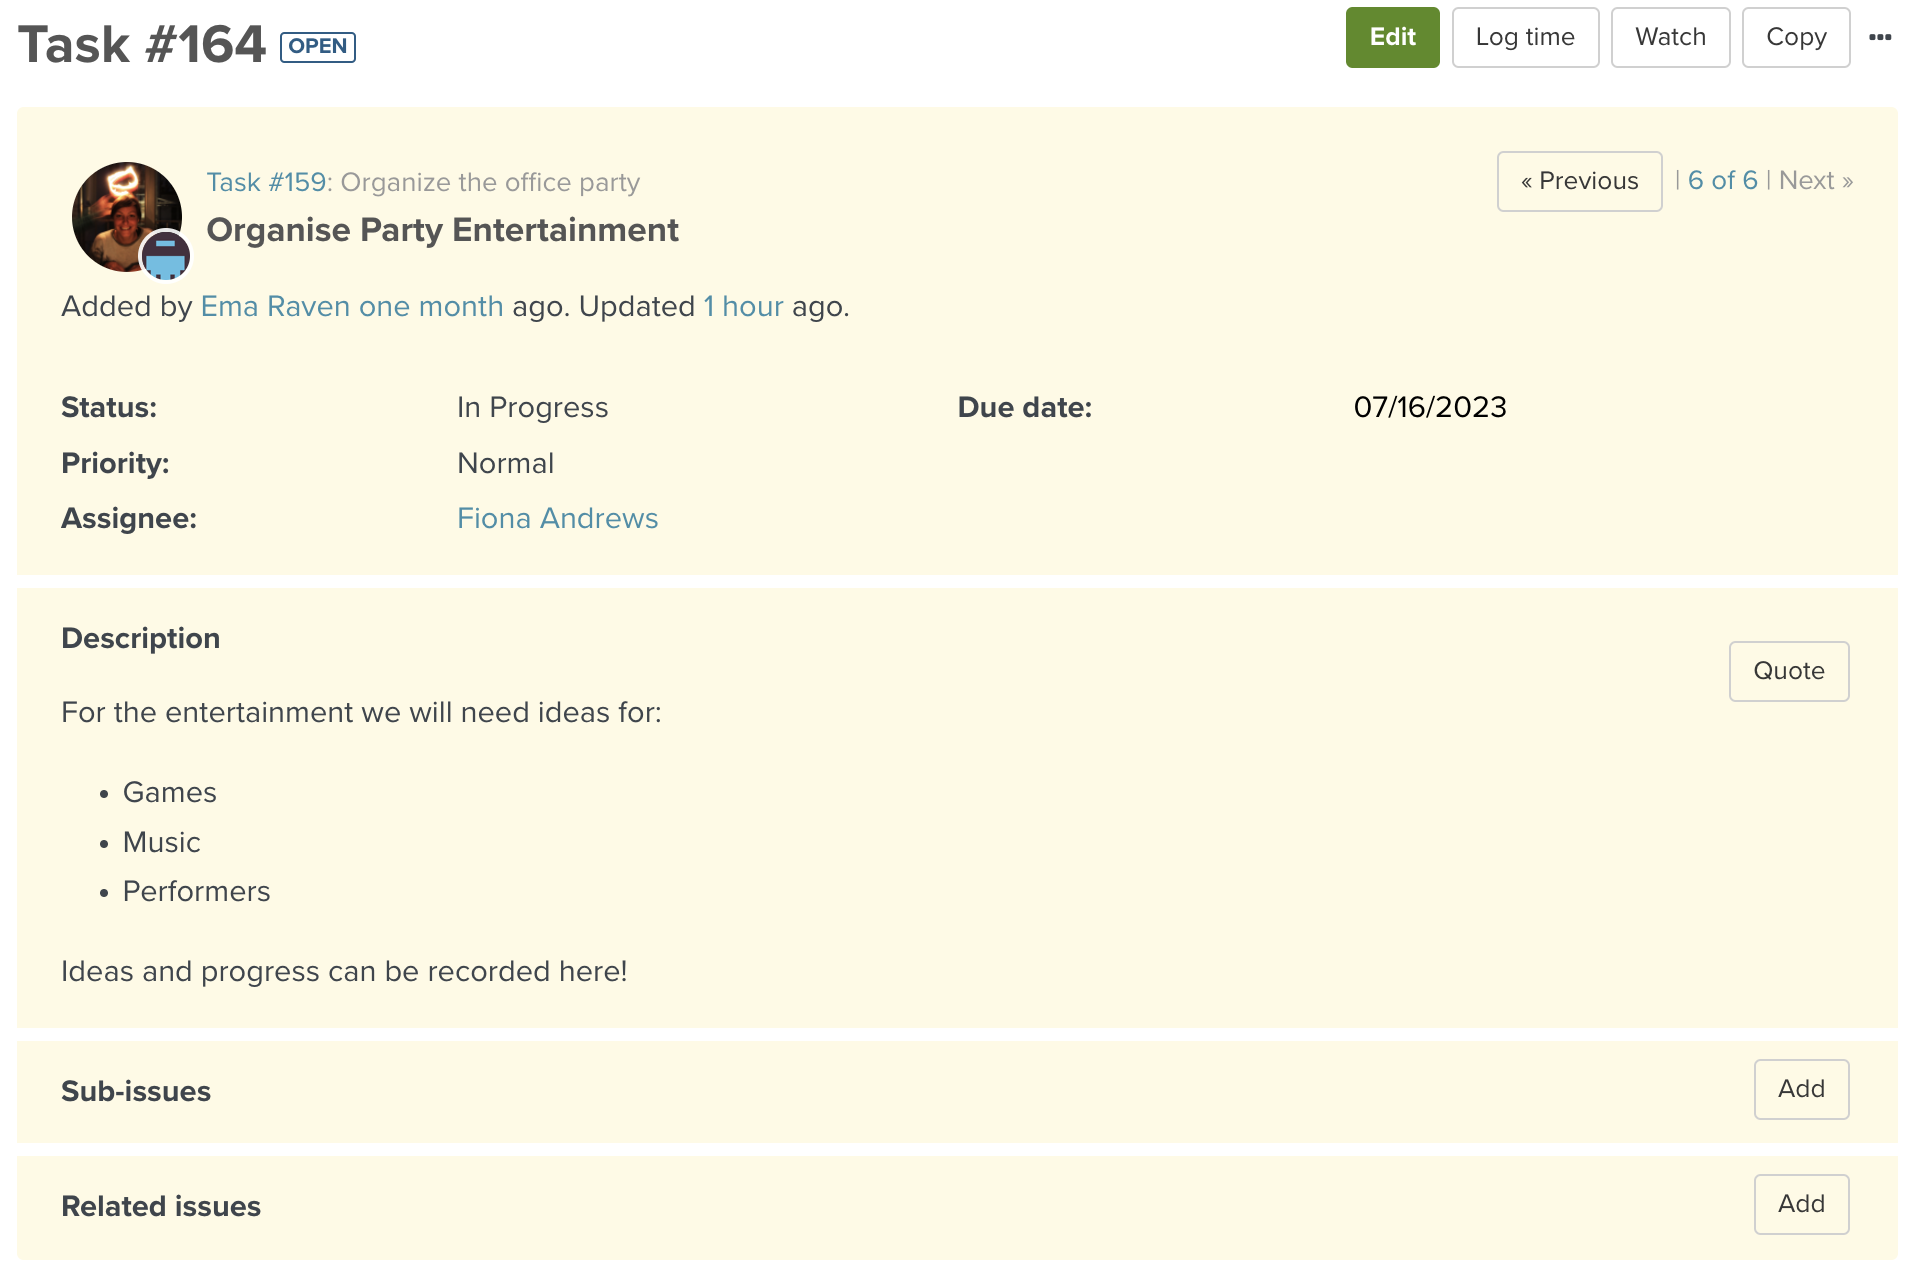
You can do this with any existing issue as well - just fill in the parent issue field and it will become a sub-issue.
Creating a sub-issue from the parent issue
Before you click on "Edit" in the issue, scroll down to the bottom of the yellow section. The sub-issue section is just above the related issues. On the right hand side click on ADD.
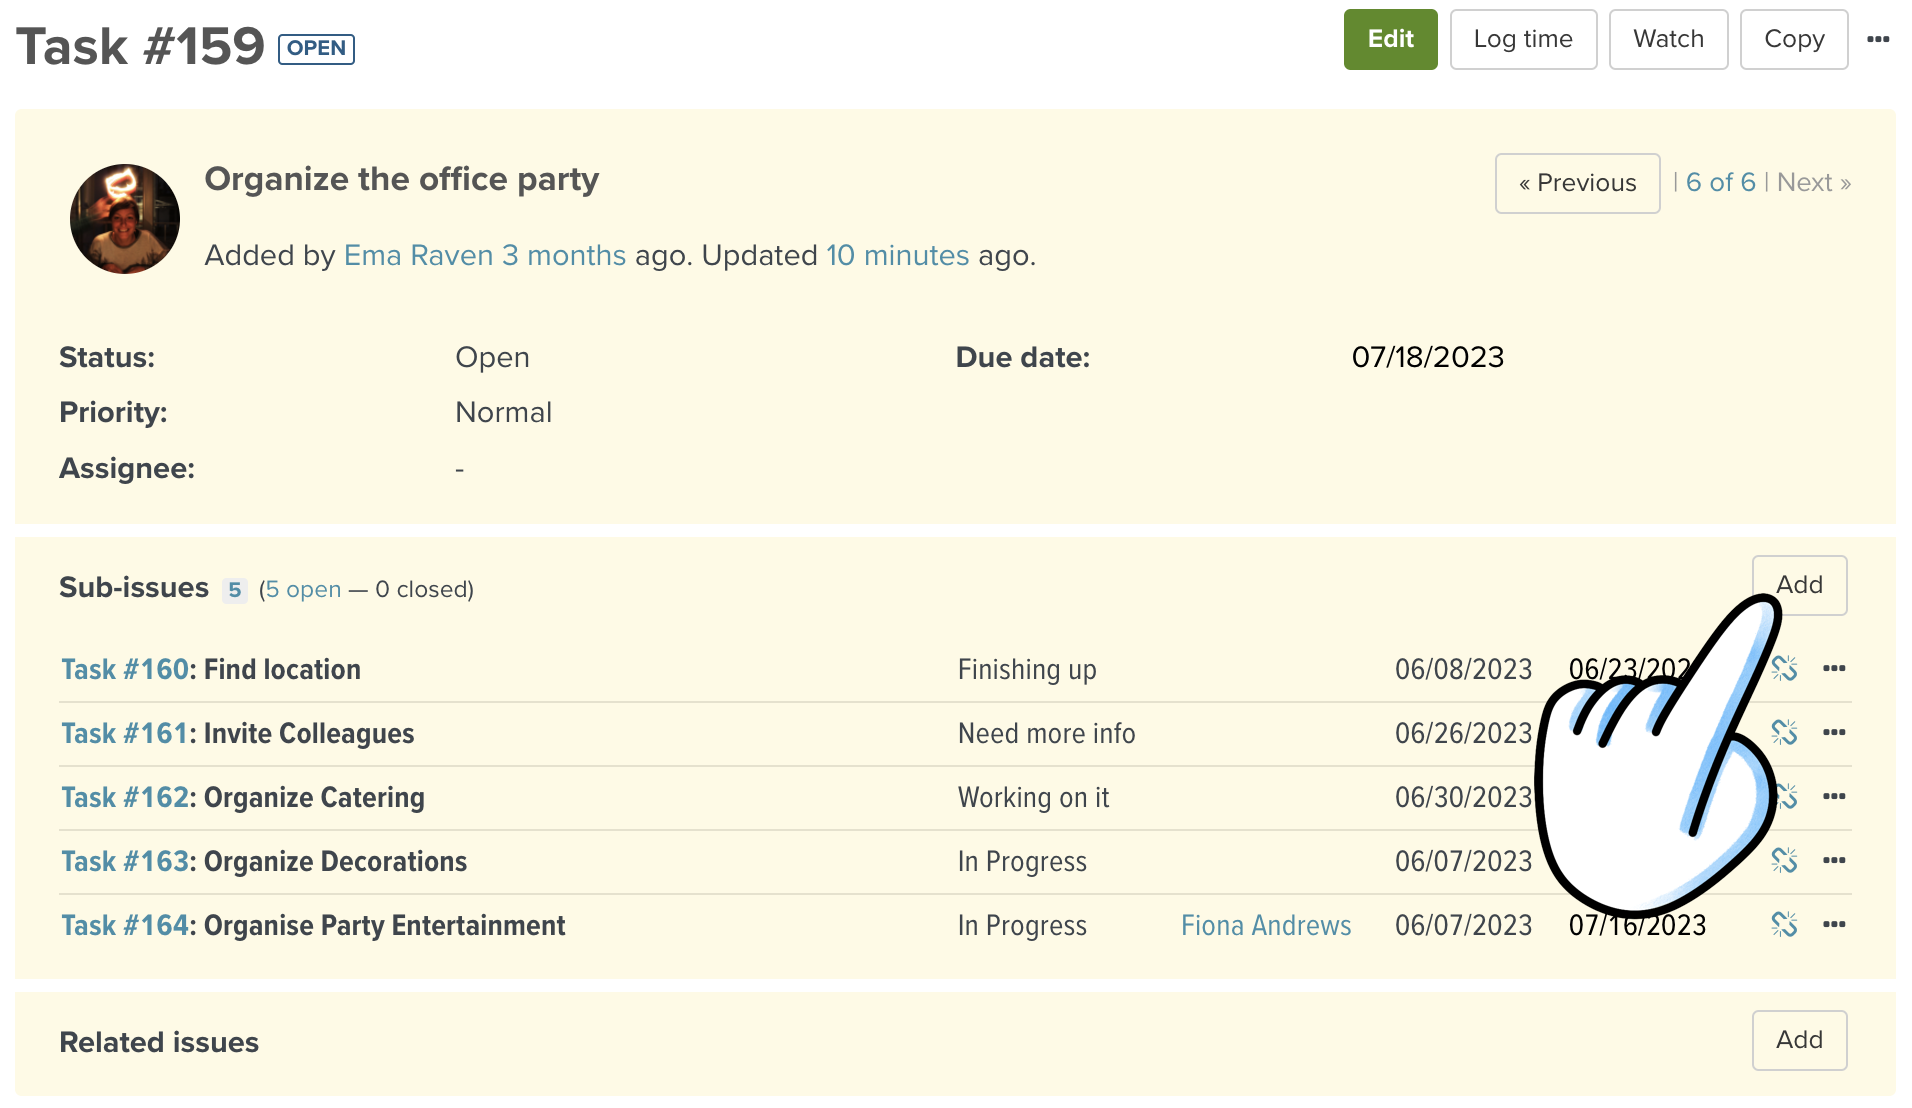
You will be redirected to a new empty issue where you can create your sub-issue. Fill out the issue information and click Submit.
Once you have created your new sub-issue, you will be taken back to the original issue, which has now become a parent issue. There is a green banner with a link to the new sub-issue and you'll notice it has automatically received the next available issue number.
In the parent issue scroll down to the "Sub-issues" section. You'll see the sub-issue(s) and a summary of how many are open or closed.
The fields "Assignee", "Start date", "Due date", "Status" and "% Done" may appear if they are filled out in the sub-issue. If they are not filled out, then the spaces will remain empty. It is not possible to choose which fields show up here.
View your issue hierarchy
Of course you can also get a great overview of your sub-issues and tree structures in Planio.
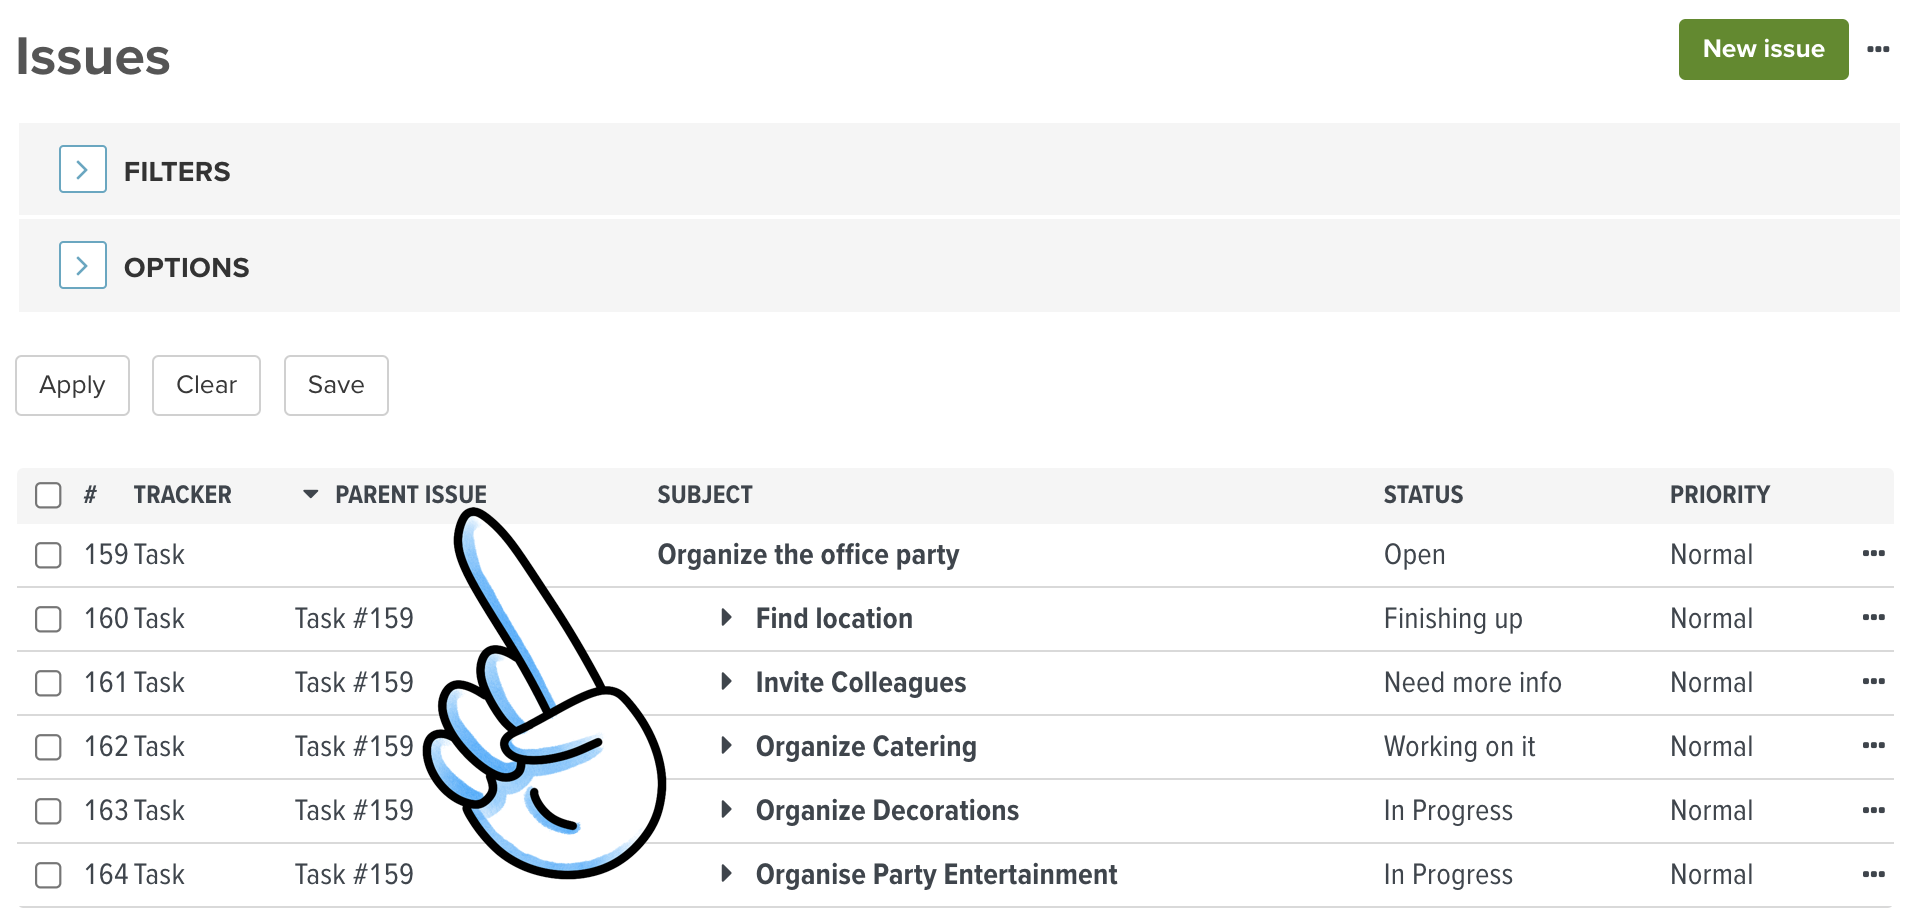
You can set up a hierarchal view of your issues in the issue list, like so:
-
- Go to the relevant issue list
-
- Click in the grey section OPTIONS
-
- Add the column "Parent Issue"
-
- Click Apply
-
- Click the new table heading Parent Issue
This will organise your issues hierarchically with the parent issue at the top and its sub-issues grouped underneath it.
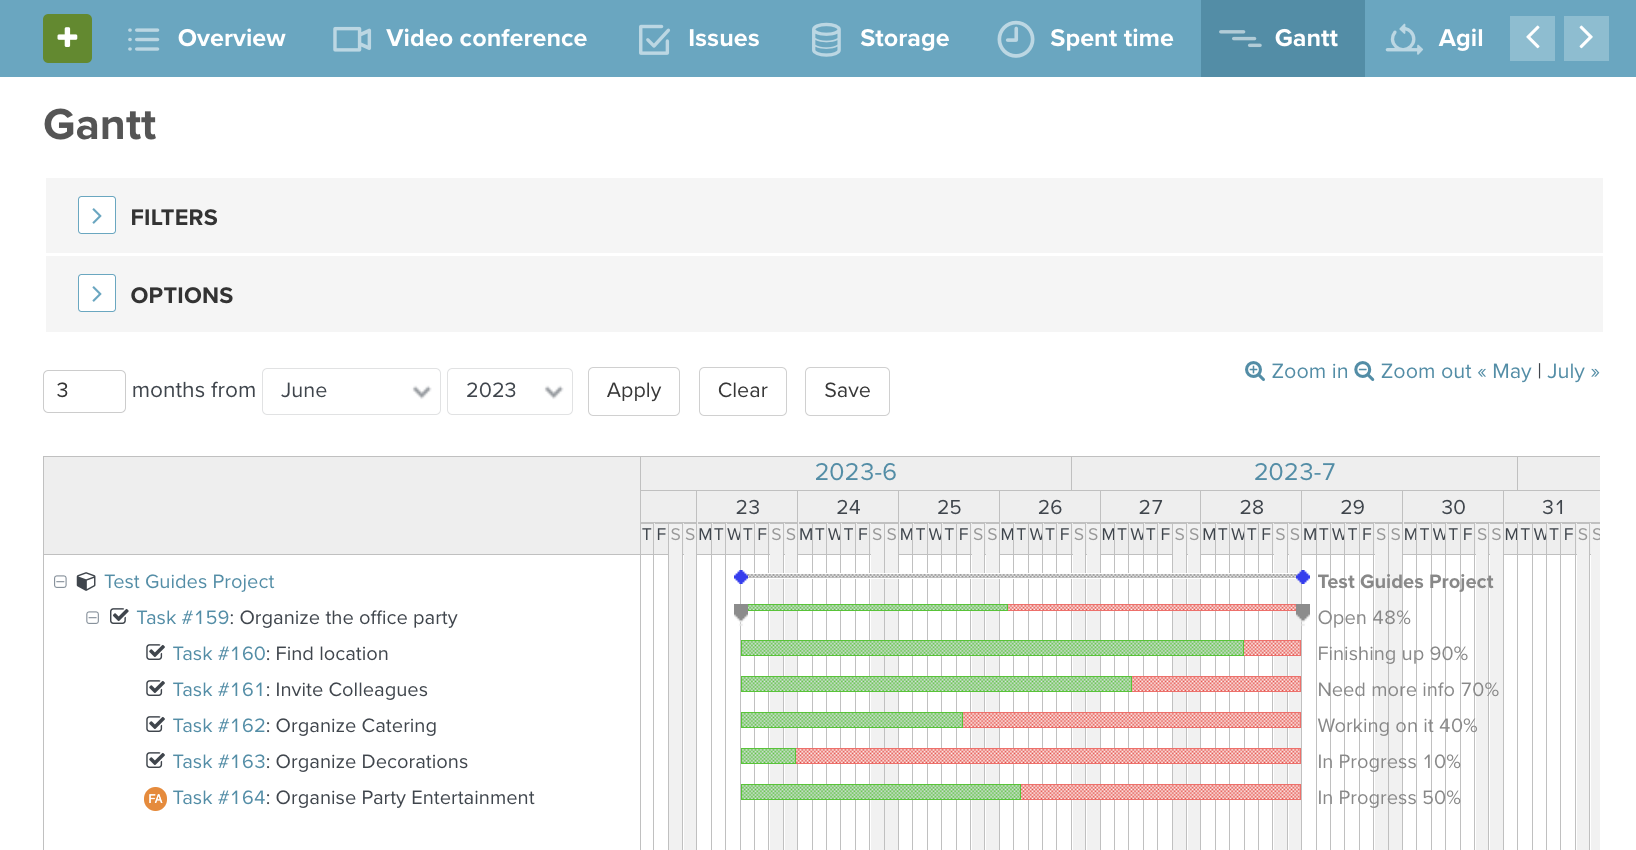
Your sub-issues will be shown hierarchically in the Gantt chart, like so:
Creating issue relations
Now let's go through all the options for setting up issue relations, which define an order of your tasks or creates a same level connection, rather than a hierarchy.
Open a new or existing issue and scroll down to the bottom of the yellow section. Here you will find the section "Related issues". Click on ADD.
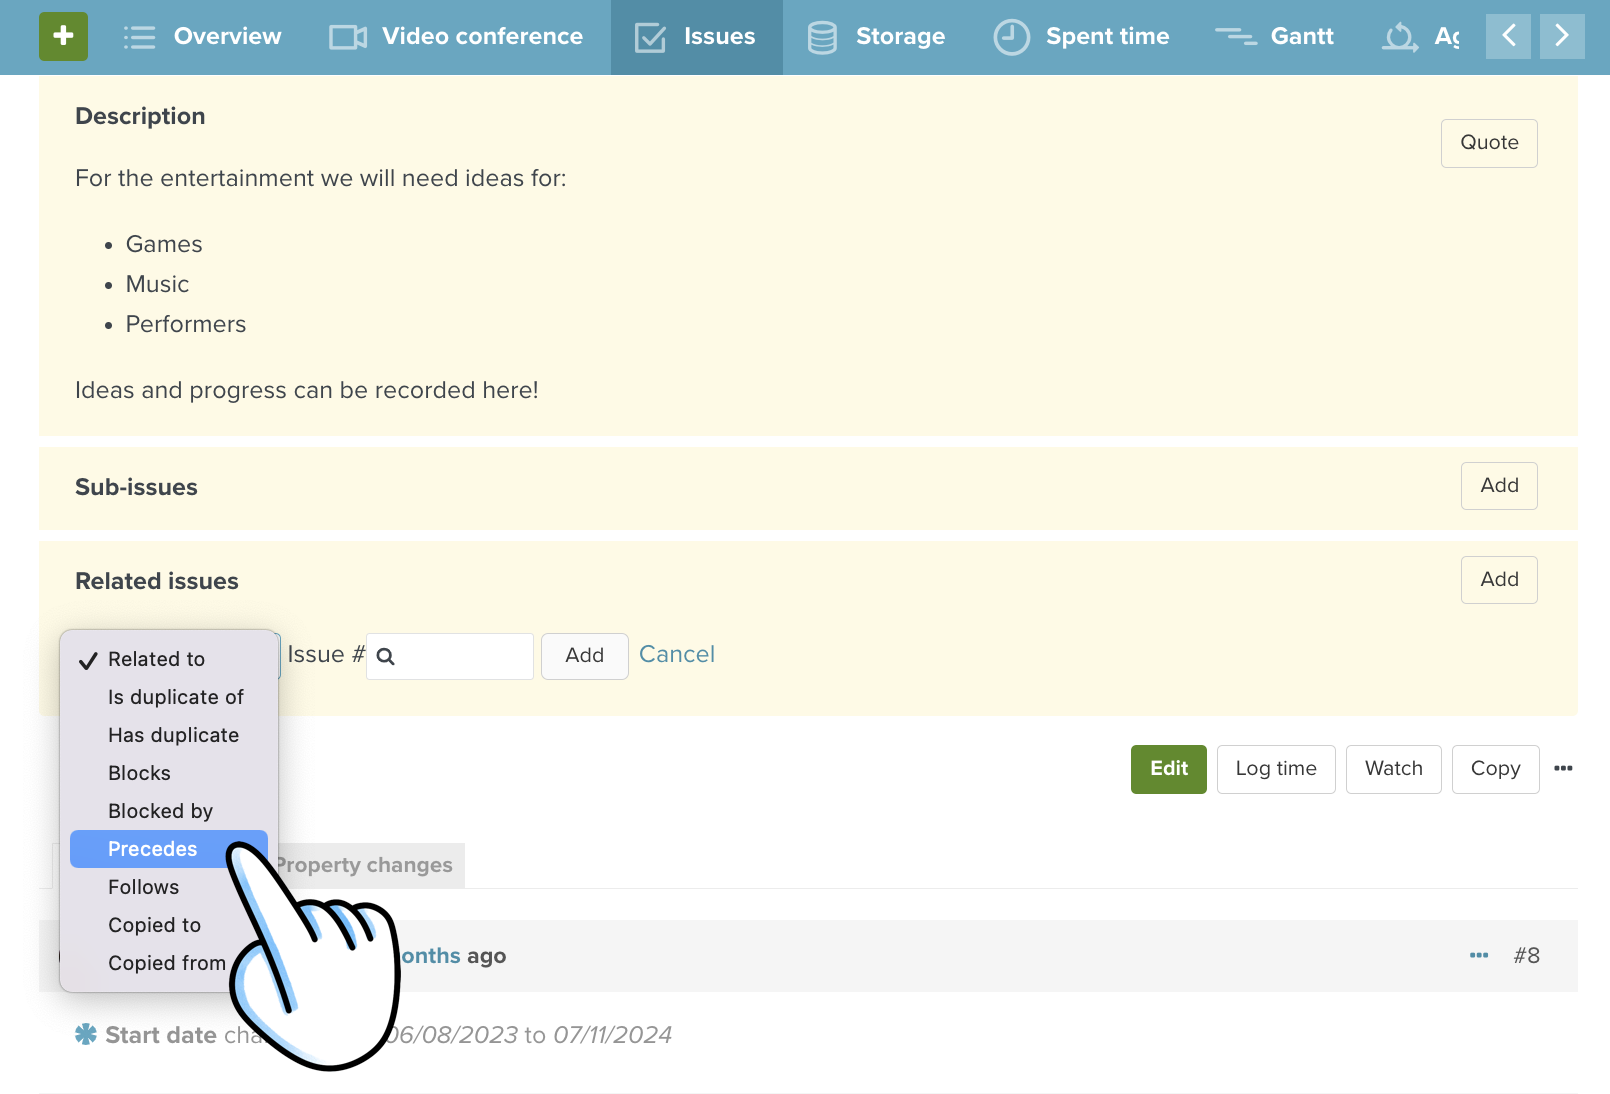
In the drop down menu you will see a lot of relation options. Let's go through them:
| Relation in Planio | Description | |
|---|---|---|
| Related to | → | Creates a link between the two issues |
| Is duplicate of | → | Links issues so that closing one will close the other (e.g. closing A will close B) For example, if issue B is a duplicate of A, closing B will leave A open and closing A will automatically close B |
| Has duplicate | → | Reciprocal of Is duplicate of. For example, if issue A has the duplicate B, closing B will leave A open but closing A will automatically close B |
| Blocks | → | This ensures the linked issue cannot be closed until the main issue has been closed . If issue B blocks A, A can't be closed unless B is closed already |
| Blocked by | → | Reciprocal of Blocks |
| Precedes | → | Links issues to define an "order", where A needs to be completed x days before B can be started on. If B follows A, you can't give B a starting date equal or less than the ending date of A. |
| Follows | → | Reciprocal of Precedes. If issue B follows A (A ends the 21/04 and B begins the 22/04) and you add +2 days at the ending date of A, 2 days will be added to the start and end dates of B |
| Copied from | → | Links issues to identify whether it was copied, and from which issue it was copied from |
| Copied to | → | Reciprocal of Copied from |
Once you have set up an issue relation, each one will be linked in the respective issues in the "Related issues" section
View your issue relations
The issue relations will now show up in all related issues.
The fields "Assignee", "Start date", "Due date", "Status" and "% Done" may show up if they are filled out in the related issue. If they are not filled out, then the spaces will remain empty. It is not possible to choose which fields show up here.
View issue relations in the Gantt chart
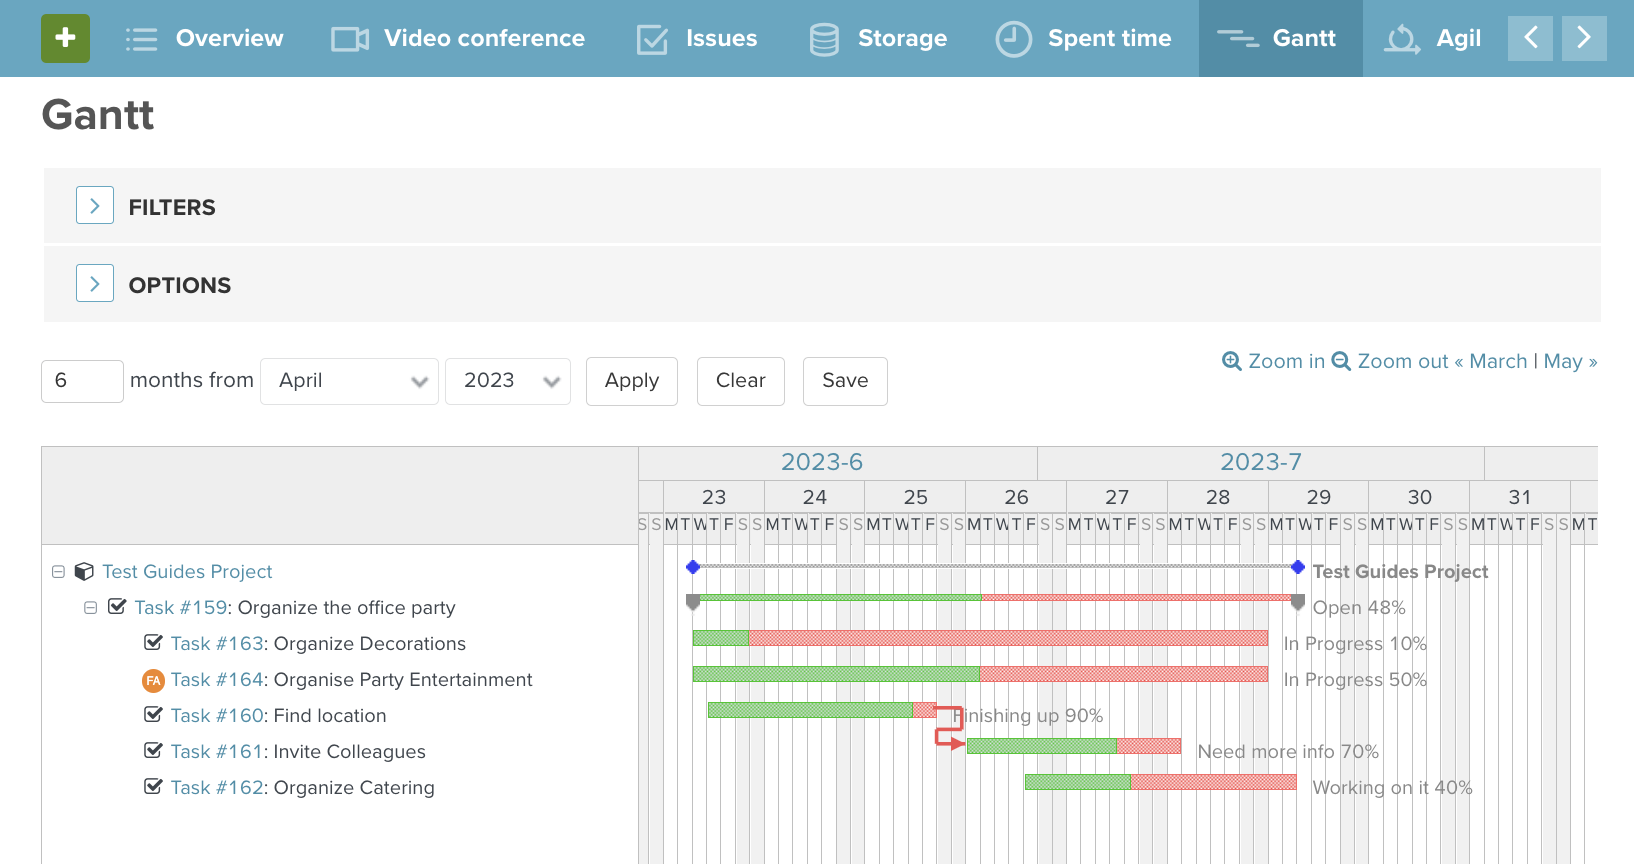
If you have the relation "Blocks" or "Precedes" set up then you can also have these visually represented in the Gantt chart.
-
- Go to the Gantt chart
-
- Click in the grey section OPTIONS
-
- Put a tick in the box "RELATED ISSUES"
-
- Click Apply
-
- Issues that are blocked by another will be shown with a red arrow
-
- Issues that follow or precede another will be shown with a blue arrow
Administration settings for sub-issues and issue relations
There are a selection of settings, which can be defined globally and are only available to the administrators.
Issue Settings
Navigate to Your Avatar → Administration → Settings → Issue Tracking.
Here you will find many global settings for your account - we have listed the settings that are related to issue relations, sub- and parent issues:
| Setting | Description | |
|---|---|---|
| Allow cross-project issue relations | → | If this is not ticked, then users can only add relationships between issues from the same project. Issues from other projects will also not be suggested in the drop down suggestions. |
| Disabled: Users can only add sub-issues between issues from the same project | ||
| With all projects: A parent issue can have sub-issue in any other project | ||
| Allow cross-project sub-issues | → | With project tree: A parent issue can have sub-issue in the same project, ancestor projects and all their descendants (e.g. also "sibling projects", "cousin projects", etc.) |
| With project hierarchy: A parent issue can have sub-issues in the same project, subprojects, or ancestor projects | ||
| With subprojects: A parent issue can only have sub-issues in the same project or subprojects (not in parent projects or unrelated projects) | ||
| Allow closed parent issues with open sub-issues | → | If this is ticked, a parent issue can be closed, although the sub-issues are still open |
Parent issue attributes
Navigate to Your Avatar → Administration → Settings → Issue Tracking.
In the section Parent issue attributes there are three options for using information from the sub-issues to calculate your parent issue attributes or fields.
It is possible that parent issues fields are defined or calculated using information from the sub-issues.
This is possible for the fields Start date / Due date, Priority and % Done.
These fields are then not editable in the parent issue any more and are automatically calculated using the same fields in all its sub-issues.
| Field | Description | |
|---|---|---|
| Start date / Due date | → | The earliest start date of all sub-issues will be displayed in the parent issue field "Start date" and the latest due date of the sub-issues will be used in the parent issue field "Due date". You can therefore no longer edit these fields in the parent issue. Instead, the sub-issues must be edited. |
| Priority | → | The highest priority of the (open) sub-issue is taken and will define the parent issue priority. You can therefore no longer edit the "Priority" field in the parent issue. Instead, the sub-issues must be edited. |
| % Done | → | This field takes effect when the setting "Calculate the issue done ratio with" is set to "Use the issue field". A rounded average of the sub-issues will be shown in the parent issue field. If a sub-issue has further sub-issues this will also be considered in the calculation. A closed sub-issue is calculated as 100%. You will no longer be able to edit the "% Done" field in the parent issue. Instead, the sub-issues must be edited. |
Sub-issue role permissions
The permissions of your users are managed through their roles. You can prevent roles from being able to manage sub-issues.
This can be managed by navigating to Your Avatar → Administration → Roles and permissions → choose the role you want to edit → scroll to ISSUE TRACKING → put or remove the tick from "Manage sub-issues" → click Save.
Parent issue field in trackers
You can add or remove the parent issue field from a tracker completely.
This can be managed by navigating to Your Avatar → Administration → Trackers → set or remove the tick from the box "Parent issue" → click Save
Parent issue field in workflows
You can make the parent issue field "Read-only" or "Required" for specific role + tracker + status combinations, so that the field is either not editable, or required for a certain role, while a certain tracker is in a certain status.
This can be managed by navigating to Your Avatar → Administration → Workflow → Field permissions.
You will have to first set the role and tracker combination you need, then find the field "Parent issue" in the left column and use the drop down menus to determine "Required" or "Read-only" for each status that tracker goes through. Use the ">>" button under the drop down menu to fill the whole row at once.
Hints, Tips and Troubleshooting
→ I need to remove the parent- sub-issue relationship For this there are two options. You can either remove the issue number from the field "Parent issue" in the sub-issue OR "break the link" in the yellow section of the parent issue. Adding or removing a sub- or parent issues will be recoded in the history of both issues.
→ How long can the sub-issue list be, before it is too long? Due to the complexity and dependencies involved in the sub-issue function, we recommend having issue trees with no more than 50 issues.
→ I can't see the sub-issue option in my issues Sub-issues are visible to everyone who has the permission "Manage Sub-issues" ticked in their role in that project. Administrators have to allow this.
→ I don’t have the "Parent issue" field in my issue This is usually because that field has not been activated by the administrator for that tracker. Your administrator can do that by and following section Parent issue field in trackers
If you get stuck when working with sub-issues or issue relations, have any other questions, or just want to know more, please don’t hesitate to contact our super friendly support staff.
Updated by Holger Just about 1 month ago · 3 revisions