Project

Profile

Help

Blog

Introducing Webhooks: Automate Your Workflow with Planio

Feature Update
Added by Jens Krämer 4 days ago

Today, we'd like to introduce you to a powerful new feature in Planio: Webhooks. This enhancement is designed to enable seamless automation and integration with your existing tools and workflows.

What are Webhooks?

Webhooks are a way for web applications to communicate with each other in real-time. They allow you to send automated messages or information from one app to another whenever a specific event occurs. Unlike traditional APIs, which require you to poll for data, webhooks push data to your endpoint as soon as an event happens, making them more efficient and responsive.

With integration platforms like Zapier or IFTTT you can set up webhook endpoints and initiate actions in thousands of third-party applications and services, allowing you to get started with little to no coding required.

How Webhooks Work in Planio

With Planio's webhooks, you can set up triggers for various events within your projects. For example, you can configure a webhook to notify your team in Slack whenever a new issue is created or updated in Planio. This means you no longer have to manually check for updates or rely on email notifications.

Getting Started with Webhooks

To start using webhooks in Planio, follow these simple steps:

  1. In Planio, navigate to My Account.
  2. Click on Webhooks in the top right.
  3. Click New webhook.
  4. Set up your webhook. For Webhook URL, enter the URL where you'd like to receive webhook requests. Under Events, select the events you want this hook to receive requests for. Under Projects, select the projects you want this hook to be active in.

For more detailed instructions, check out our Webhooks Documentation or contact our support team for assistance.

Conclusion

Webhooks are a game-changer for teams looking to streamline their workflows and improve communication between different tools. By integrating Planio with your existing systems, you can automate processes, receive real-time updates, and enhance overall productivity. We can't wait to see how you leverage this new feature to optimize your project management experience.

Try out webhooks today and take your Planio projects to the next level!


Comments

Please register to add a comment

Restrict Time Logging to Open Issues

Feature Update
Added by Jens Krämer 12 days ago

We are excited to announce a new feature in Planio that enhances how you manage time tracking on your projects. With this update, you can now restrict time logging to issues that are still open, ensuring that all time entries are relevant and up-to-date.

How to Enable This Feature

To enable the restriction on time logging for closed issues, follow these simple steps:

  1. Go to the project where you want to apply this restriction, and click Settings in the project menu.
  2. Find the Issue tracking section within the project settings.
  3. To enable the restriction, uncheck the option Time tracking on closed issues and click Save.

As a result, it will be impossible to log time on already closed issues in this project. Please note that this setting does not automatically propagate to child projects. You will need to enable the restriction individually for each child project where you want this feature to apply.

Planio Storage Enhancements

Feature Update
Added by Jens Krämer 3 months ago

We're excited to introduce two new enhancements to Planio Storage, our file management and synchronization module.

Export Folders as ZIP Archive

You can now download the entire contents of any folder in Planio Storage directly from the web interface. The Download all files option is available in the context menu of each folder and will provide you with a ZIP archive containing the current contents of the selected folder.

To download all files within a project, simply navigate to the project's Storage section and select Download all files from the top-right three dots menu.

In most cases, your download will begin immediately. For larger data sets, we’ll prepare the files in the background and send you an email with a download link once everything is ready.

Share Folders with Others

You might already be familiar with the file-sharing feature in Planio Storage. This feature allows you to generate a link to share individual files with others, even if they don’t have a Planio account. These sharing links always point to the latest version of the file.

We’ve now expanded this functionality to allow folder sharing. The same rules apply: recipients without Planio accounts can access shared folders (if your permissions allow it — see below), and the link will always point to the latest version of the folder’s contents. When someone accesses the link, a ZIP archive of the folder’s current contents is generated and made available for download.

Folder sharing links can be created via the context menu or in the Sharing section of the folder listing sidebar.

To enable sharing with non-registered users, be sure to grant the Anonymous role the "View shared files" permission.

Please note that ZIP archives generated via the sharing feature do not include protected files and folders. This differs from the "Download all files" feature above, which includes these files if you have the appropriate permissions. We added this limitation to prevent accidentally sharing confidential files that might be buried deep within your folder structure.

New filters for issues and time entries

Feature update
Added by Felix Schäfer 4 months ago

We have been improving the filter functionalities in Planio by expanding and refining some existing filters as well as adding some whole new ones.

New Issue filters:

  • Notes
  • File description
  • Any searchable text

Issue filter updates:

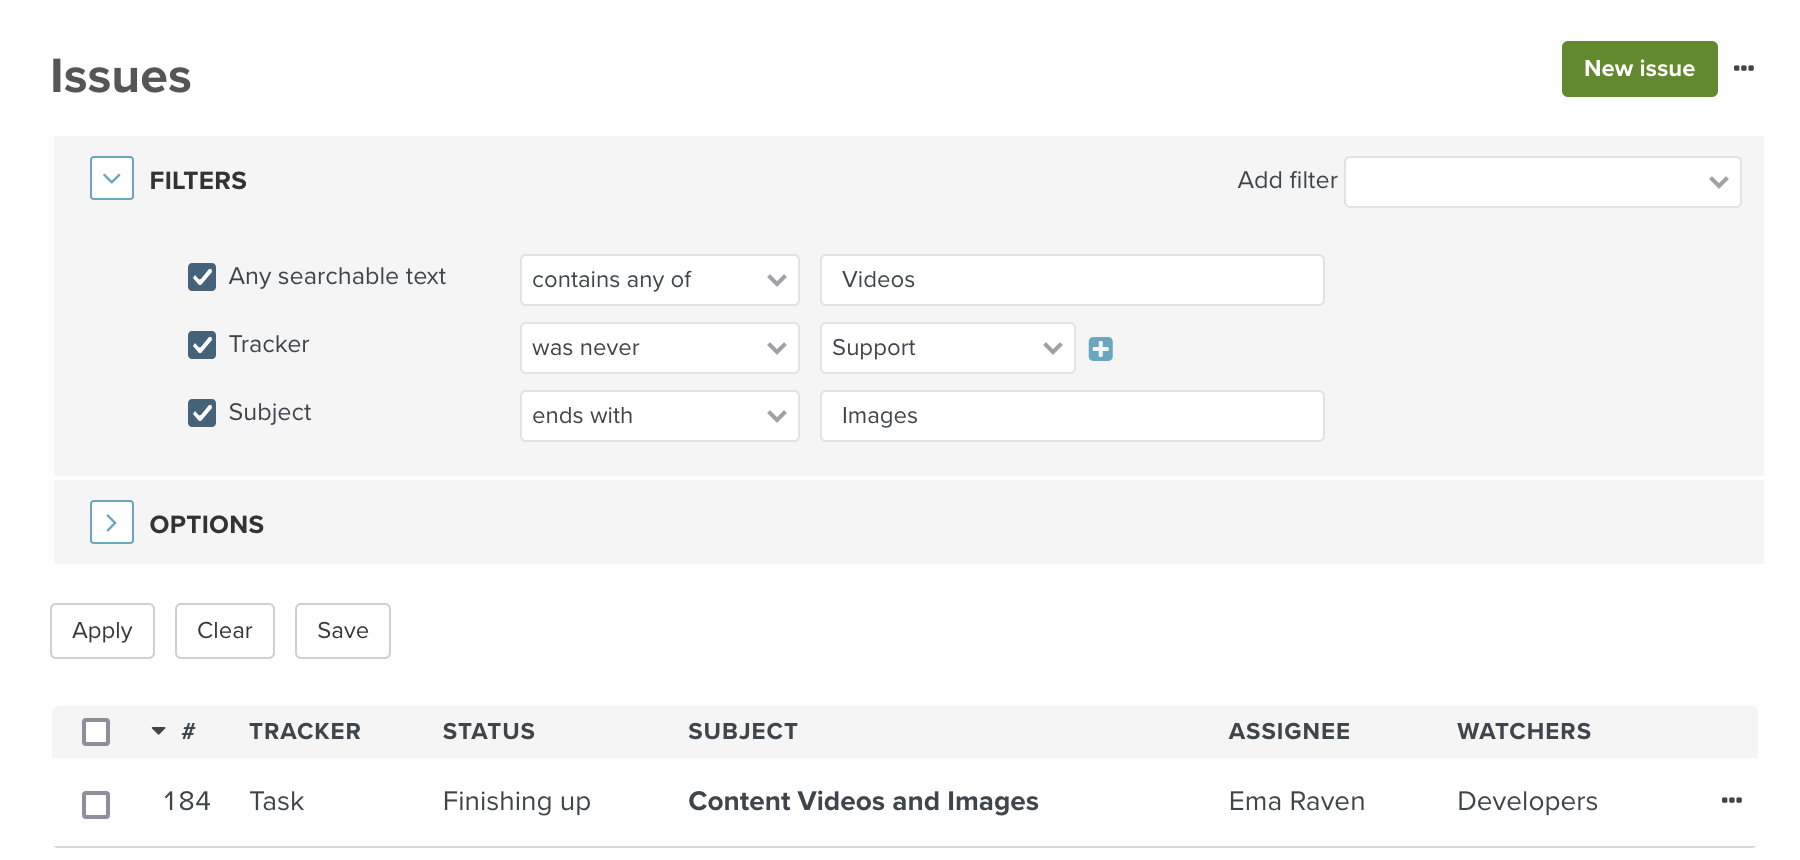
  • the "related to" filter now supports entering multiple Issue IDs
  • there is a new "contains any of" operator for text fields
  • the "starts with" and "ends with" operators now support entering multiple words
  • the Watcher filter is now also available as a column
  • there are new historical operators "is or was", "was never" and "was" for the filters Tracker, Priority, Assignee, Category and Sprint/Milestone

New Spent time filter:

  • for Spent time, we added a filter (and column) for the associated Issue's Parent issue

An example Issue query showing some filter and operator additions as well as the new Watchers column.

We hope these improvements will make using Planio more productive for everyone and we would love to hear your feedback. If you have any questions regarding those new features or anything Planio related please get in touch.

New Guide: How to use the Planio Inbox

Guides and Support
Added by Ema Raven 9 months ago

Ever wondered how the to use Planio Inbox and update issues in Planio via email? With our new guide, you can learn exactly that!

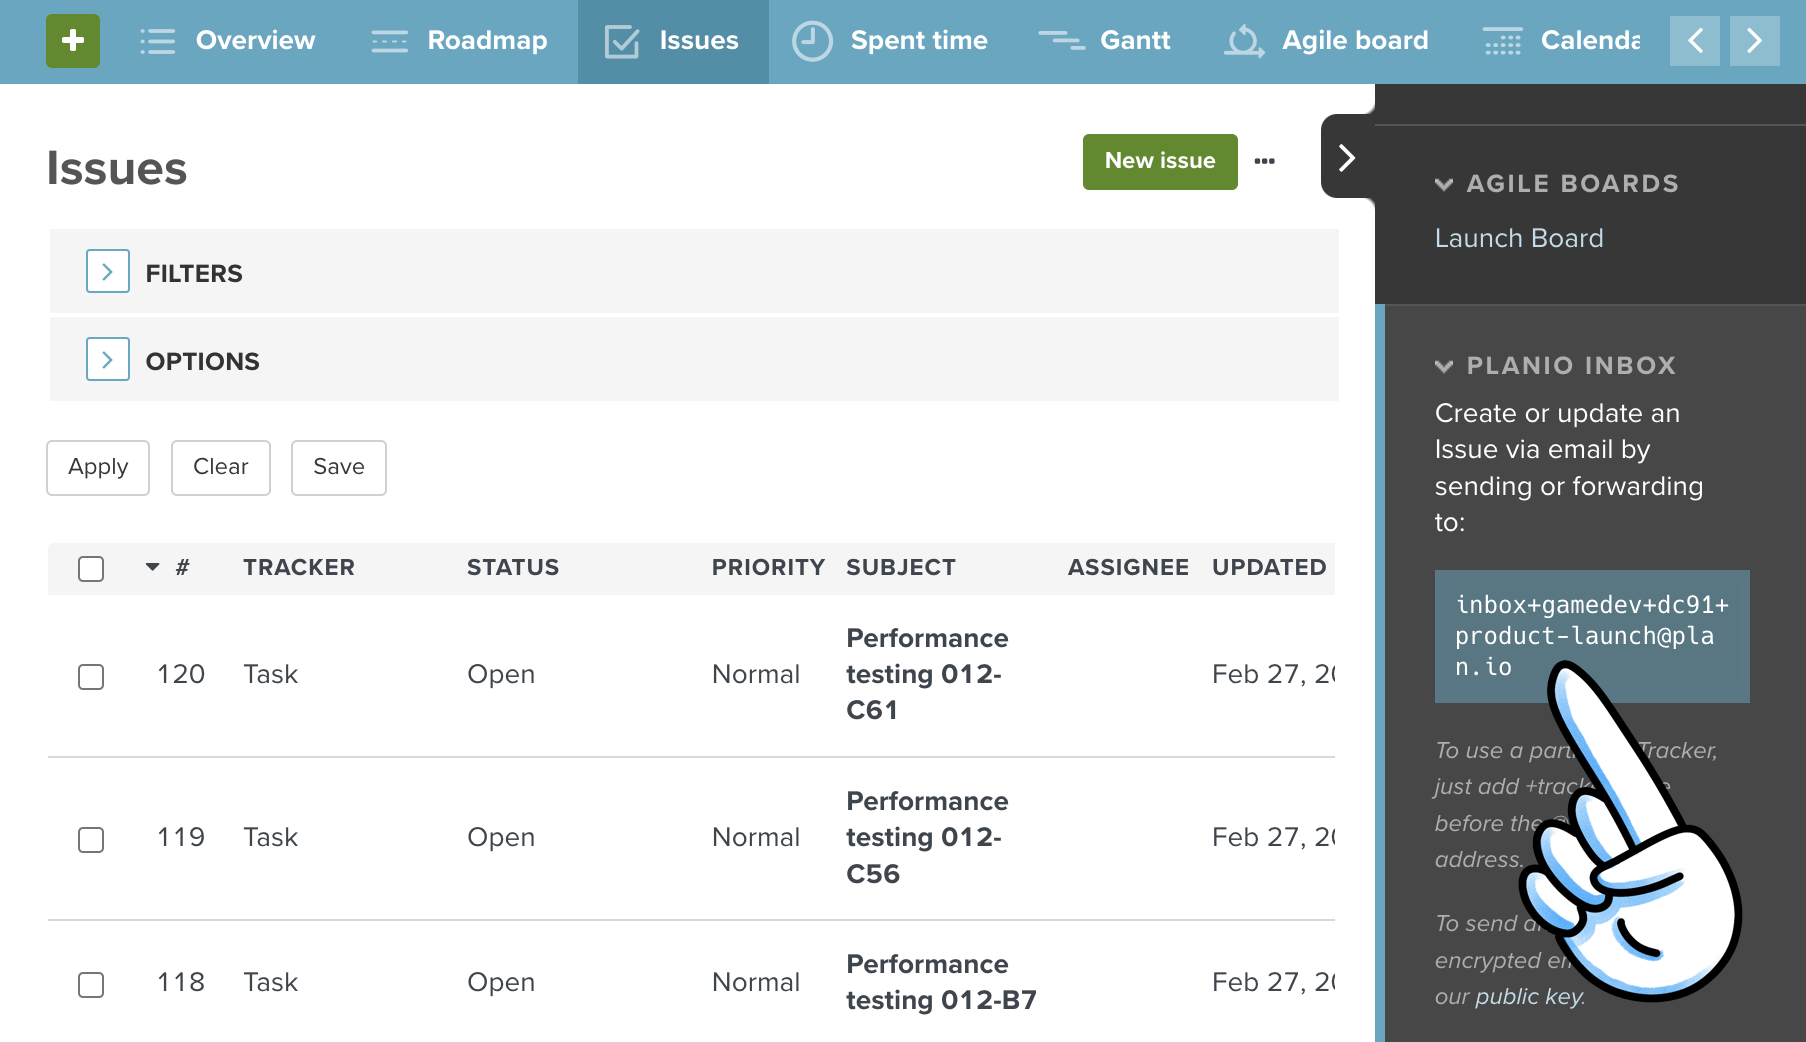
Every project in Planio has a built in project inbox, allowing you to create and edit issues via email and on the go.

Email inbox in each project in the sidebar

Check out our step by step guide and learn all about how to create and update issues on the go with the Planio inbox: https://plan.io/using-the-planio-inbox/

Seamless Visualization: Embed Mermaid Diagrams in Planio

Feature update
Added by Jens Krämer 10 months ago

You can now embed Mermaid diagrams in Planio - on wiki pages, in issue descriptions and notes, basically in all places that support Markdown formatted text.

What is Mermaid?

Mermaid is a simple markdown-like script language for generating charts and diagrams from text. With its intuitive syntax, it allows you to create flowcharts, sequence diagrams, Gantt charts, and more, making complex information easily digestible.

Elevate Your Project Documentation

Effective communication is at the heart of successful project management. Now, with the ability to embed Mermaid diagrams in task descriptions and comments, you can provide clearer context, streamline information, and enhance the overall understanding of your project's intricacies. Whether you're brainstorming ideas, explaining processes, or seeking feedback, visual aids can significantly enhance the quality and efficiency of your team's communication.

Your project's wiki is a central hub for information. Now, you can enrich it further by embedding Mermaid diagrams to illustrate workflows, system architectures, or any other visual representation that enhances comprehension. This feature ensures that your team has a holistic understanding of the project's structure and processes.

How to Embed Mermaid Diagrams in Planio

Simply wrap the Mermaid syntax in a mermaid code block directly in issue descriptions, notes, and wiki pages. For example, you can create a flowchart with the following syntax:

``` mermaid
graph LR;
    A-->B;
    A-->C;
    B-->D;
    C-->D;
```

which results in this diagram:

graph LR;
    A-->B;
    A-->C;
    B-->D;
    C-->D;

You can use the Preview tab to check the diagram state while you're editing it. These code blocks can as well be generated using the </> icon in the formatting toolbar (be sure to add mermaid to the Code highlighting toolbar languages list under Your Avatar -> My Account).

Using Textile?

If your Planio account is still using Textile as the formatting language, you can embed Mermaid diagrams using this code block syntax:

<pre><code class="mermaid">
graph LR;
    A-->B;
    A-->C;
    B-->D;
    C-->D;
</code></pre>

As an administrator of your Planio account you can also contact us to have your account converted to the more modern Markdown syntax free of charge.

This new feature is now live in Planio, and we can't wait for you to explore the possibilities it opens up for your projects. Be sure to check out the Mermaid documentation to learn more about the many different kinds of diagrams you can create.

Update on Subversion Commit Hooks

Feature update
Added by Jens Krämer about 1 year ago

As announced before, we've continued to work on our repository hooks feature.

We have now moved the already existing SVN post-commit web hooks over to the new Repository Hooks UI, and introduced two new hook types:

  • Require valid ticket reference is a pre-commit hook which will reject commits that do not reference an existing Planio issue. This is a great way to ensure your cross references between issues and related commits are complete and that there are no "stray" commits.
  • Insert ticket subject is a post-commit hook which will extend such references to Planio issues with their subject, saving you typing work and making commit messages more informative at the same time.

You can find more information on how to use those hooks in our guide.

Require Two-Factor Authentication for Specific User Groups

Feature update
Added by Jens Krämer about 1 year ago

We're happy to announce this new feature which gives you more options when it comes to configuring Two-Factor Authentication (2FA) for your organization.

What's new?

2FA has been present in Planio for quite some time now. Until now, you could enable it in two steps - as an optional feature, leaving it up to users whether they activate it for their account or not, or as a requirement for all users.

We're now introducing a middle ground, allowing you to enable 2FA as an option for all users, while enforcing its use for selected groups of users (i.e., administrative / management users) at the same time.

How to Enforce 2FA for a Group of Users

  1. Make sure Two-factor authentication is set to optional under your avatarAdministrationSettingsAuthentication.
  2. Navigate to AdministrationGroups. Click on the name of the group you want to edit or create a new one for this purpose.
  3. In the General tab, tick the Require two factor authentication box.
  4. Add users to your group if you just created it, and save your changes.

When users of the group you just configured next sign in, they will be required to set up 2FA, if they haven't already.

Repository Commit Hooks

Feature update
Added by Felix Schäfer over 1 year ago

We are currently developing and slowly rolling out commit hooks for repositories on Planio.

Initially, pre-commit webhooks are available for Subversion repositories. Project managers can influence the commit life cycles of each repository in a project, by for example enforcing a certain commit message format, limiting commit rights for certain portions of the subversion repository, or by enforcing other custom rules.

You can find more information on how to use those hooks in our guide.

We will add more hook types and extend this functionality to Git repositories in the future.

Delivering Non-Delivery Notifications for Planio Help Desk

Feature update
Added by Holger Just about 2 years ago

Using the Planio Help Desk Pro Feature, you can communicate with external contacts such as customers or external stakeholders via email directly from your Planio issues.

Sometimes however, emails can't be delivered to the final recipient, e.g. when the email account is no longer active or has reached its storage quota. In these cases, email servers sometimes send an automatic non-delivery notification back to the sender, also called a bounce message, informing them that the message could not be delivered.

Until now, Planio filtered out these types of notifications to avoid cluttering your issues with automatic responses.

Occasionally though, these notifications can be useful. Once you know a customer or external contact didn't receive your mail you can use a different communication channel to contact them, for example with an alternative email address, or even a plain old phone call.

This is why we have now made it possible to receive bounce emails in projects where you have the Planio Help Desk app installed.

To configure how Planio should handle these notifications, you can go to your projectSettingsHelp DeskIssue status for bounce mails. Here you can select either:

  • Default Status: to create an issue with the default status used by the tracker set in the field "Tracker for emails",
  • None, do not create issue: to keep the previous behavior and not create an issue at all,
  • Your Status: to create the issue and to set it to a custom status of your choosing.

Configure the status for bounce emails

Configure the status for bounce emails

Pro Tip: You could create a new status called Bounce via your avatarAdministrationIssue Statuses and set it up to be a closed status. Then, select this status in your project's Help Desk settings. This way, you'll never see bounces (because they're closed immediately), but you'll be able to check them on demand by filtering your issues by that status.

(1-10/84)

Also available in: Atom