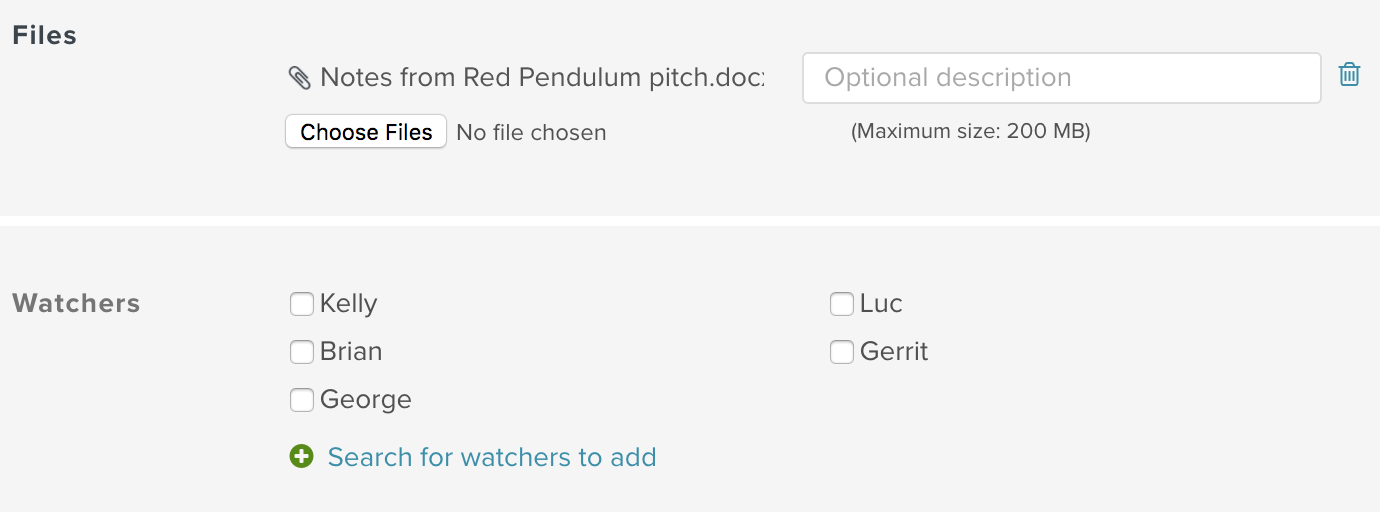
Making bulk changes to Issues
The bulk action functionality in Planio makes handling multiple issues much easier, particularly when project milestones are reached or deadlines loom!
With just a few clicks you can reassign a category, modify an assignee, change the due dates of multiple issues and much more.
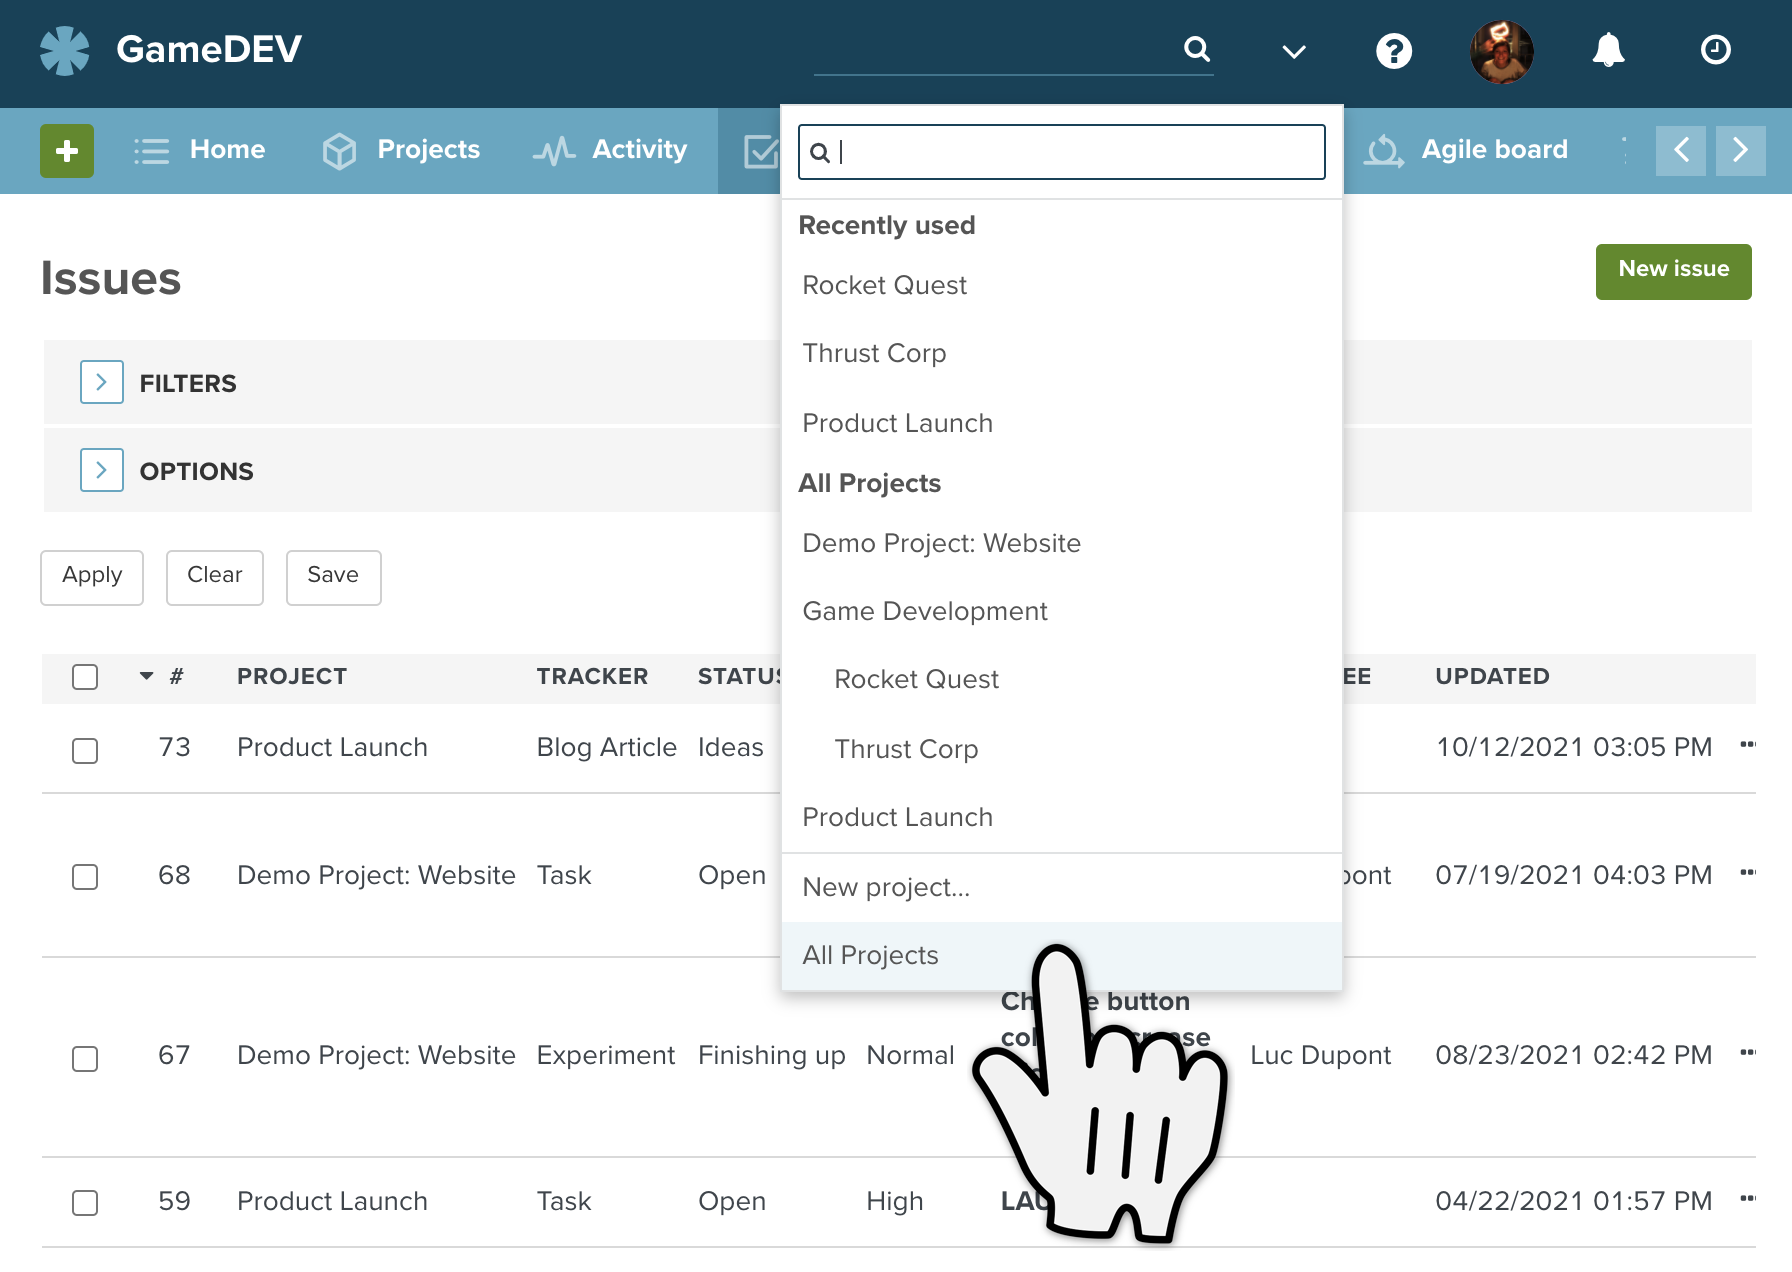
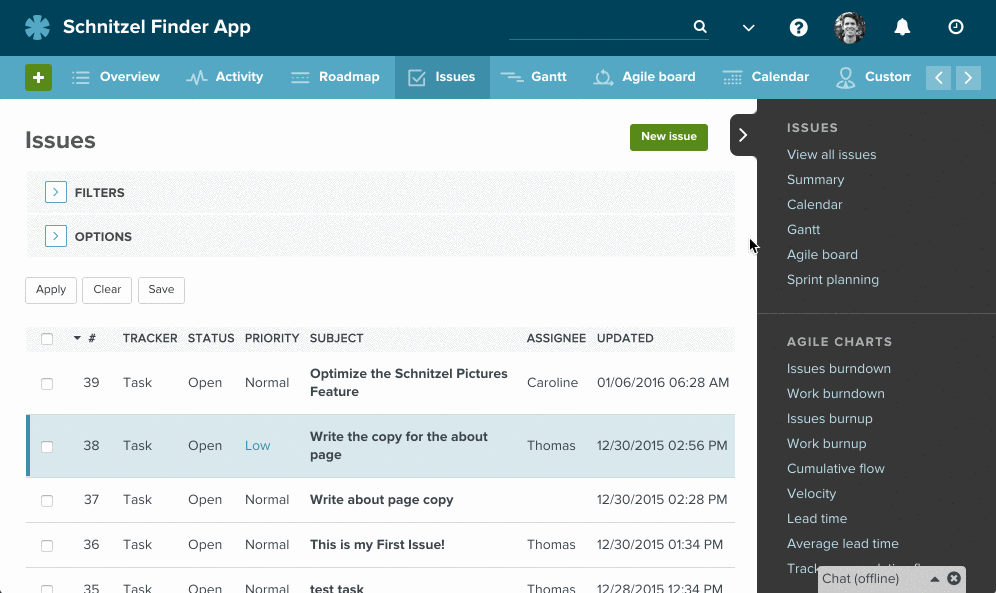
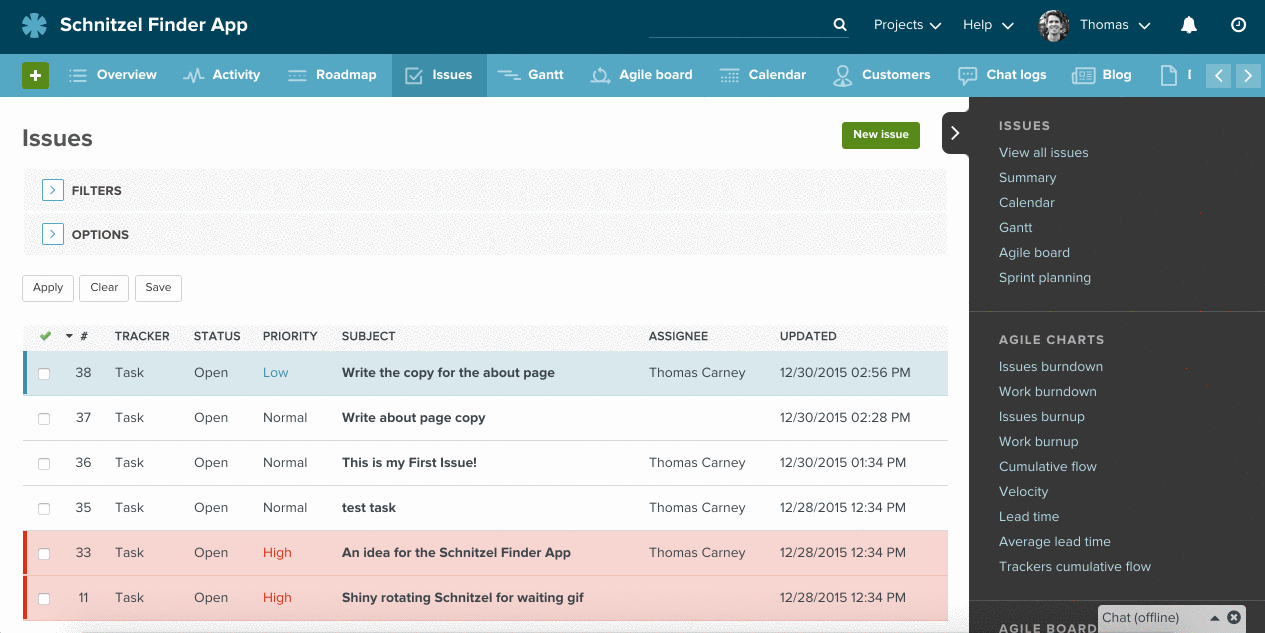
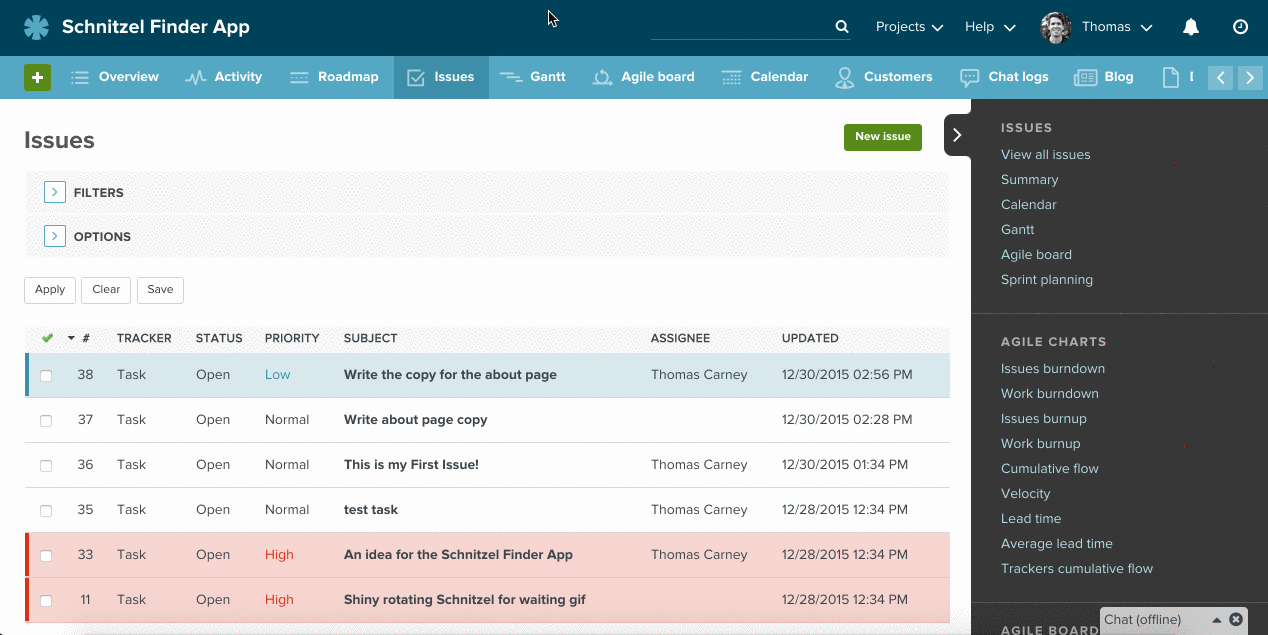
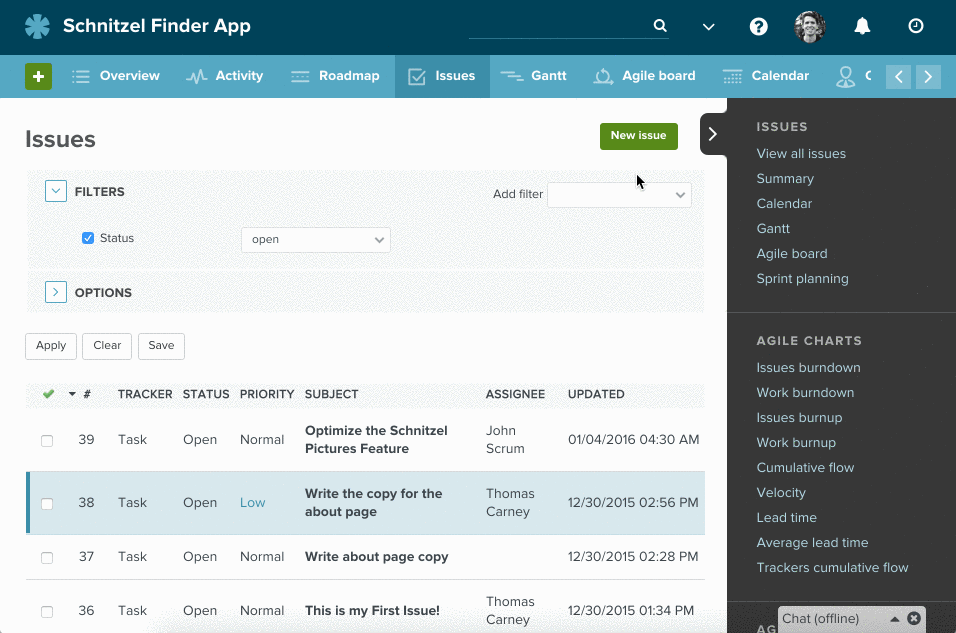
First, navigate to your issue list and make sure you can see all the issues you need to update. If you need to change issues in multiple projects, you can use the "All projects" option in the drop down menu.
Using the tick-box on the left hand side of each issue row in in the issue list, highlight the issues you want to change.
Using the filters, you can refine the issue list so that you can simply highlight the whole issue list instead of single issues if you want.
There is a tick box at the top of the issue list, which will highlight all the issues on that page at once.
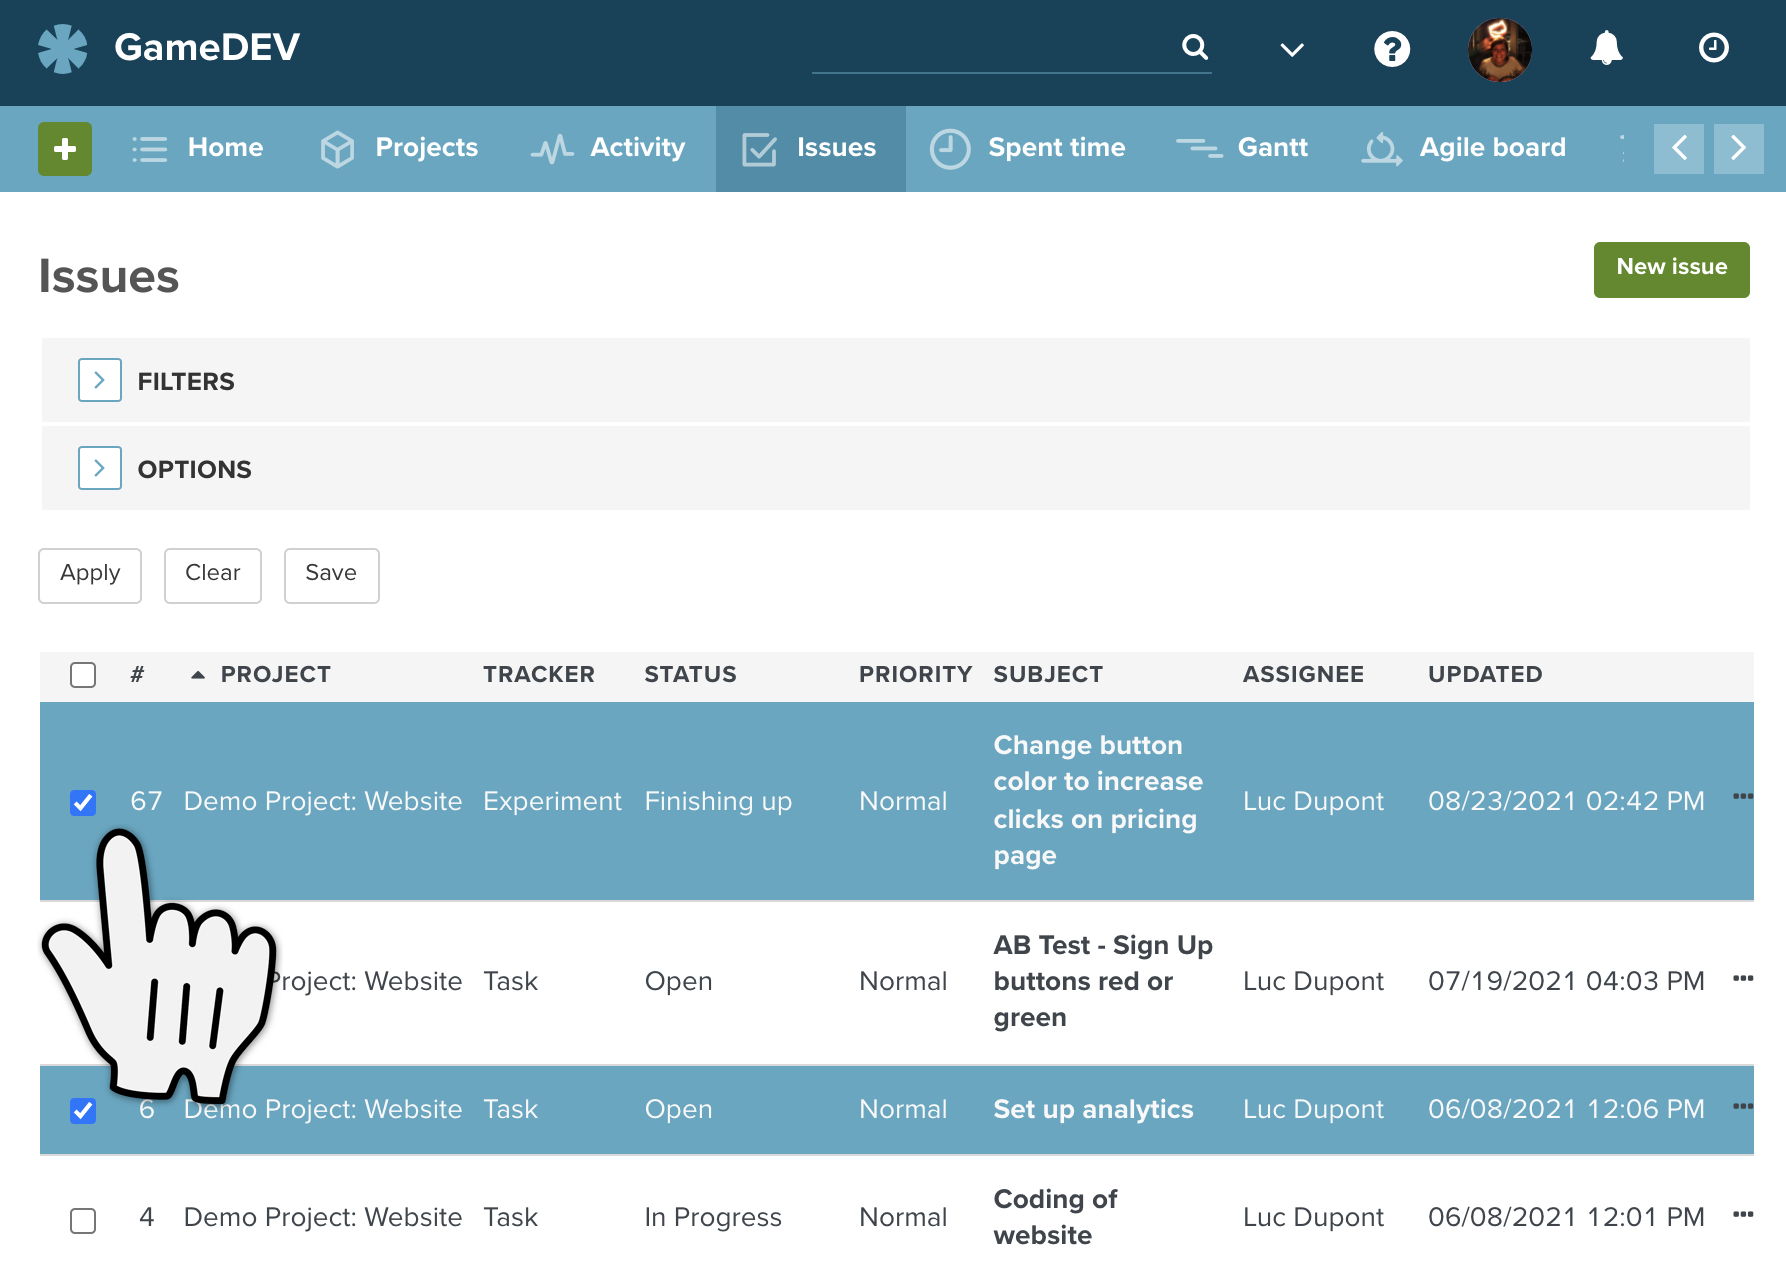
Scroll to the right of the issue list and click on the three dots in one of the highlighted issue rows.
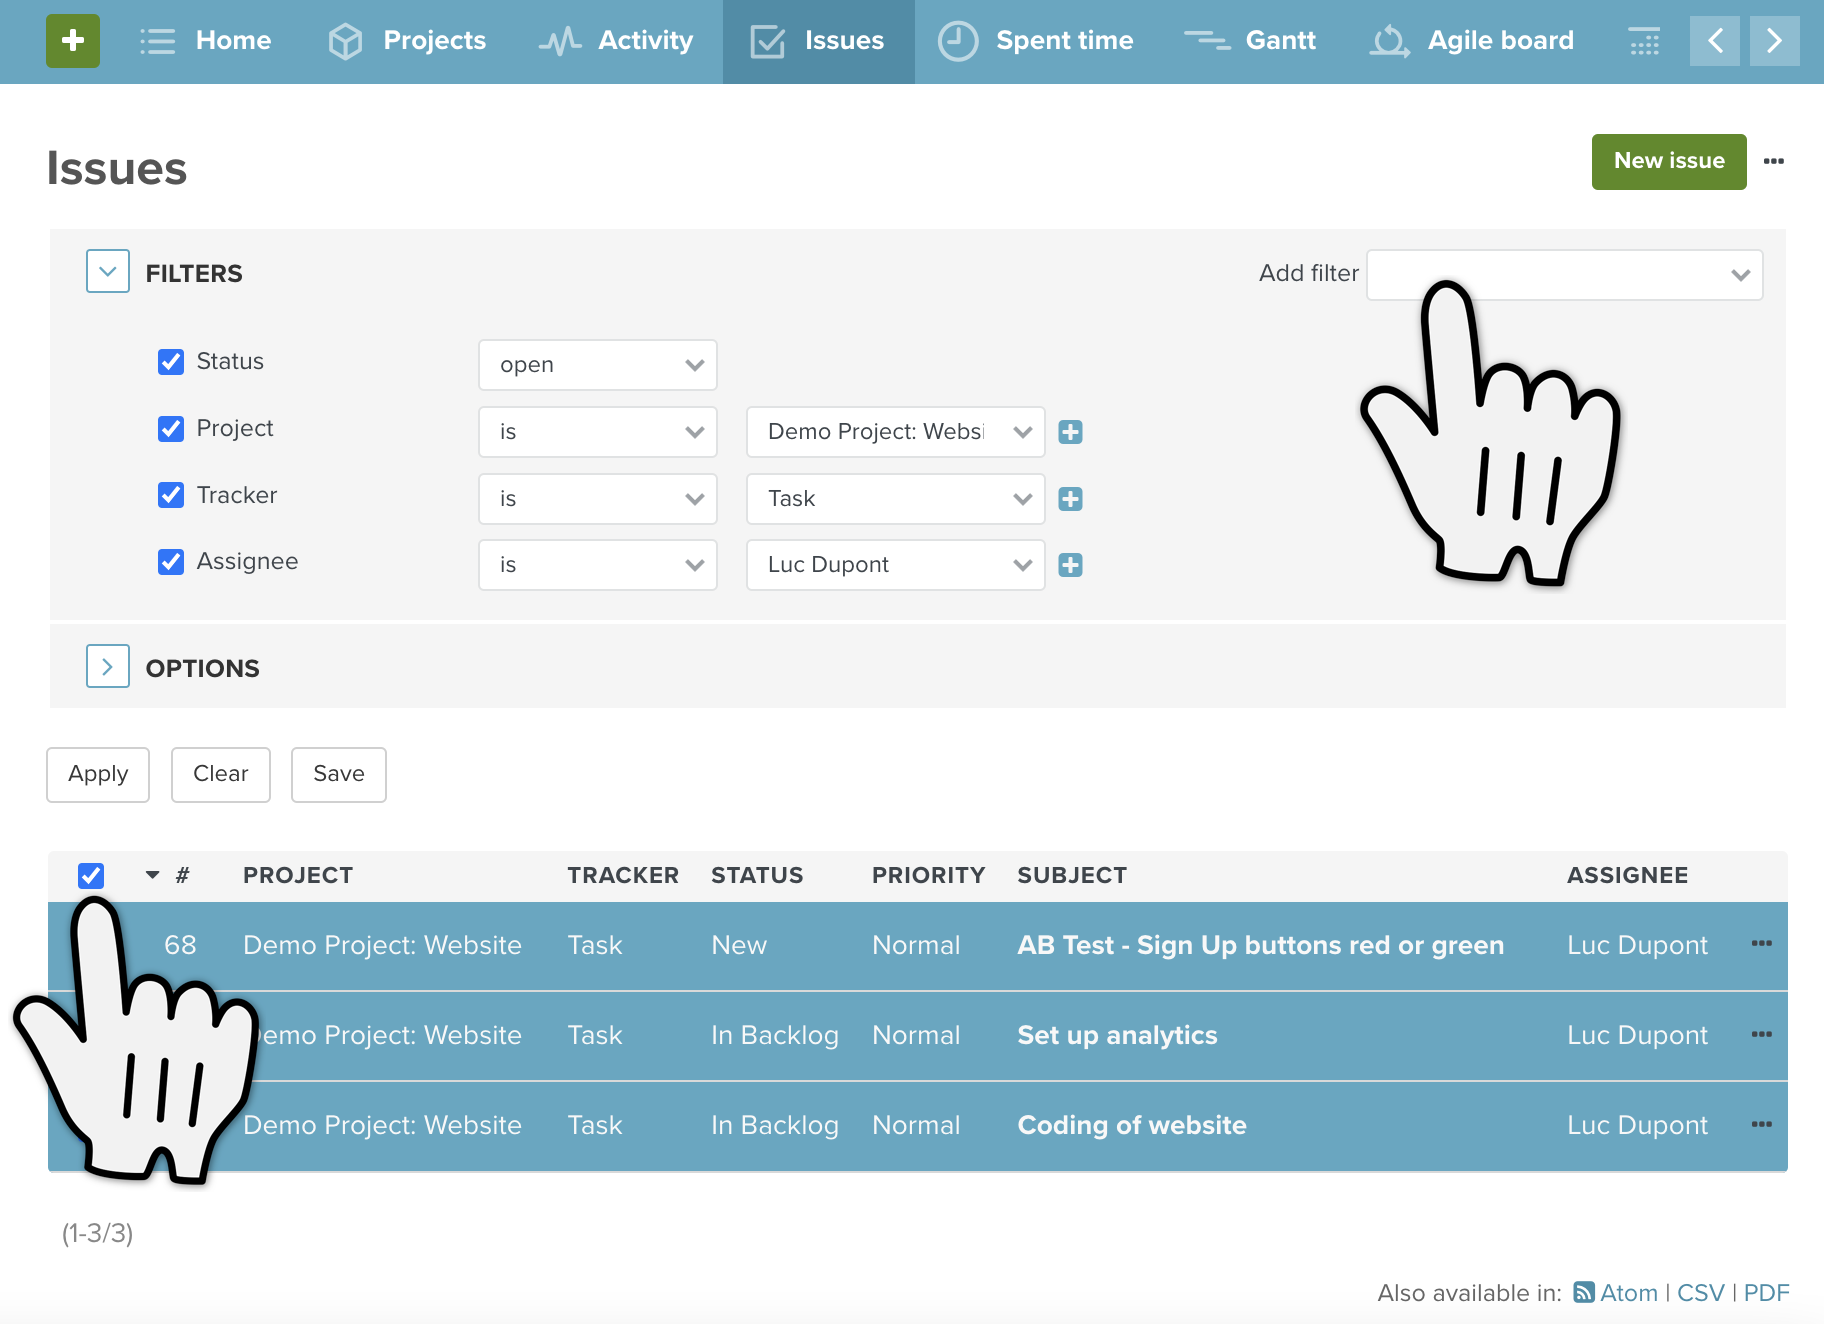
In the bulk edit menu that opens, click on Edit.
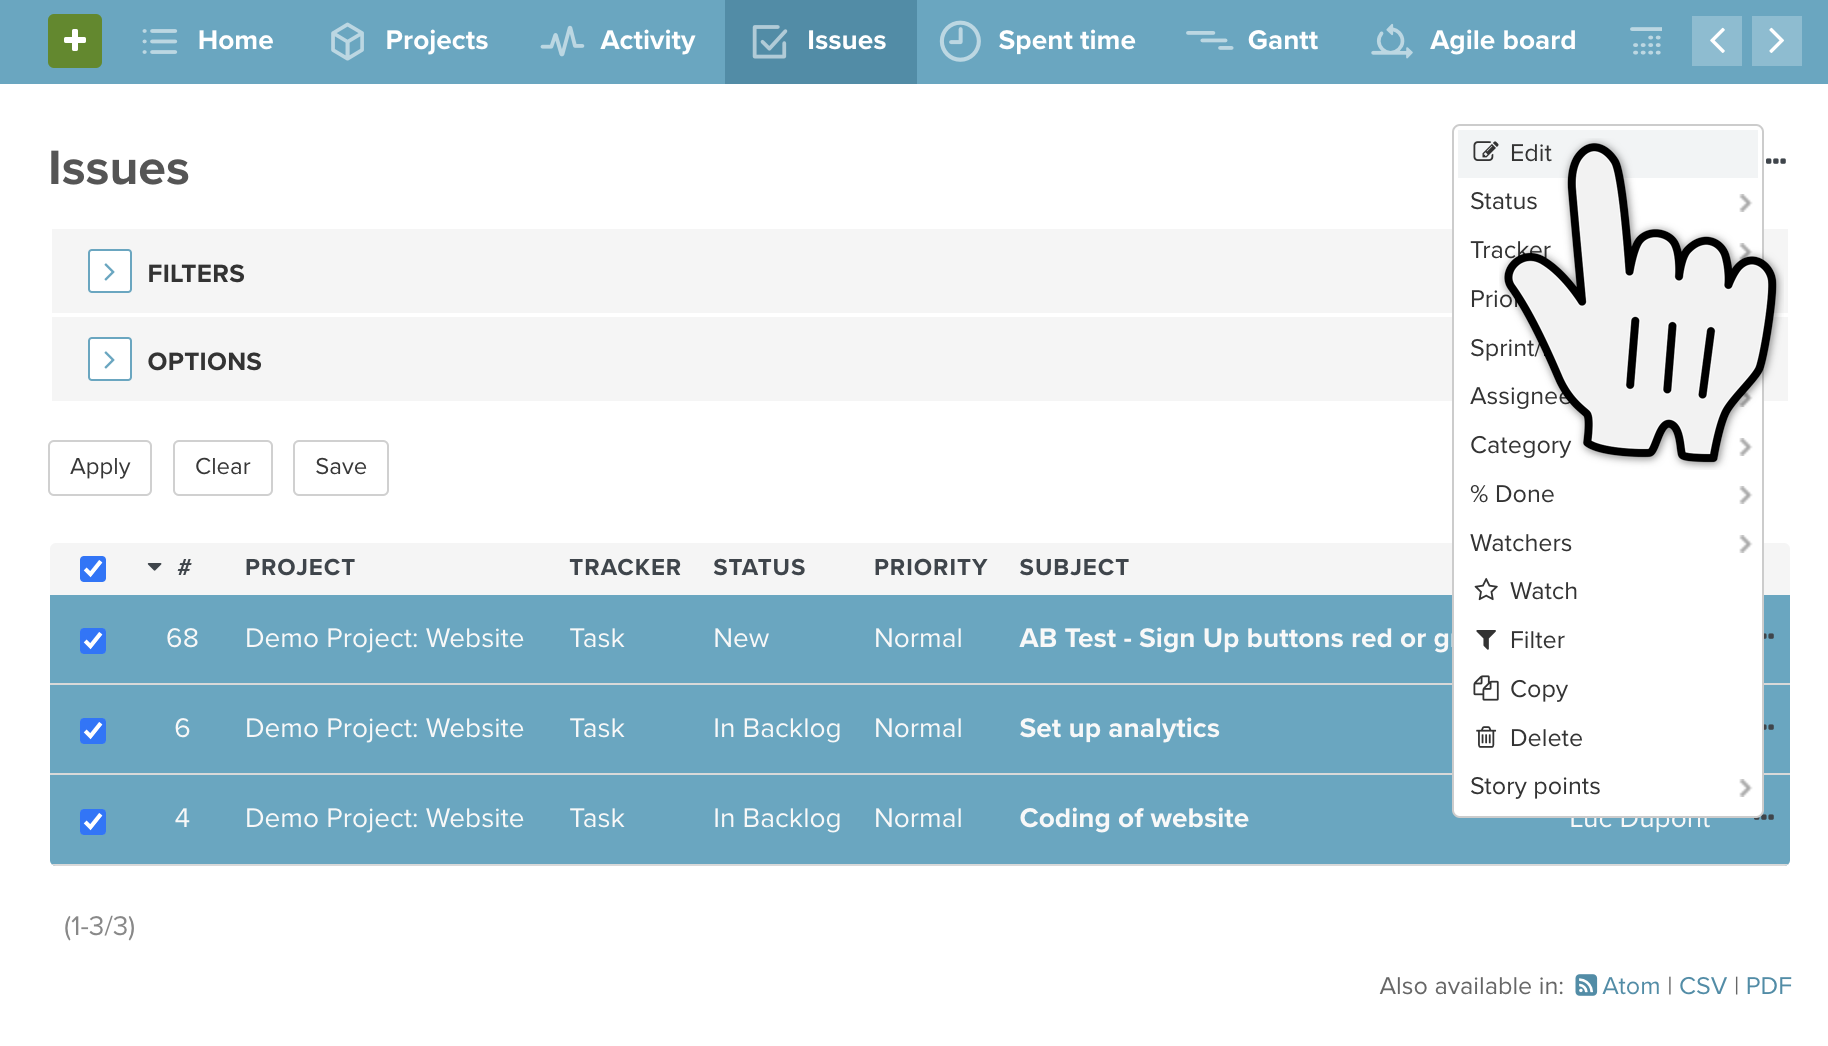
You will be redirected to a new page, where all the issue fields are shown.
In this example, we want to change the status to "To Do", the priority to "High" and set a new due date in 3 issues at the same time.
That means we will use the field drop-down menus to change the Status → To Do, the Priority → High and the Due date → 27.07.22.

If the parameter you want to change is NOT available in the bulk edit menu then please scroll down to Hints Tips and Troubleshooting
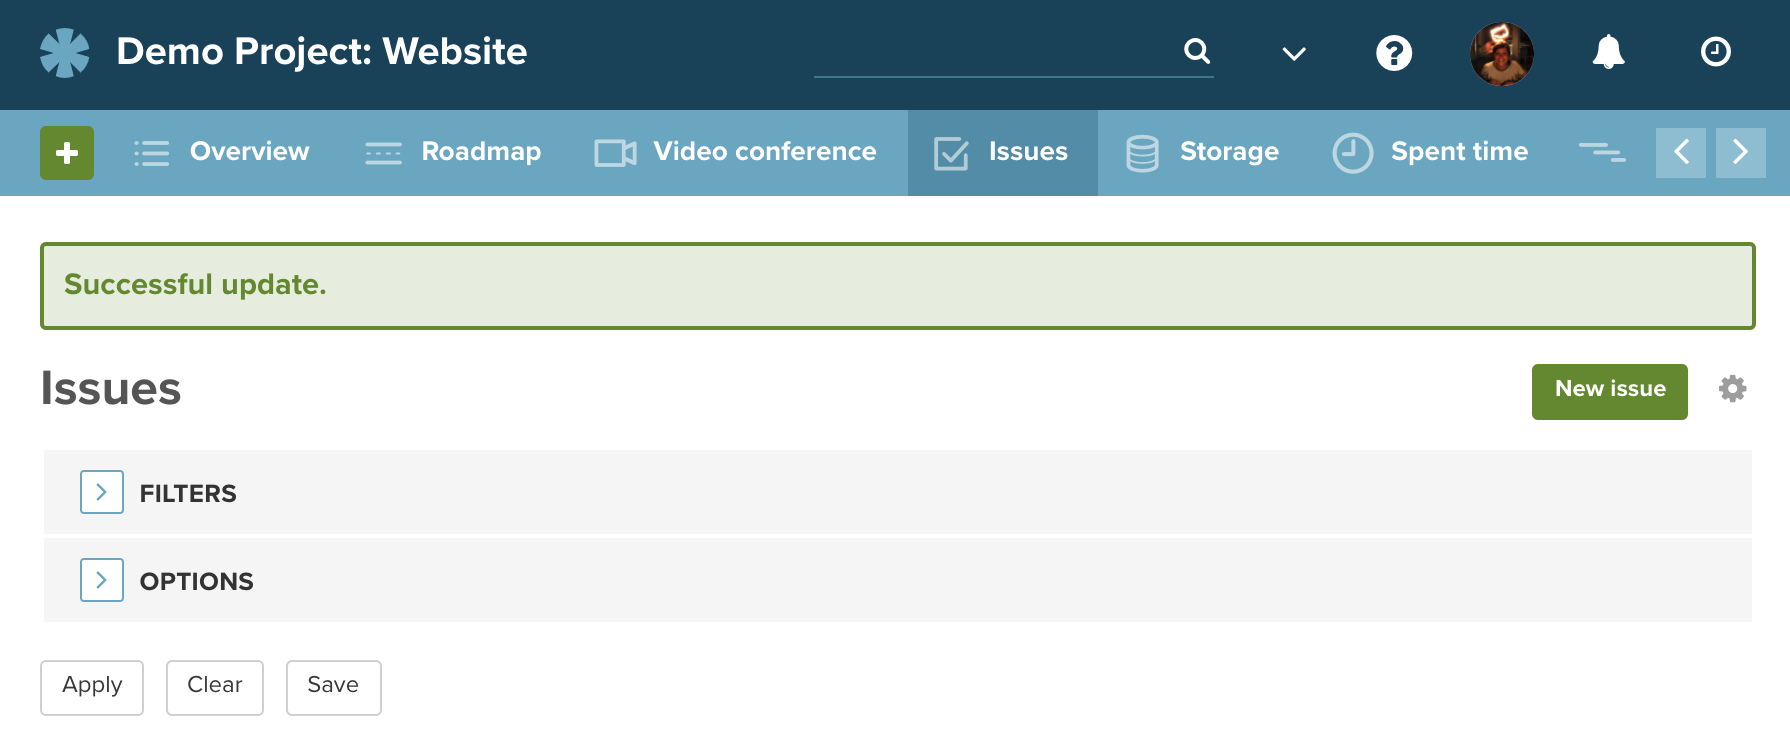
When you're done, click Save and you will be redirected back to the updated issue list.

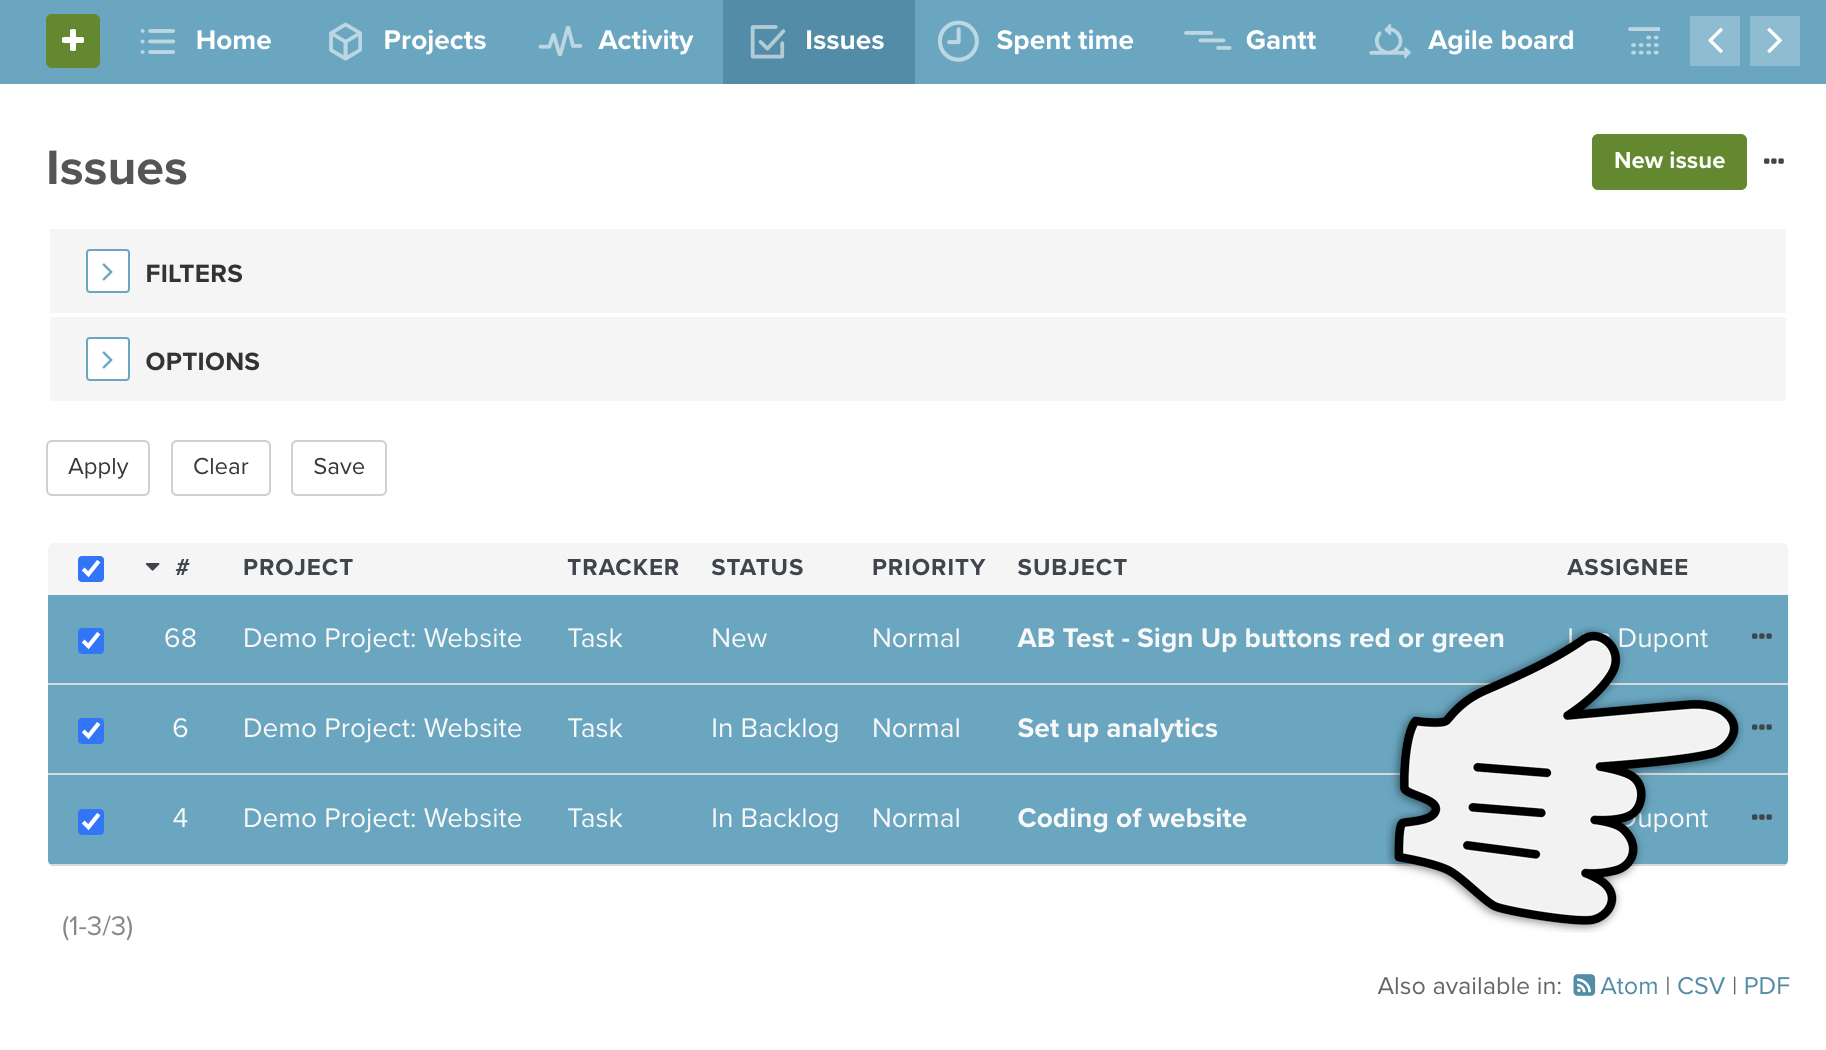
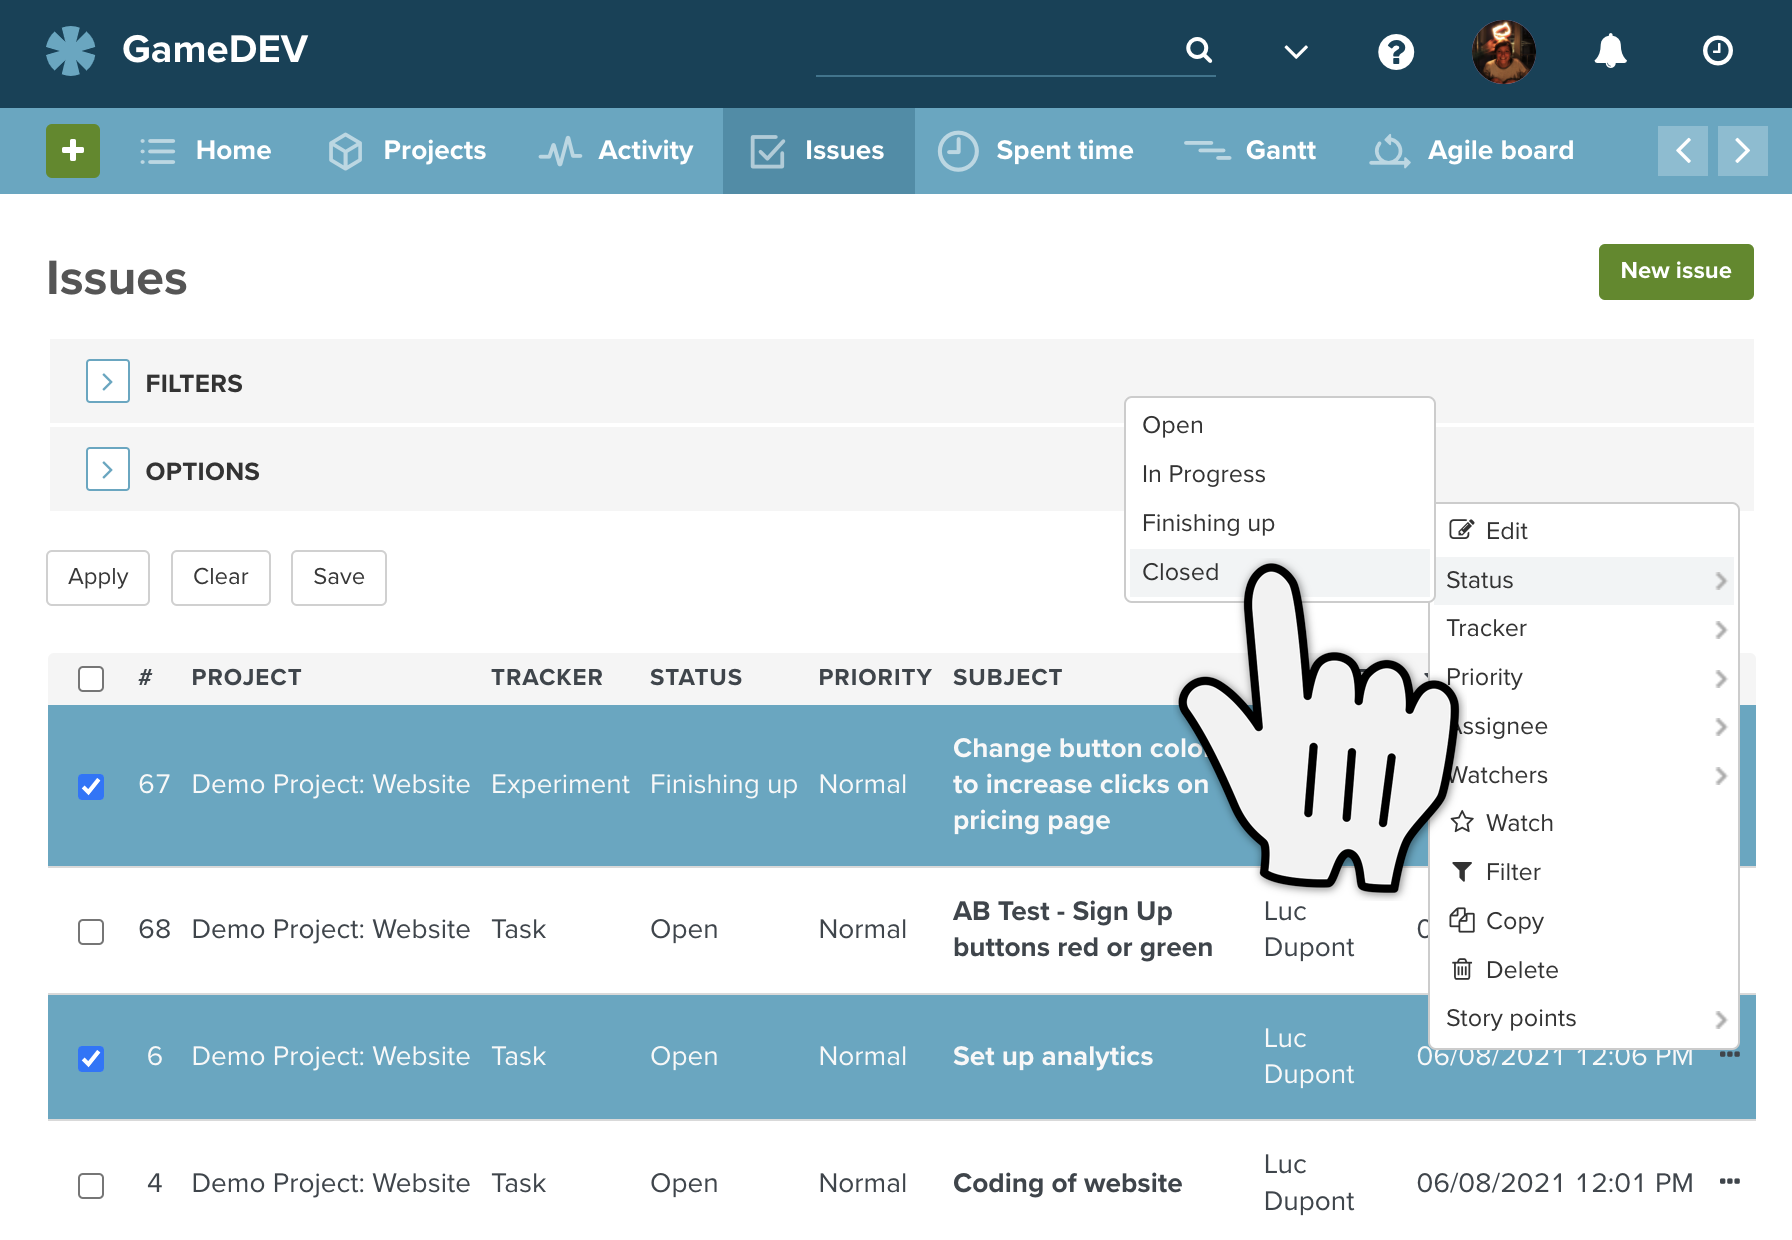
If you only want to change one parameter, you can save yourself a few clicks and use the other options in the bulk edit menu. Don't click on Edit and instead click on the parameter you want to change in all of the highlighted issues. In our case, we want the status to be changed to "Closed" and so we will click on Status → Closed.
This will automatically update and you will be redirected back to the updated issue list.
→ The parameter I want to use doesn't show up: As you can only make the same change to all the highlighted items at once, the parameter that you want to change must be available for all the issues. Therefore only options that apply to ALL the highlighted items will be displayed. Try highlighting fewer items, or items with more in common (the same tracker for example), to see if the option you want is then displayed.
→ Can I make bulk edits to time entries? Yes, the bulk edit functionality is also available for time entries and works in the same way as described above, except instead of going to the issue list, you would go to the "Spent time" tab.
→ Use it when removing a status or tracker: If you ever want to delete a tracker or status for example from your account, you'll have to make sure this isn't being used in any issues (even issues in archived or closed projects!), otherwise you'll get the error response "Unable to delete issue status (This status is used by some issues)". Use the issue filters to find where the status or tracker is still being used, and then the bulk edit functionality to change them all at once.
→ Use it when removing a custom field from your account: If you want to remove a custom field from your account you could just delete it, but then all the entries would also be deleted - and in Planio, deletions are permanent! If you want to keep those entries, you can move them to another field instead with the bulk edit functionality before deleting that custom field. Remember, you'll have to perform the bulk edit for each different entry in your issues, systematically moving the entry from one field to another.
If you get stuck when trying to use the bulk edit function, have any other questions, or just want to know more, please don’t hesitate to contact our super friendly support staff.
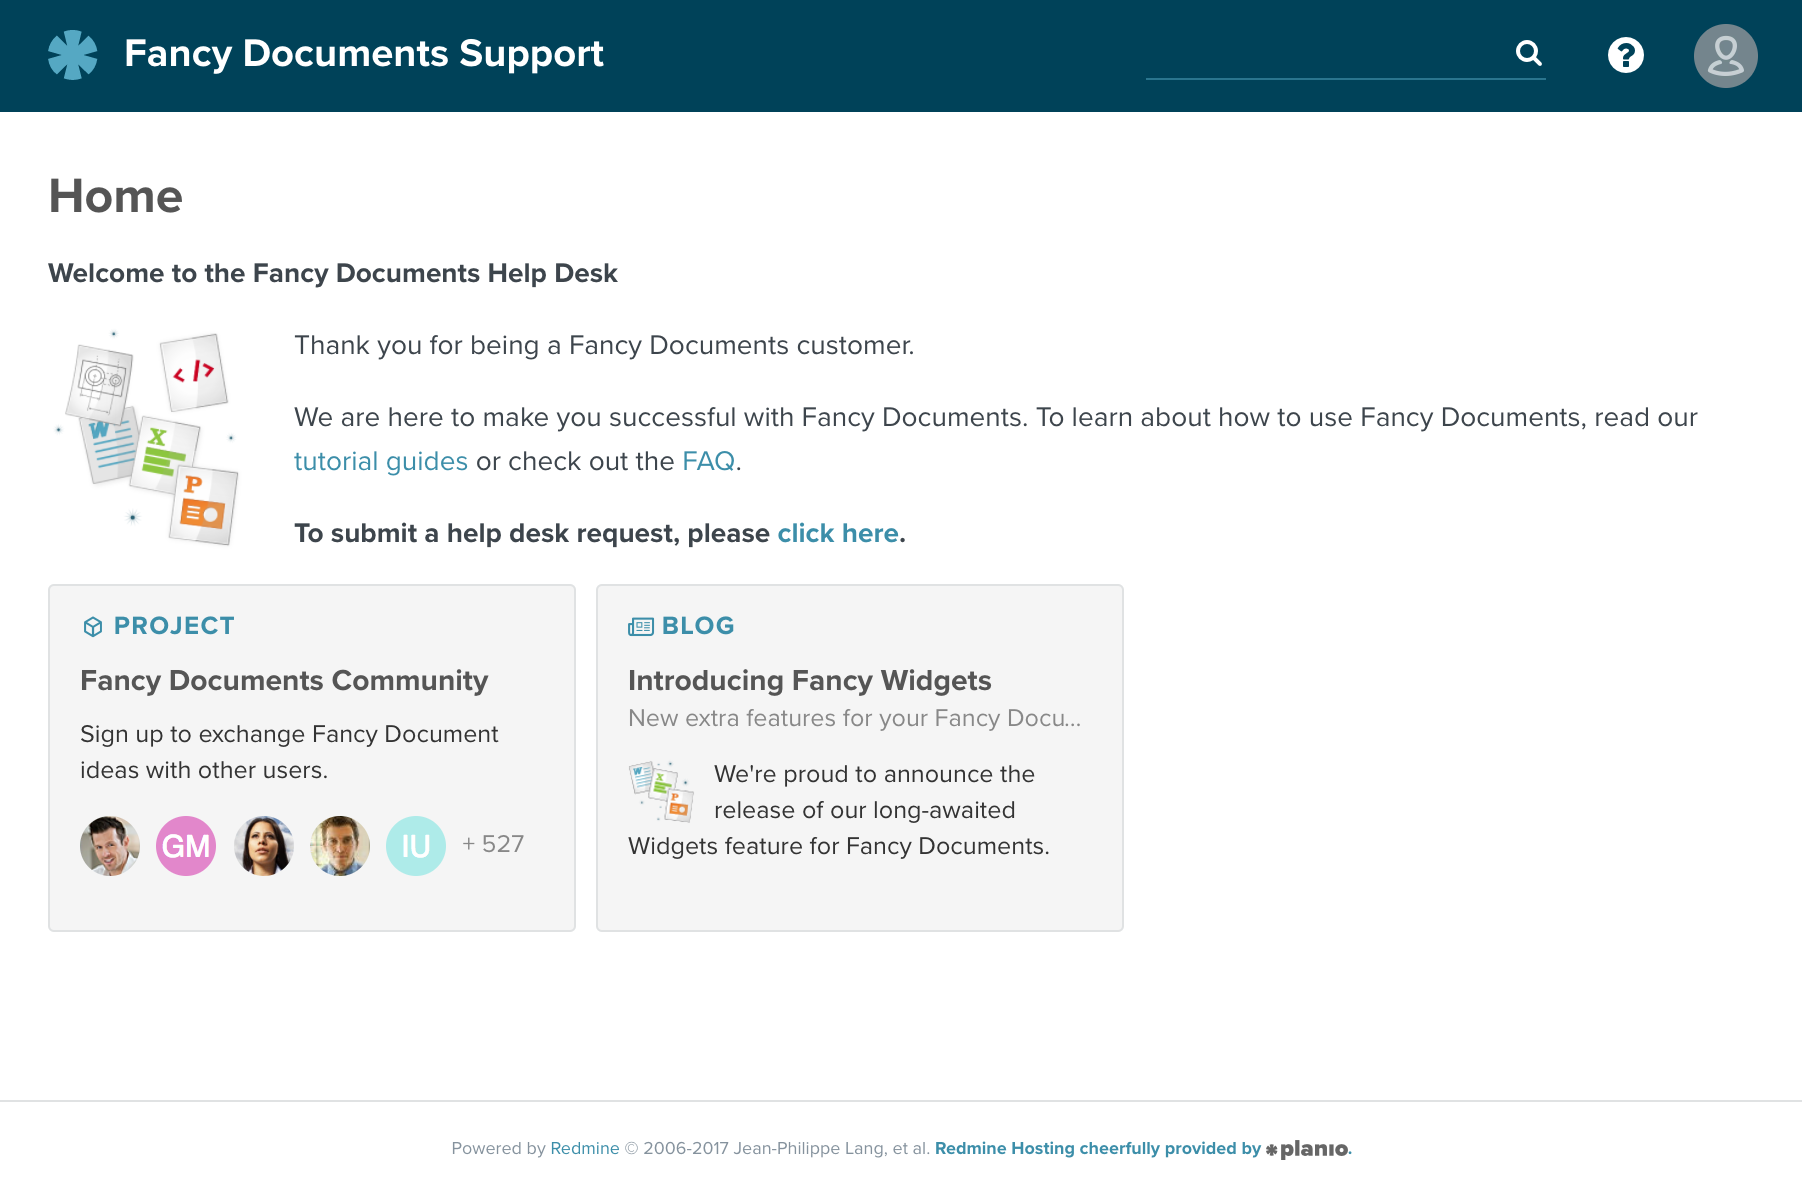
The Planio Help Desk App in Planio enables you to handle customer inquiries right from within Planio using all the Planio issue tracking features you love.
Normally, this is done via email. In this guide, however, we will look at setting up a customizable online form on your own website that sends your customer's messages directly to Planio where they'll appear as issues.
You can send HTML form requests directly to Planio, as Planio will accept an unauthenticated POST request with application/x-www-form-urlencoded form data.
Therefore, we’re going to build a simple form with an action attribute that submits the form to Planio via the HTTP POST method.
<form action="https://example.plan.io/helpdesk" method="POST">
You will have to replace example.plan.io with your own Planio domain.
Then, we’ll add input fields for a name, email, email subject, and the description:
<label for="name">Your name:</label>
<input name="name" id="name" type="text" />

<label for="mail">Your email address:</label>
<input name="mail" id="mail" type="email" />

<label for="subject">Subject:</label>
<input name="subject" id="subject" type="text" />

<label for="description">Your message:</label>
<textarea name="description" id="description"></textarea>
A Planio account can have multiple projects, so we need a way to assign this message to a particular project in Planio. Therefore, we’ll add a hidden input field with the value set to the identifier of the project you want to forward the issue:
<input name="project" type="hidden" value="example-project" />
Please note: The field needs to be set to the project identifier, not the project name (e.g. help-desk instead of "Help Desk").
Then, we add a submit button:
<input type="submit" value="Submit request" />
Forms are frequently the target of spambots that send messages to any form they can find online. One strategy for dealing with spam bots is to add an additional input field to the form called a honeypot field. Then, you hide the form field using CSS. If that input field is filled out, which spambots usually do, then the message is discarded as spam - hence the name honeypot field.
Here’s the honeypot field along with some CSS:
<style type="text/css">#url { display:none; }</style>
<input name="url" id="url" type="text" />
Using a honeypot field is optional but we highly recommend it to avoid spam.
After receiving your contact form data, Planio will redirect back to the page it came from. This works nicely in many cases, but you might want to display a short "Thank you" message to your users once the form is submitted instead and make the form appear a little more snappy.
Here's one way to achieve that with an Ajax call using jQuery:
<p class="thanks" style="display:none;">Thank you for getting in touch.</p>
<p class="error" style="display:none;">Something went wrong. Please try again.</p>

<script src="https://code.jquery.com/jquery-3.1.1.min.js"></script>
<script type="text/javascript">
  $(function() {
    $('form').submit(function() {
      $.ajax({
        url: $(this).attr('action') + '.json',
        method: 'post',
        dataType: 'json',
        data: $(this).serialize(),
        success: function () {
          $('form').hide();
          $('.thanks').show();
        },
        error: function () {
          $('.error').show();
        }
      });
      return false;
    });
  });
</script>
So, pulling it all together, a full HTML page including our form would look like this:
<!doctype html>
<html lang="en">
  <head>
    <title>Contact us!</title>

    <style type="text/css">
      body { font-family: sans-serif; margin: 2em; }
      label, input, textarea {
        width: 15em;
        float: left;
        margin-bottom: 1em;
        font-size: 1.2em;
      }
      label, input[type=submit] { width: 10em; clear: left; }
      #url, .thanks, .error { display: none; }
    </style>

    <script src="https://code.jquery.com/jquery-3.1.1.min.js"></script>
    <script type="text/javascript">
      $(function() {
        $('form').submit(function() {
          $.ajax({
            url: $(this).attr('action') + '.json',
            method: 'post',
            dataType: 'json',
            data: $(this).serialize(),
            success: function () {
              $('form').hide();
              $('.thanks').show();
            },
            error: function () {
              $('.error').show();
            }
          });
          return false;
        });
      });
    </script>
  </head>

  <body>
    <h1>Contact us!</h1>
    <form action="https://example.plan.io/helpdesk" method="POST">
      <p class="error">Something went wrong. Please try again.</p>
      <label for="name">Your name:</label>
      <input name="name" id="name" type="text" />

      <label for="mail">Your email address:</label>
      <input name="mail" id="mail" type="email" />

      <label for="subject">Subject:</label>
      <input name="subject" id="subject" type="text" />

      <label for="description">Your message:</label>
      <textarea name="description" id="description"></textarea>

      <input name="project" type="hidden" value="example-project" />
      <input name="url" id="url" type="text" />

      <input type="submit" value="Submit request" />
    </form>
    <p class="thanks">Thank you for getting in touch.</p>
  </body>
</html>
You can download the entire HTML page here: contact-us.html.
When someone fills out this form, the message will show up in Planio as an issue as you can see here:
That’s just one of the examples of how you can use the Redmine API at Planio to streamline your processes. You’ll find more examples and documentation, including how to add your own custom fields to your contact forms, in our Redmine API documentation.
Planio is not only great for one-off projects. It really shines when it comes to recurring tasks that follow a certain workflow within your organization.
Follow along this guide to create a simple vacation approval workflow for your team members - and apply what you've learned to create your own custom workflows.
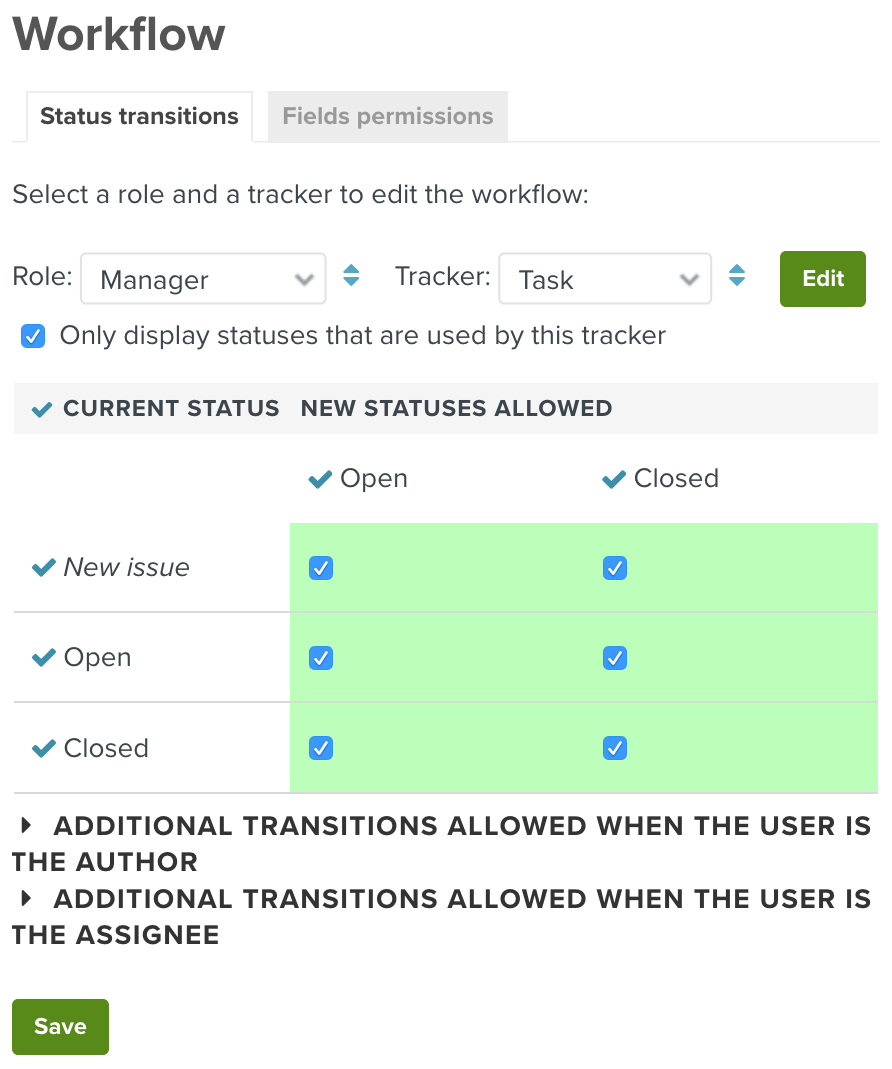
In Planio, every issue must belong to a tracker which defines its workflow. Let's look at this in more detail:
We'd like to see trackers as special issue types. An issue must belong to exactly one tracker. Task, Support incident, Software bug, or -- you guessed it -- Vacation request would be great examples for a tracker.
Issue statuses describe the different states, that an issue in Planio can have at any given moment. For instance, an issue can be Open, In progress, Waiting for review, or Closed. An issue will always have exactly one status and the status will likely change over time as people work on the issue.
Users in Planio have their own user account using which they take part in projects using one or more roles: While some users may take part as Manager, others may be regular Staff or e.g. Client. The role defines what a user can and cannot see or do in a given project. It also defines the user's workflow.
The workflow brings it all together: A workflow defines for every possible combination of tracker and role which issue statuses are available. It defines for all its tracker's issues which status changes are allowed and which issue properties are visible and/or changeable.
Say what!? This is arguably the most complex (and powerful) part of Planio, but don't worry -- we will walk you through it and you will be a workflow expert in no time!
We knew you would love this section. Dreaming of that deserted beach in the Caribbean? Let's request some vacation days and off we go.
In many companies, taking a vacation requires approval by a manager. Employees must submit a request mentioning the start and end date of the requested vacation and managers will approve or disapprove the request. Upon approval, the dates of that vacation can not be altered, and the vacation request is final. If disapproved, employees can alter their requested dates and re-request approval until -- hopefully -- they will be allowed their well-deserved days in the Caribbean.
We will now build this workflow in Planio allowing for actual vacation requests being made and approved. We will also show you how to visualise them on Planio's calendar, so you can get a great overview on who is on vacation at which point in time.
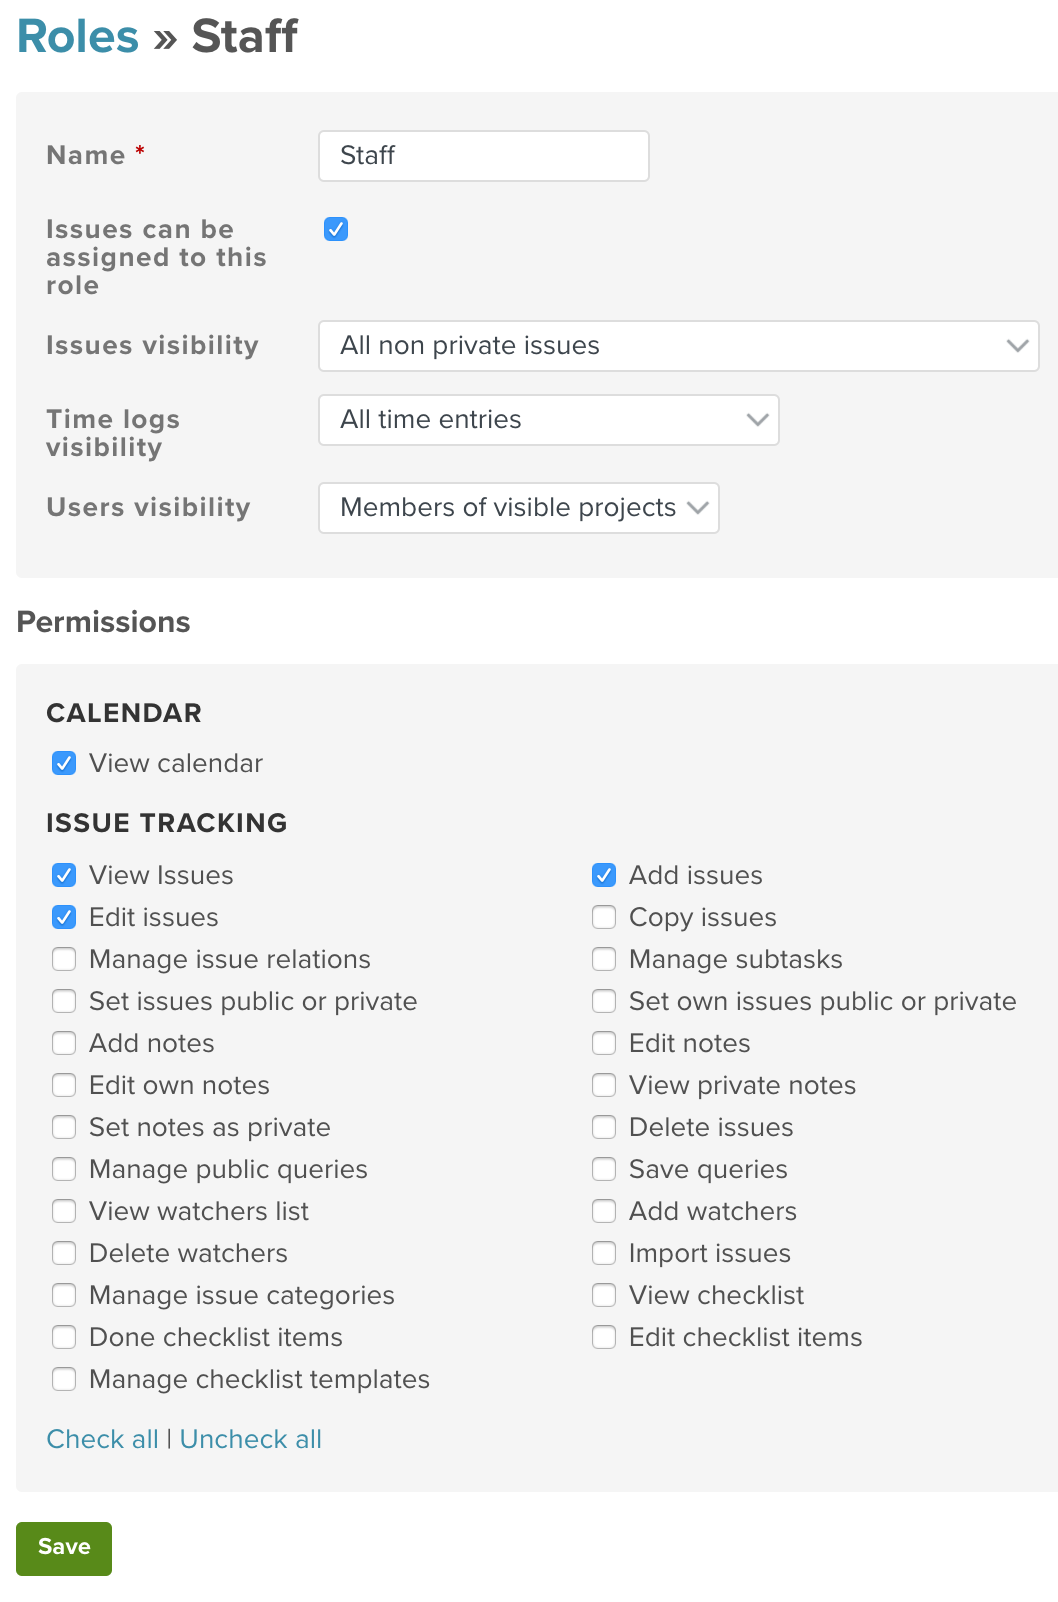
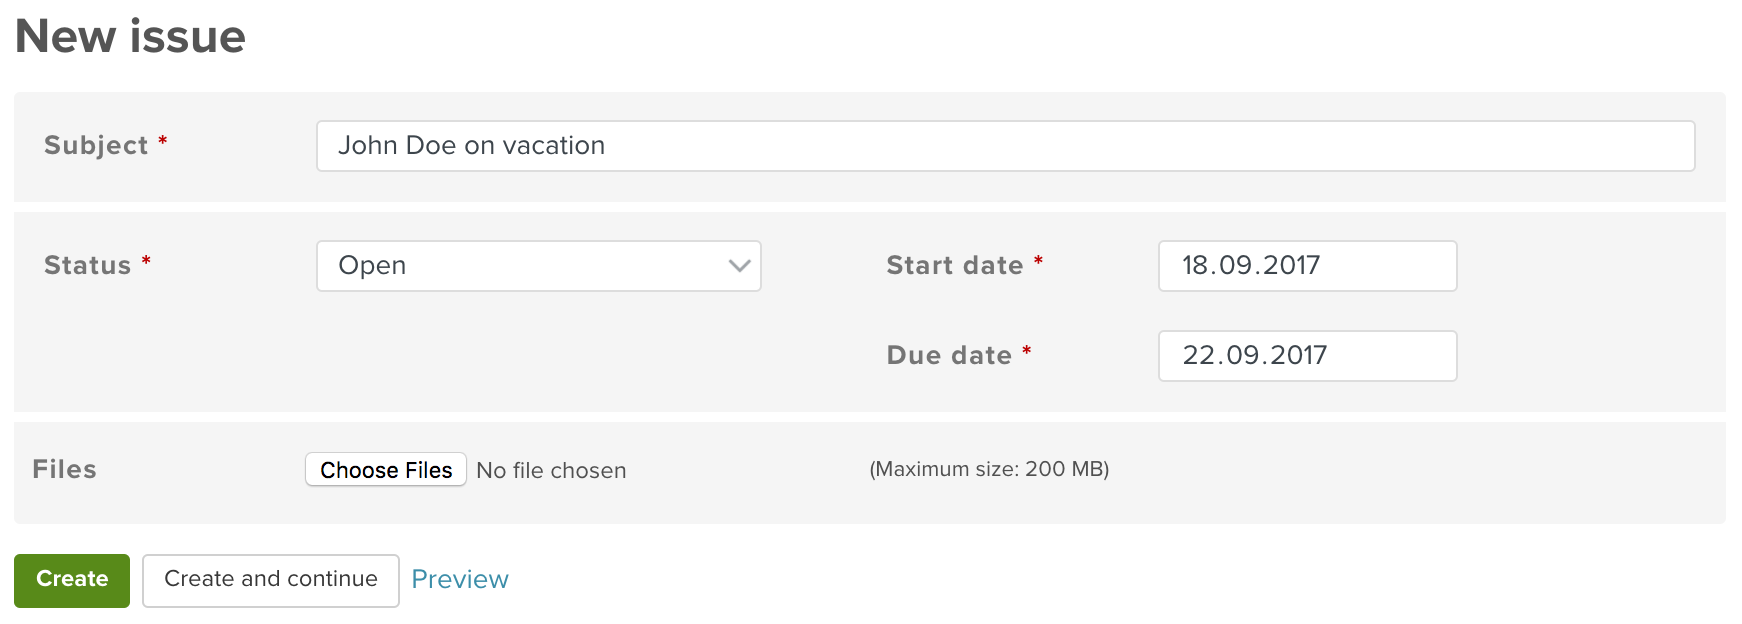
To implement this, we will create a Tracker called Vacation request, three Issue statuses called Open, Approved, and Rejected, and two Roles, called Manager and Staff.
Finally, we will tie all those together using a custom Workflow in Planio.
First things first. Let's get down to business:
![]()
The steps are similar but slightly different for the three statuses Open, Approved, and Rejected.

This one should be easy:
This is the fun part. Here is where it all comes together.
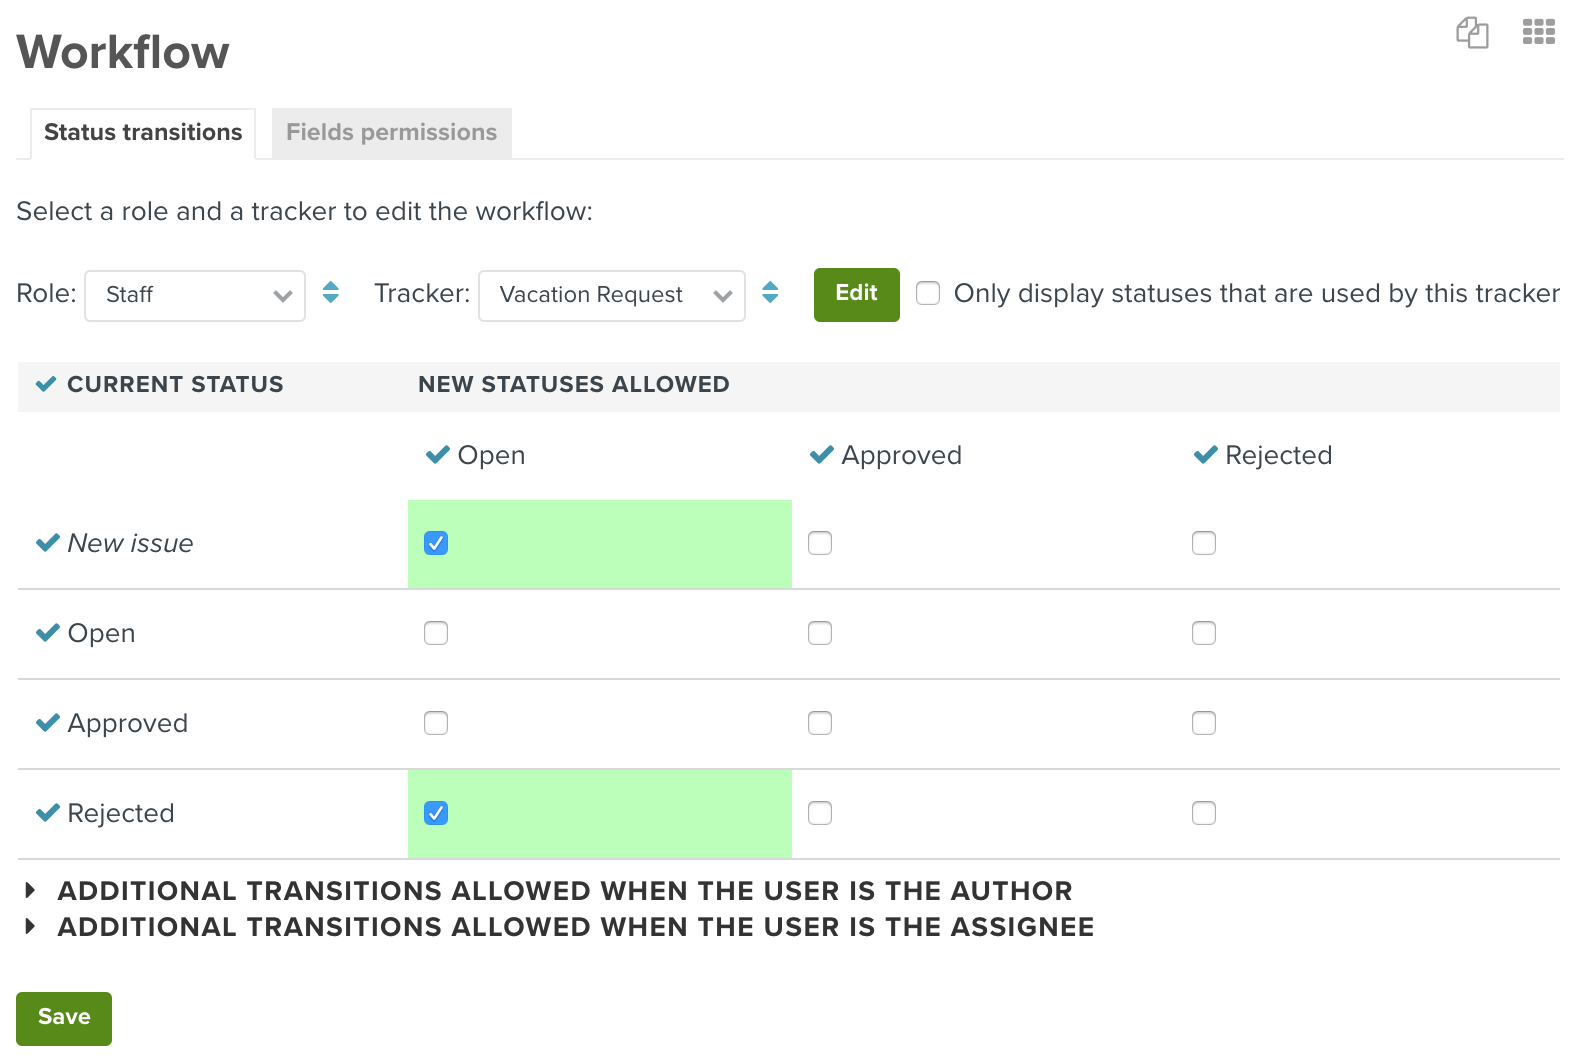

Wait, what did we just do? Have a look at the screenshots again. What we defined is:
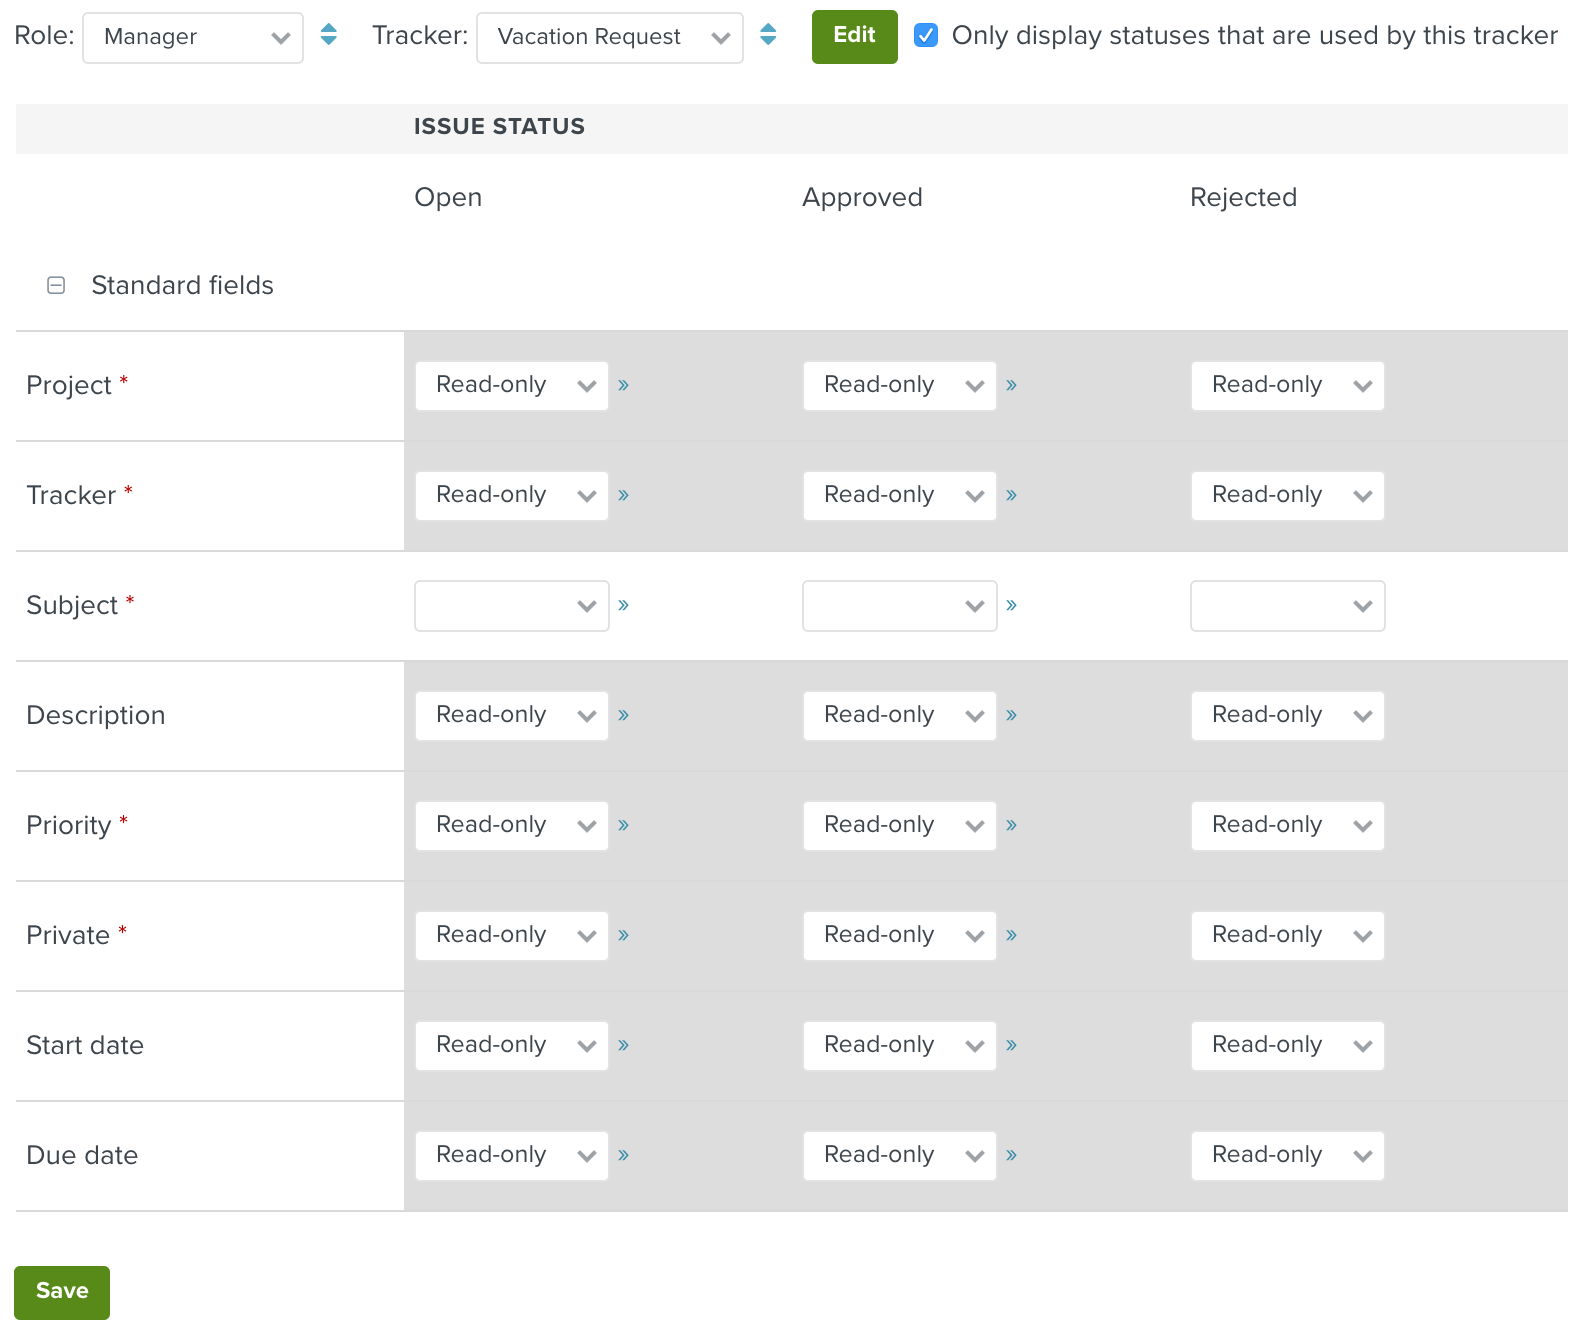
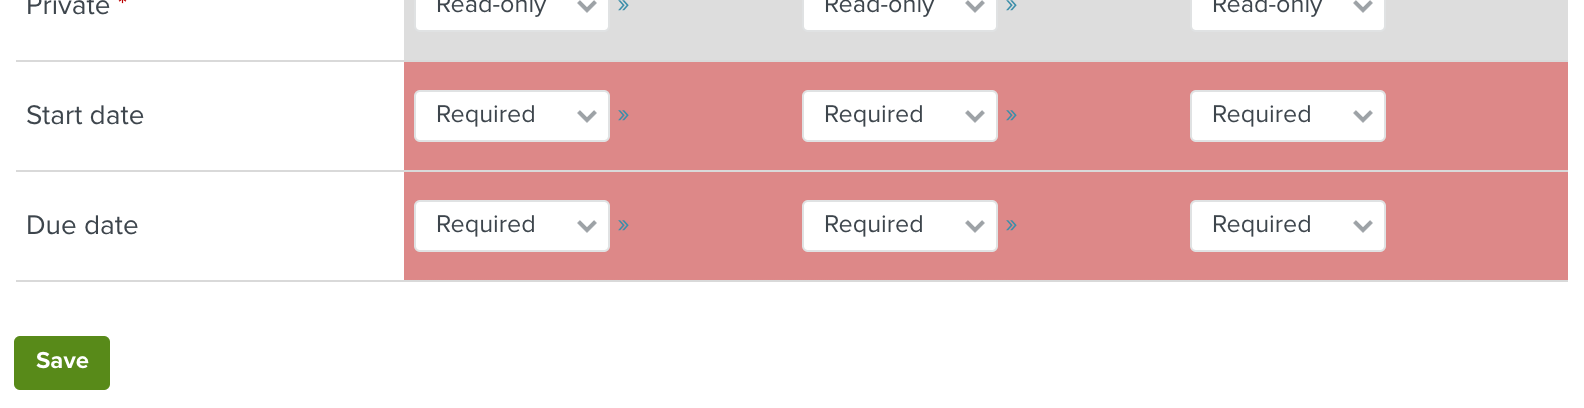
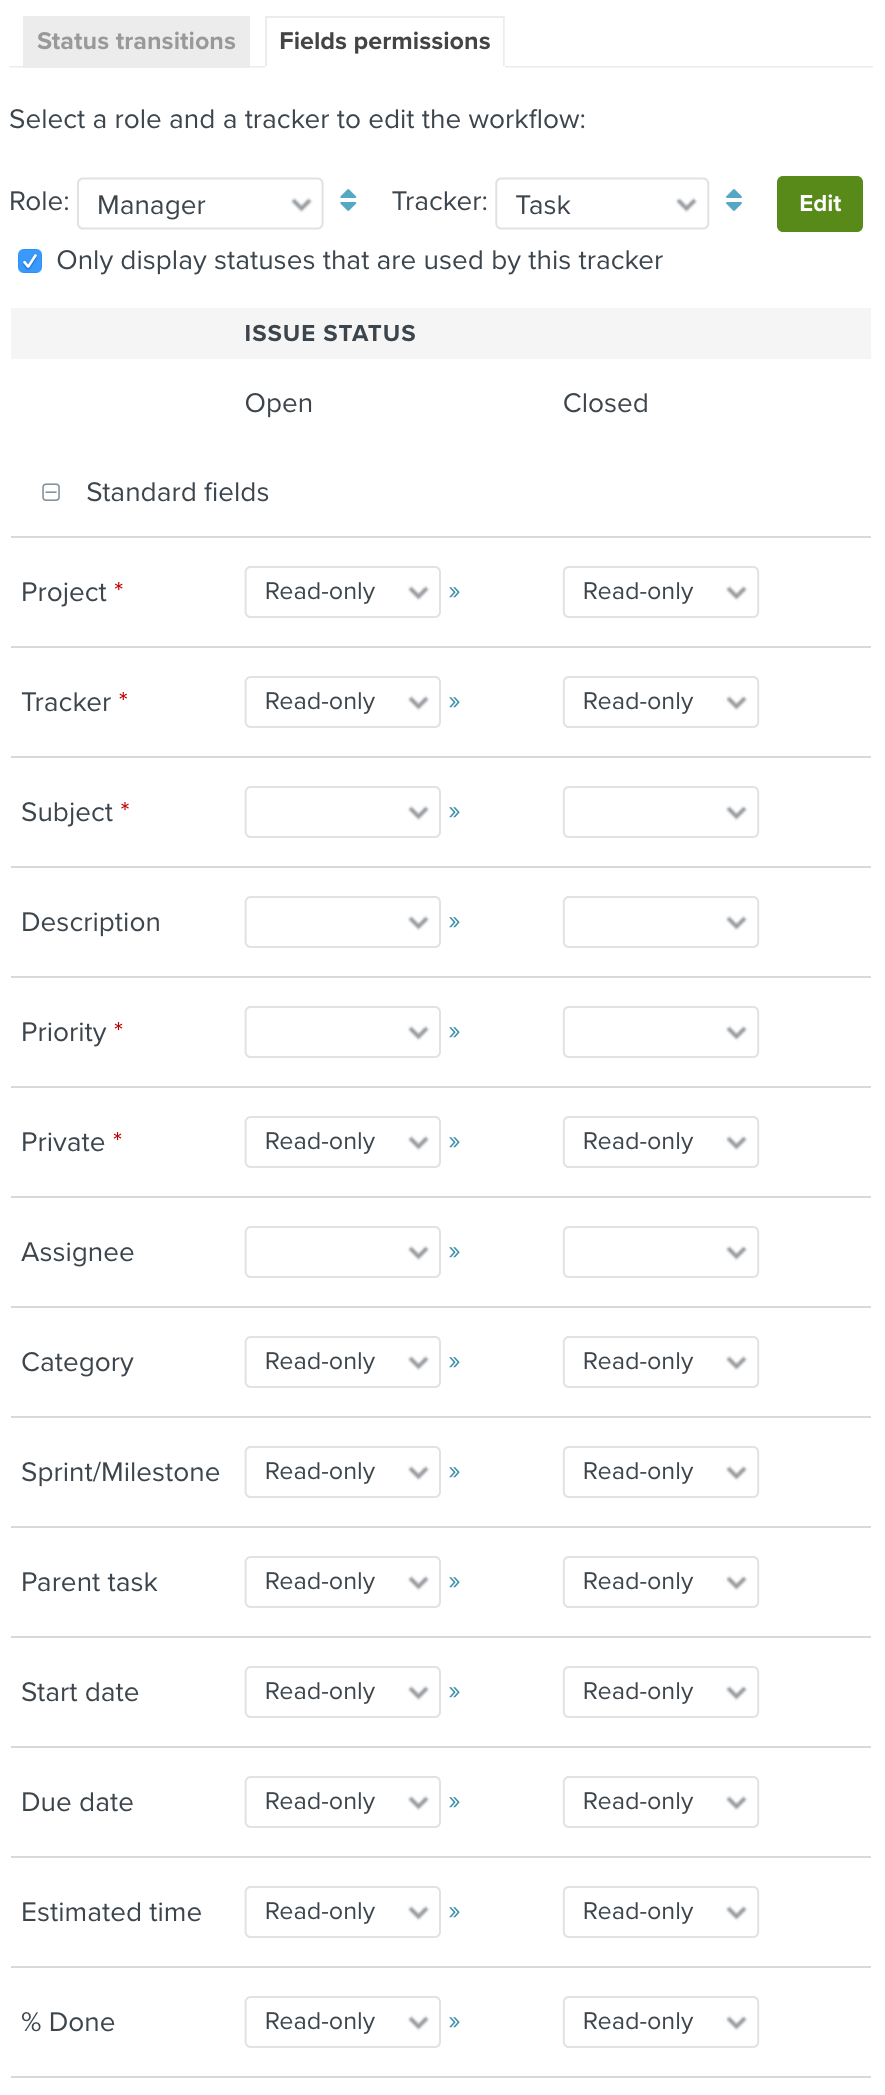
Now, let's customize the issue form fields a bit according to the issue status.
That's enough of prep work. Let's try it out.
That's it, you're done. Your users can now use this project for your new vacation request planning workflow. In order to submit a vacation request, all they'd have to do is create a new issue. Selecting a start date and a due date will be required when creating vacation request issues and all other useless fields will be hidden.
In order to try it out for yourself and play around with it, we recommend you create two users via your avatar -> Administration -> Users that have no administrator privileges and add them as Staff and Manager to your project respectively.
(If you try it out as an administrator, don't be alarmed by the fact that you can always choose from all statuses when updating an issue. That's normal if you're an admin. Regular users will only see the statuses as defined by their workflow.)
What's up with the Calendar module we've enabled in the roles and your project, you ask yourself? Well, after adding a couple of vacation requests, check out the Calendar tab in your project. The Planio calendar will give you a nice monthly overview of all vacation requests which have been tracked.
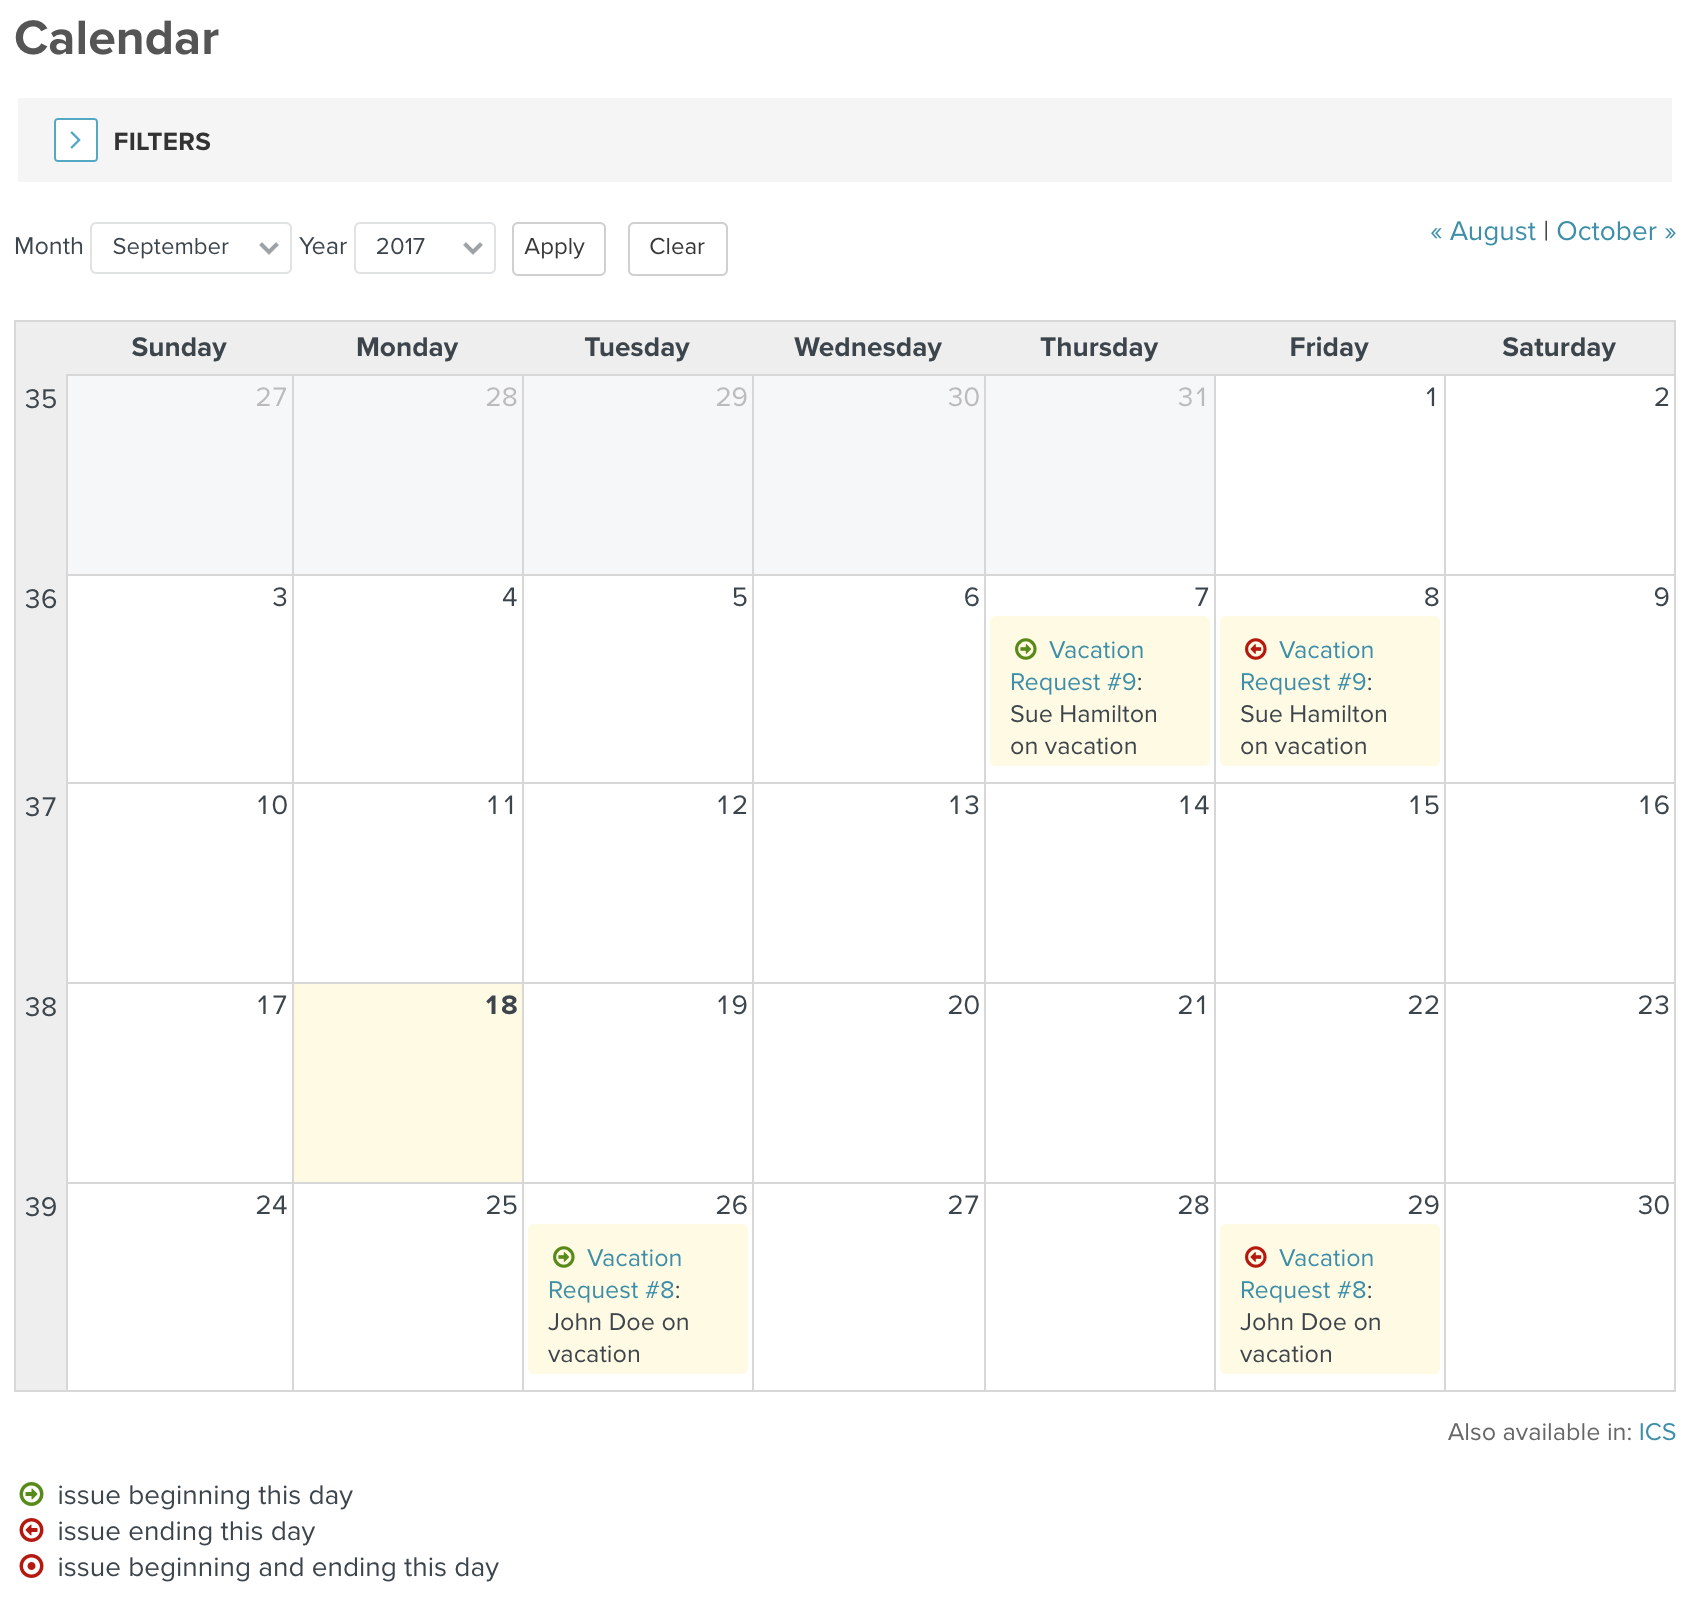
By using a custom query, you can even create a calendar view that displays only approved vacation requests. Or create a query for your managers that shows only Open requests that have to be approved still.
Custom fields enable you to personalize functionality in Planio according to your organization’s unique operating procedures.
No matter how you operate you can add these fields all over your Planio account so you can always fill out and save the information you need, no matter how individual it may be.
As an administrator of an account, your imagination is the limit when it comes to customizing the Planio experience. Planio supports many different field formats (such as text, integer, list, date etc.), and new fields can be added to many different functionalities (e.g. issues, spent time, users, groups, folders, customer companies etc.).
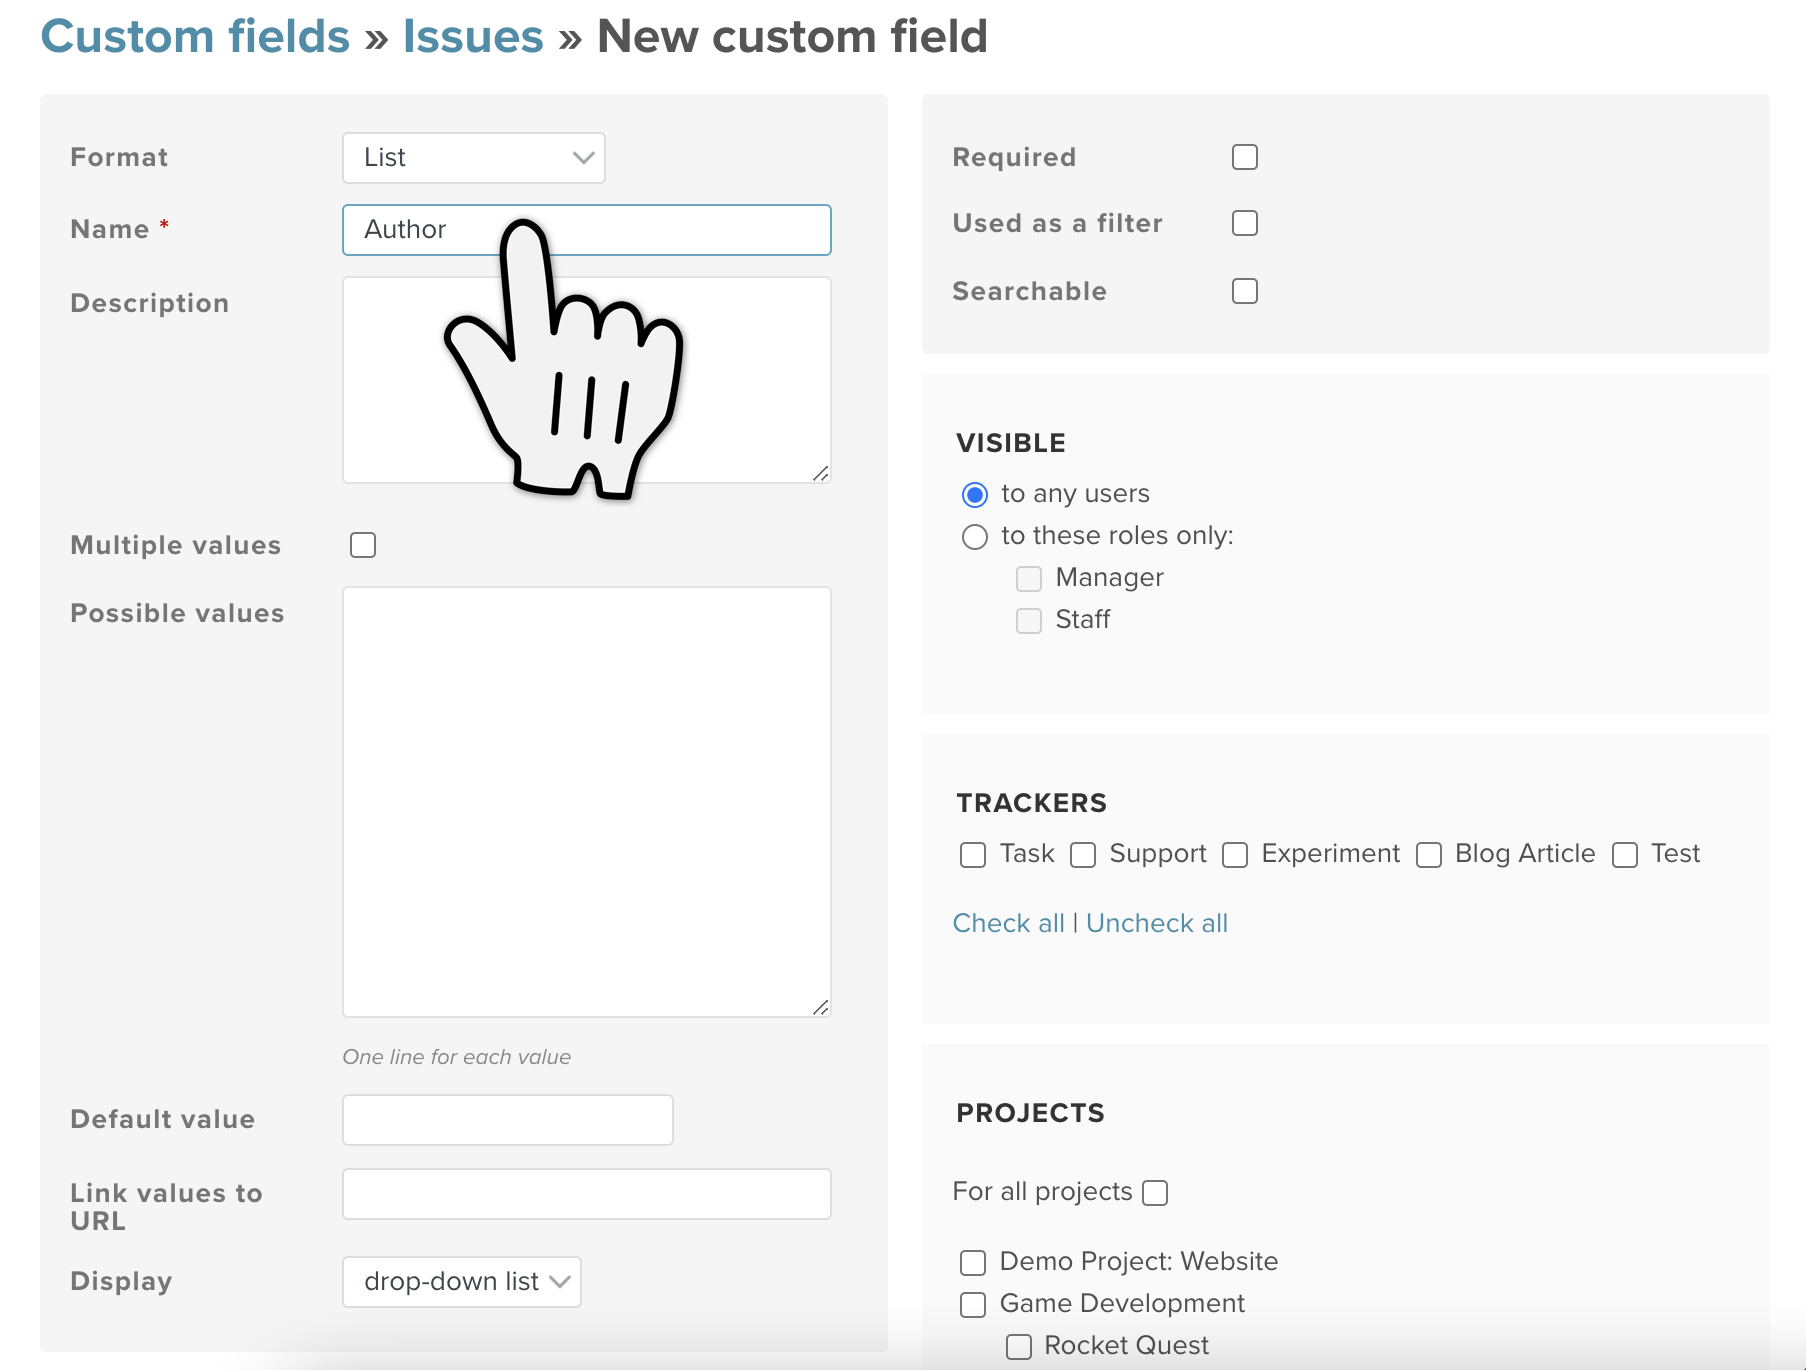
In this example, we will add the issue field "Author" to our blog article tracker.
In the top right hand corner you should see your name or your Avatar, which you can click on. This will open up a drop down menu.
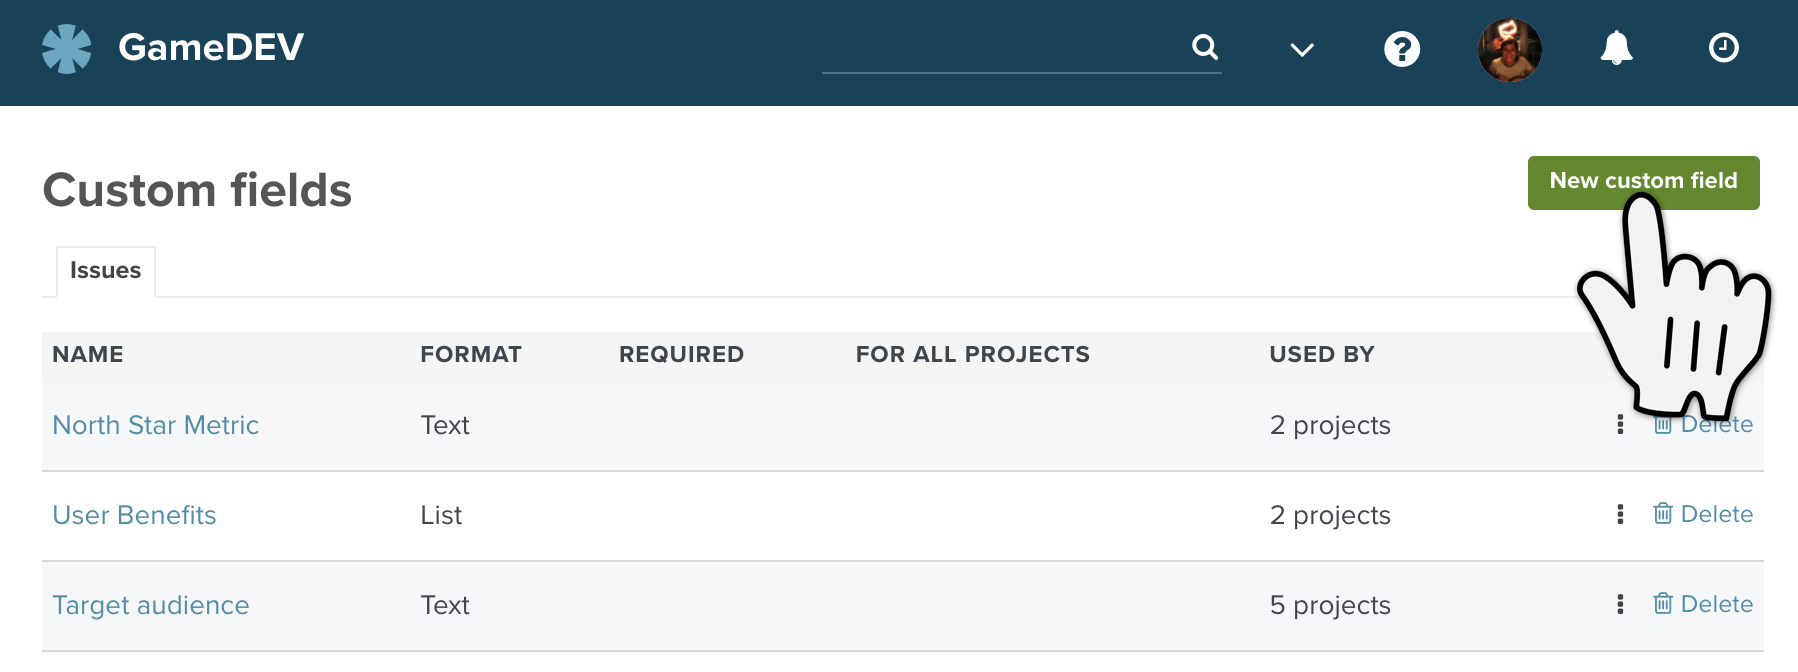
Once you have clicked on Administration you will see a set of tiles with global settings for the account. Click on the tile Custom fields.

You’ll be redirected to the Custom fields page where you will see a list of custom fields that already exist in your account. In the top right hand corner there is a green button New Custom Field. Click on it.
Here you’ll be asked where your custom field should appear. There is a list of all the functionalities in Planio where you can add you own custom field. For this use case we will create a custom field, which we want to see in our issues.

Now you can configure your custom to field to exactly what you need. Start by choosing the format of the field. Each format will need slightly different information and so the fields on this page will update automatically once you have chosen which format you want to use.
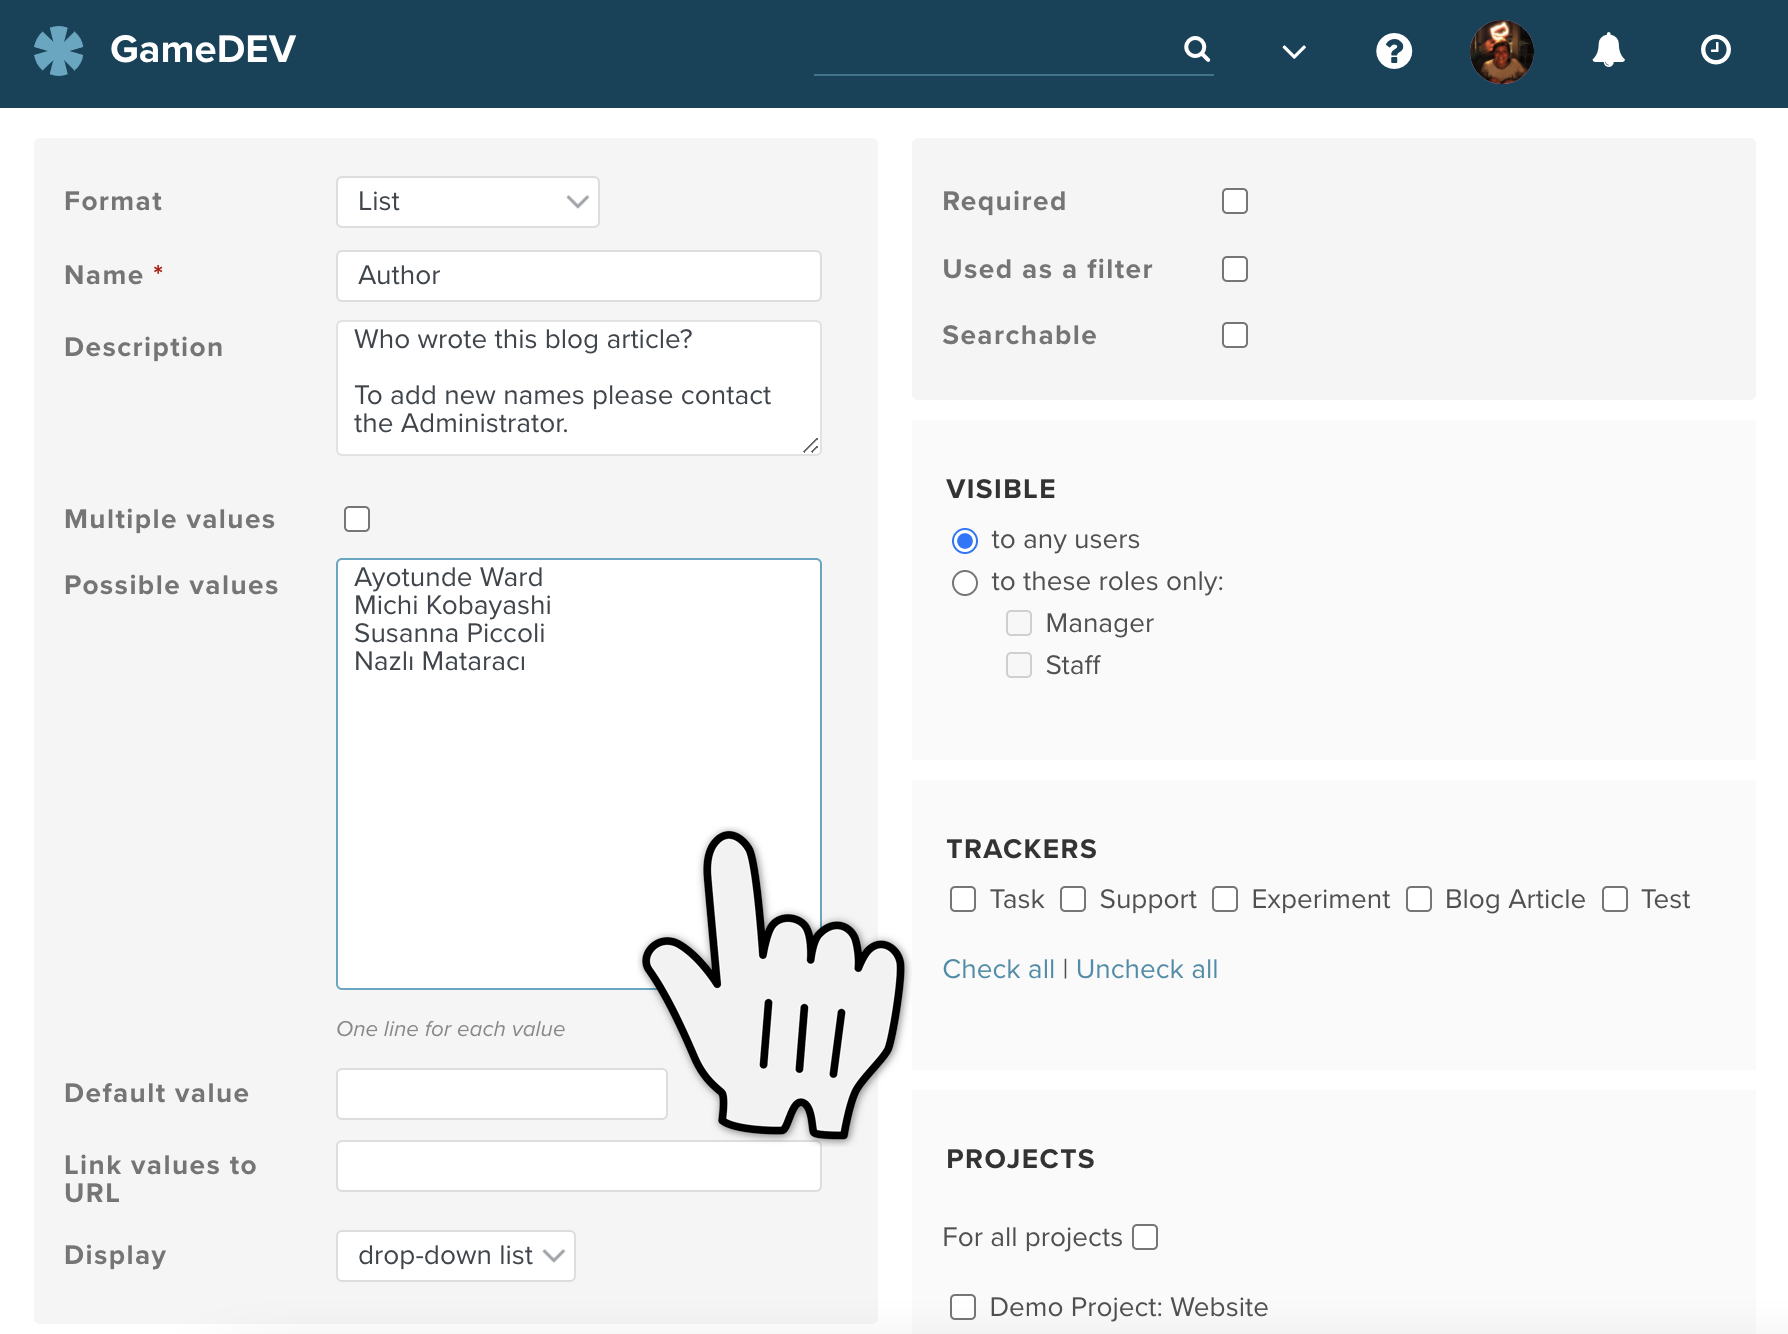
In our use case we have a set list of authors who will be writing the blogs and so we can create a custom field with a list of existing authors to choose from.
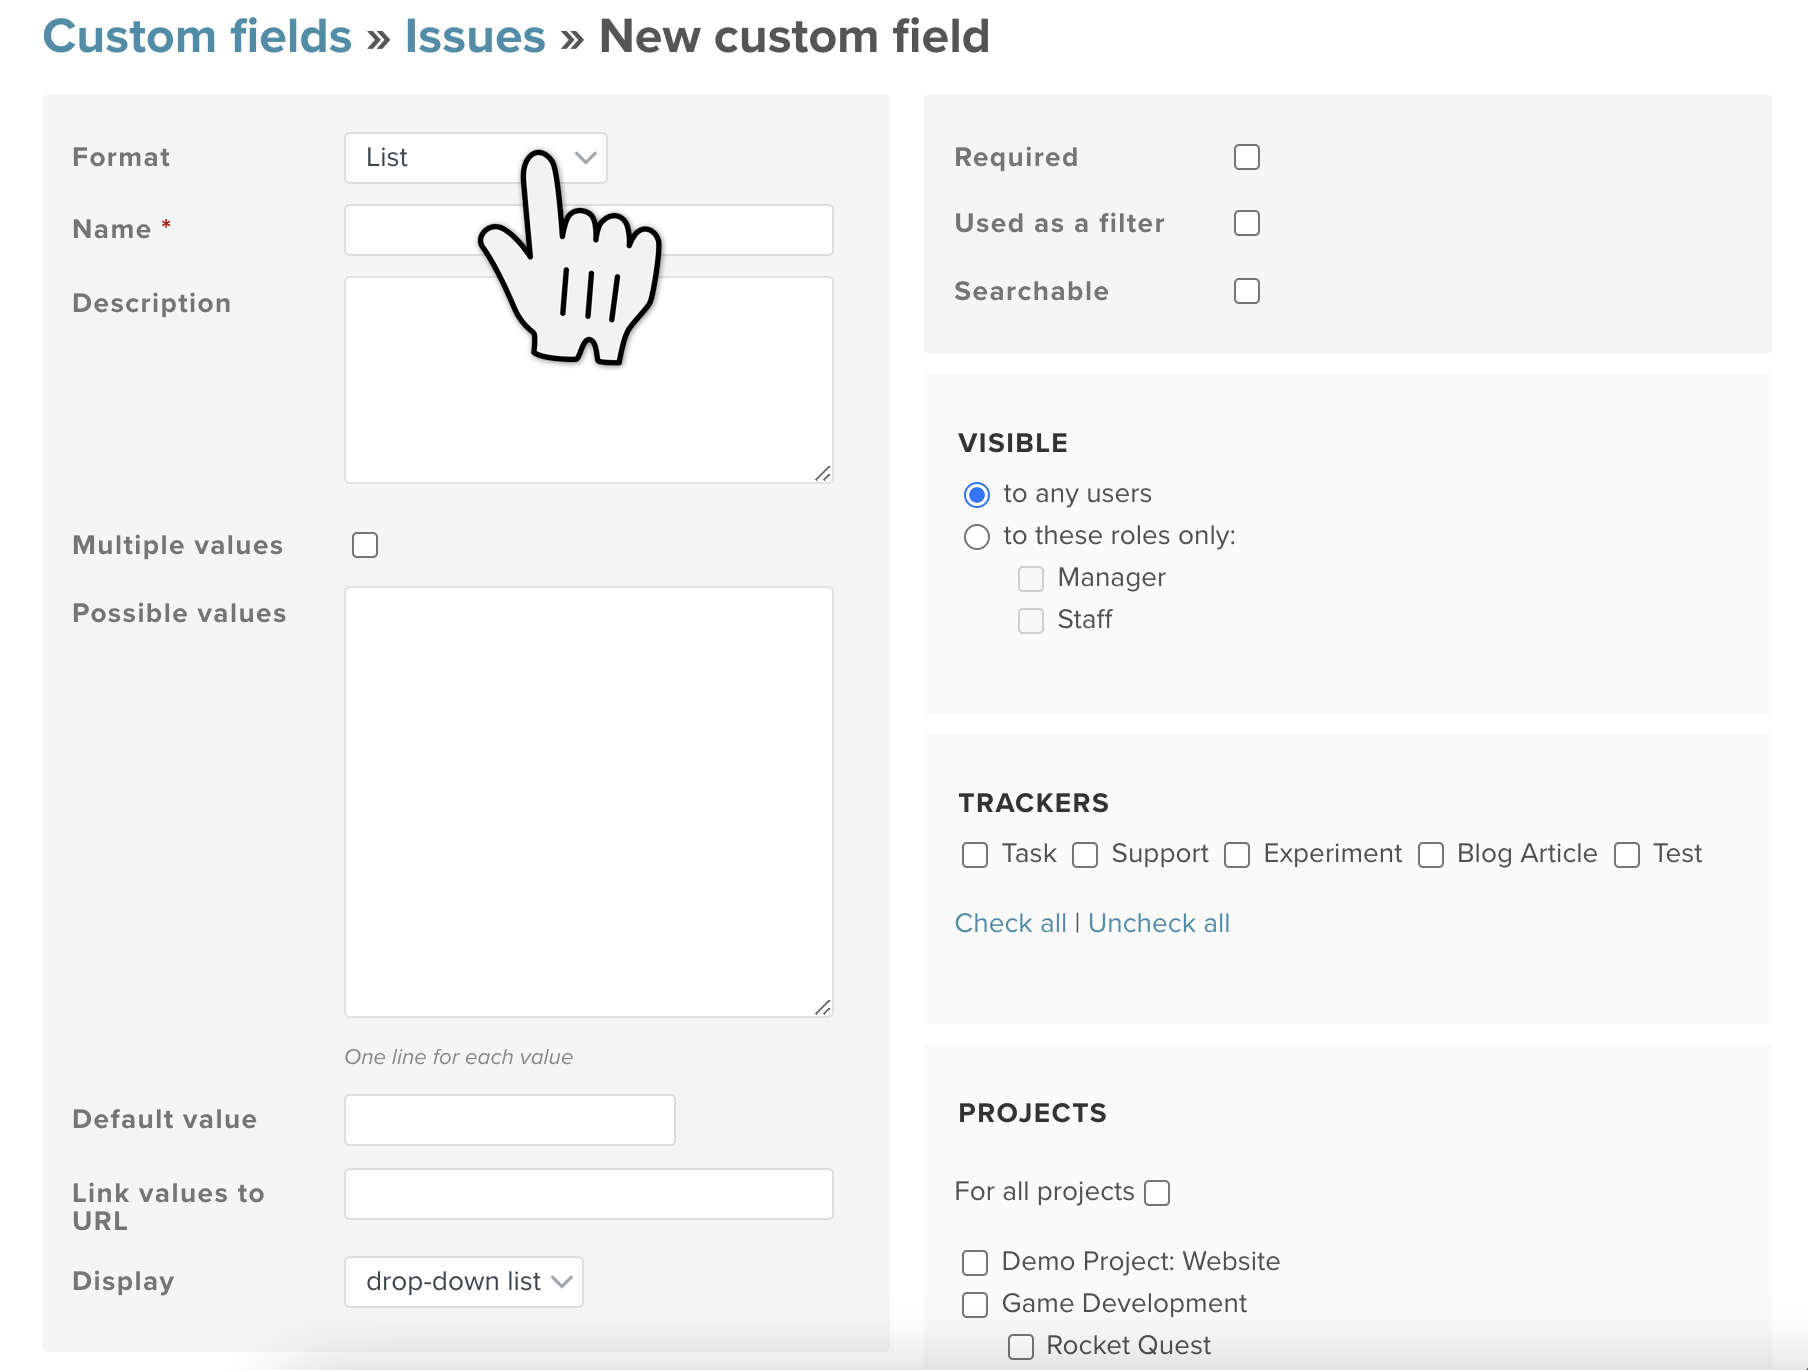
Remember that the format cannot be changed once your custom field has been saved. Everything else can be edited afterwards though.
This will be the name that appears in your issues, along side the other fields you usually fill out (Project, Assignee, Due Date etc.)
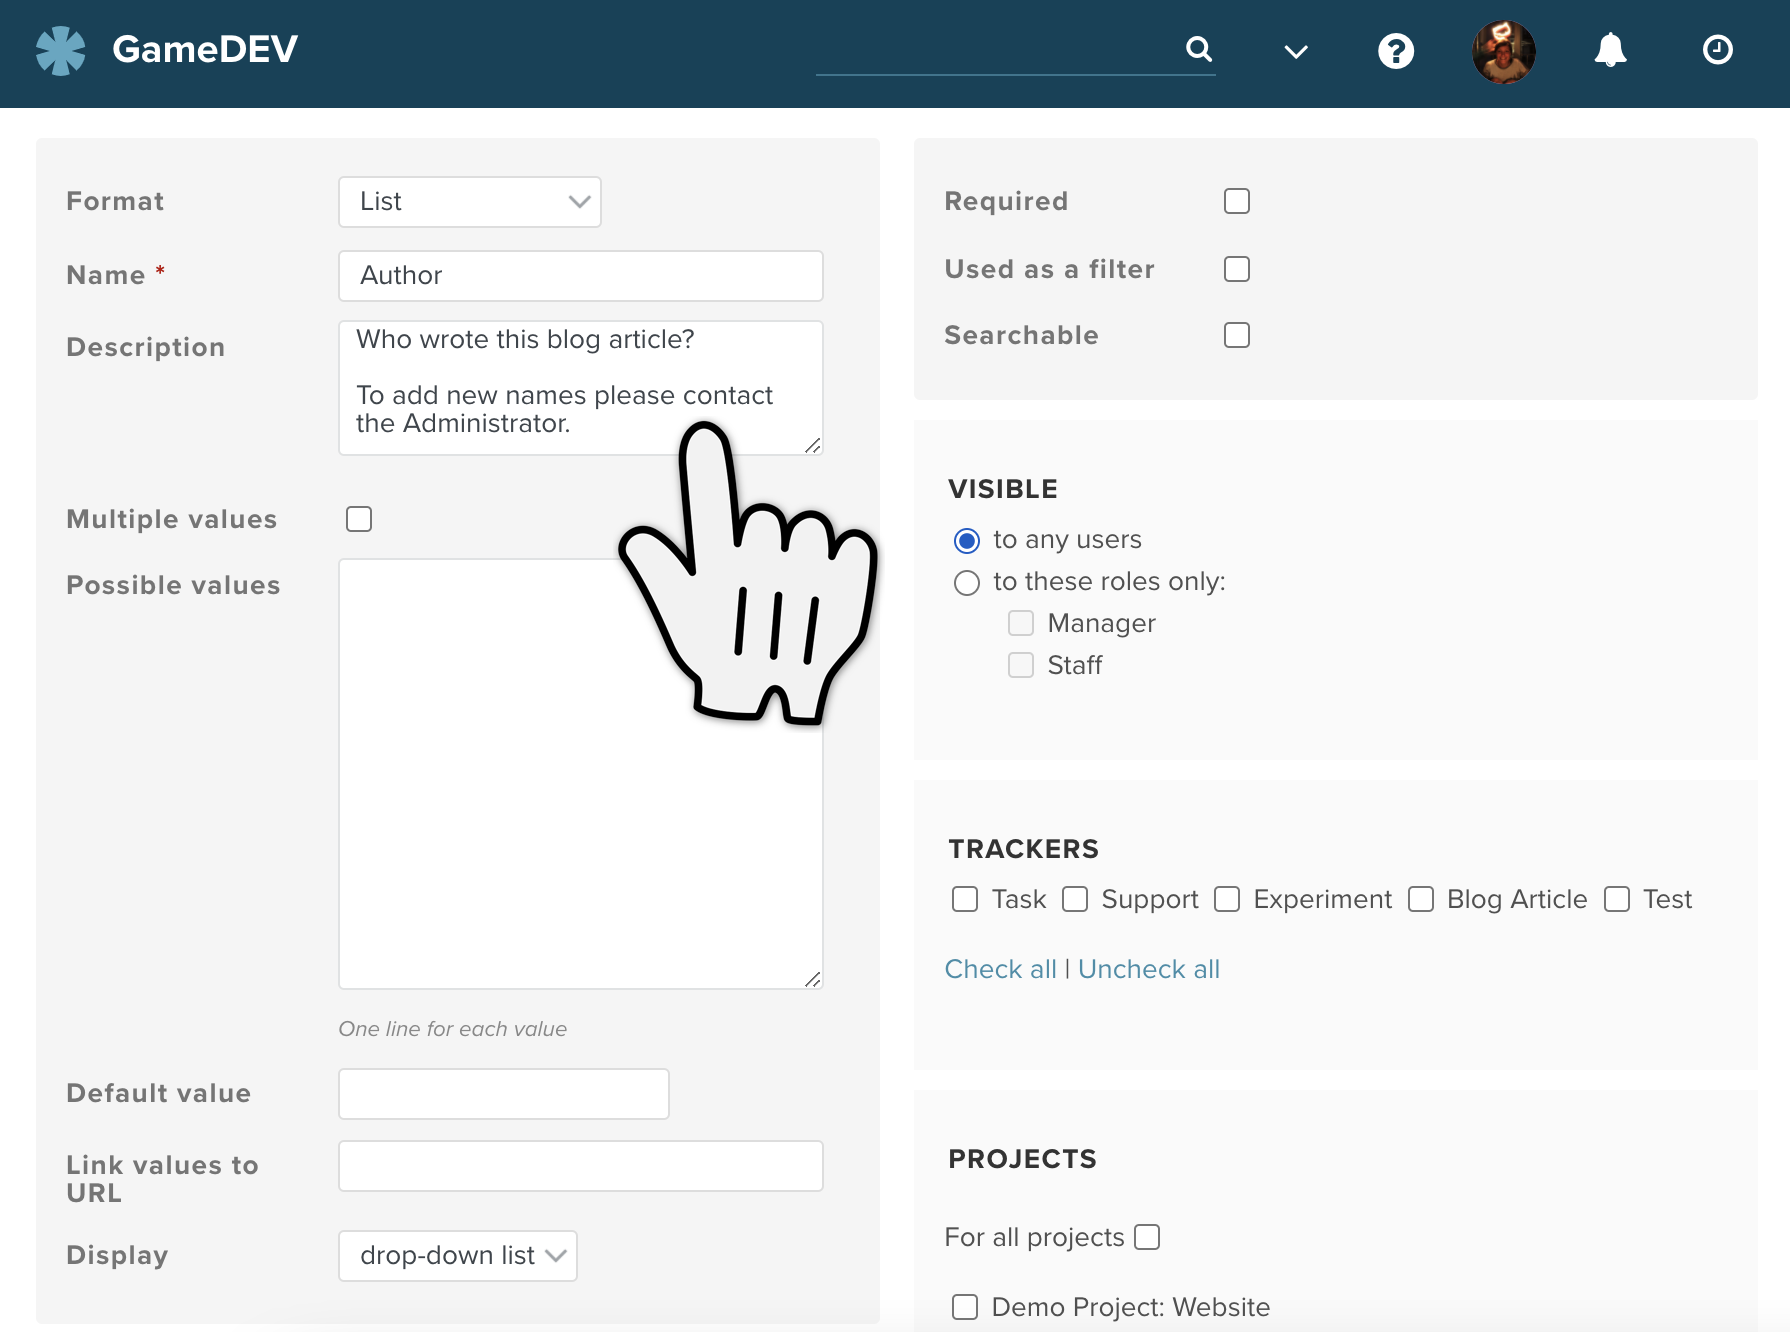
If you choose to add a description, users will be able to read this text in the issues. A little ? will show up next to the custom field in the issues and if your users hover over that ? the description will pop up. You can use this to help your users know what exactly they should be filling out here.
Here you can finally add the values that your users can choose from when filling out that custom field. Here we are adding a list of names of authors. For the list format specifically, remember to add only one value per line. There is a little note under the Possible values box in each format type to remind you if this is needed.
If you entered for example https://en.wikipedia.org/w/index.php?search=%value% in the Link values to URL field, and someone filled out this new Author custom field with "William Shakespeare", the value would become clickable and a click would lead to the Wikipedia entry for William Shakespeare.
This field accepts the following URL variables:
| Variable | Explanation |
|---|---|
| %value% | the custom field value |
| %id% | ID of the customized object e.g., the ID of the issue |
| %project_id% | ID of the project of the customized object if defined |
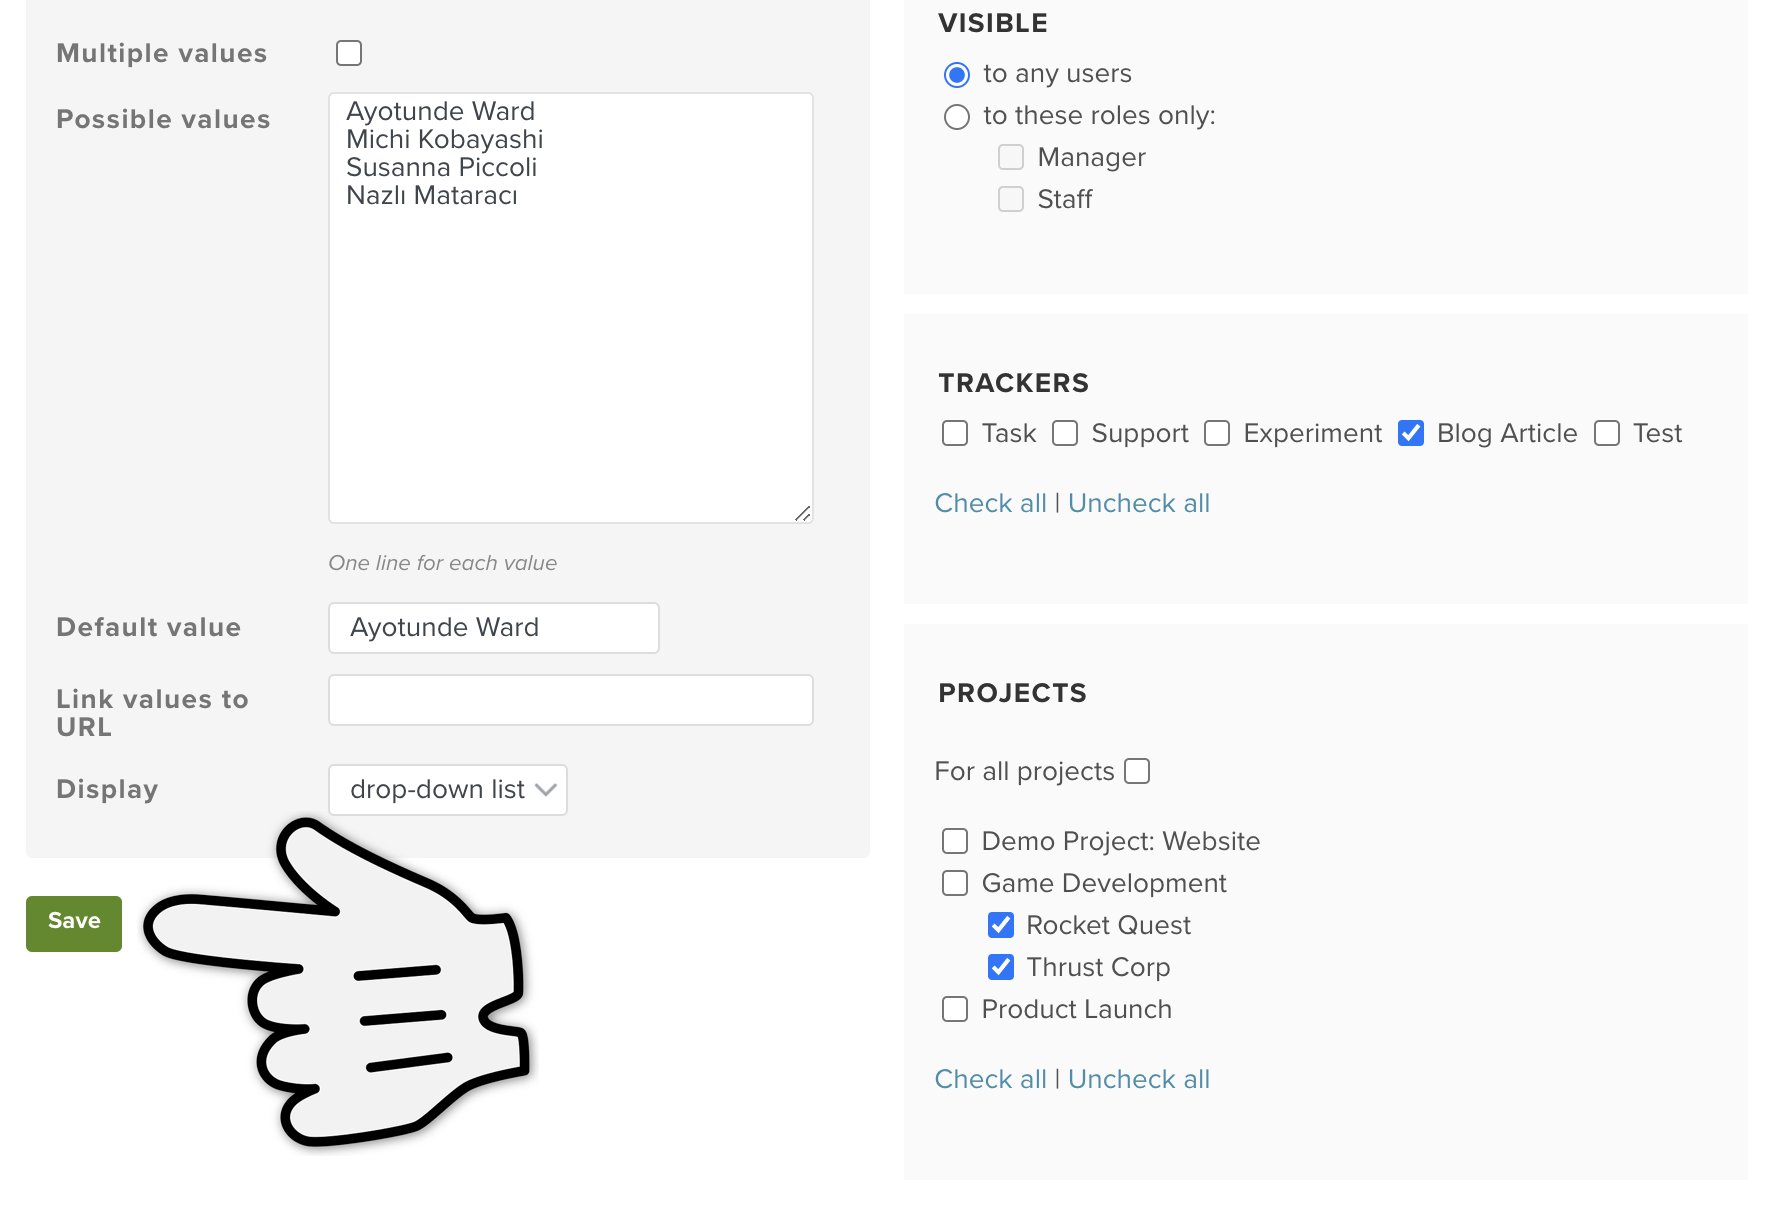
Here you can set up further options for how to handle or use the new custom field.
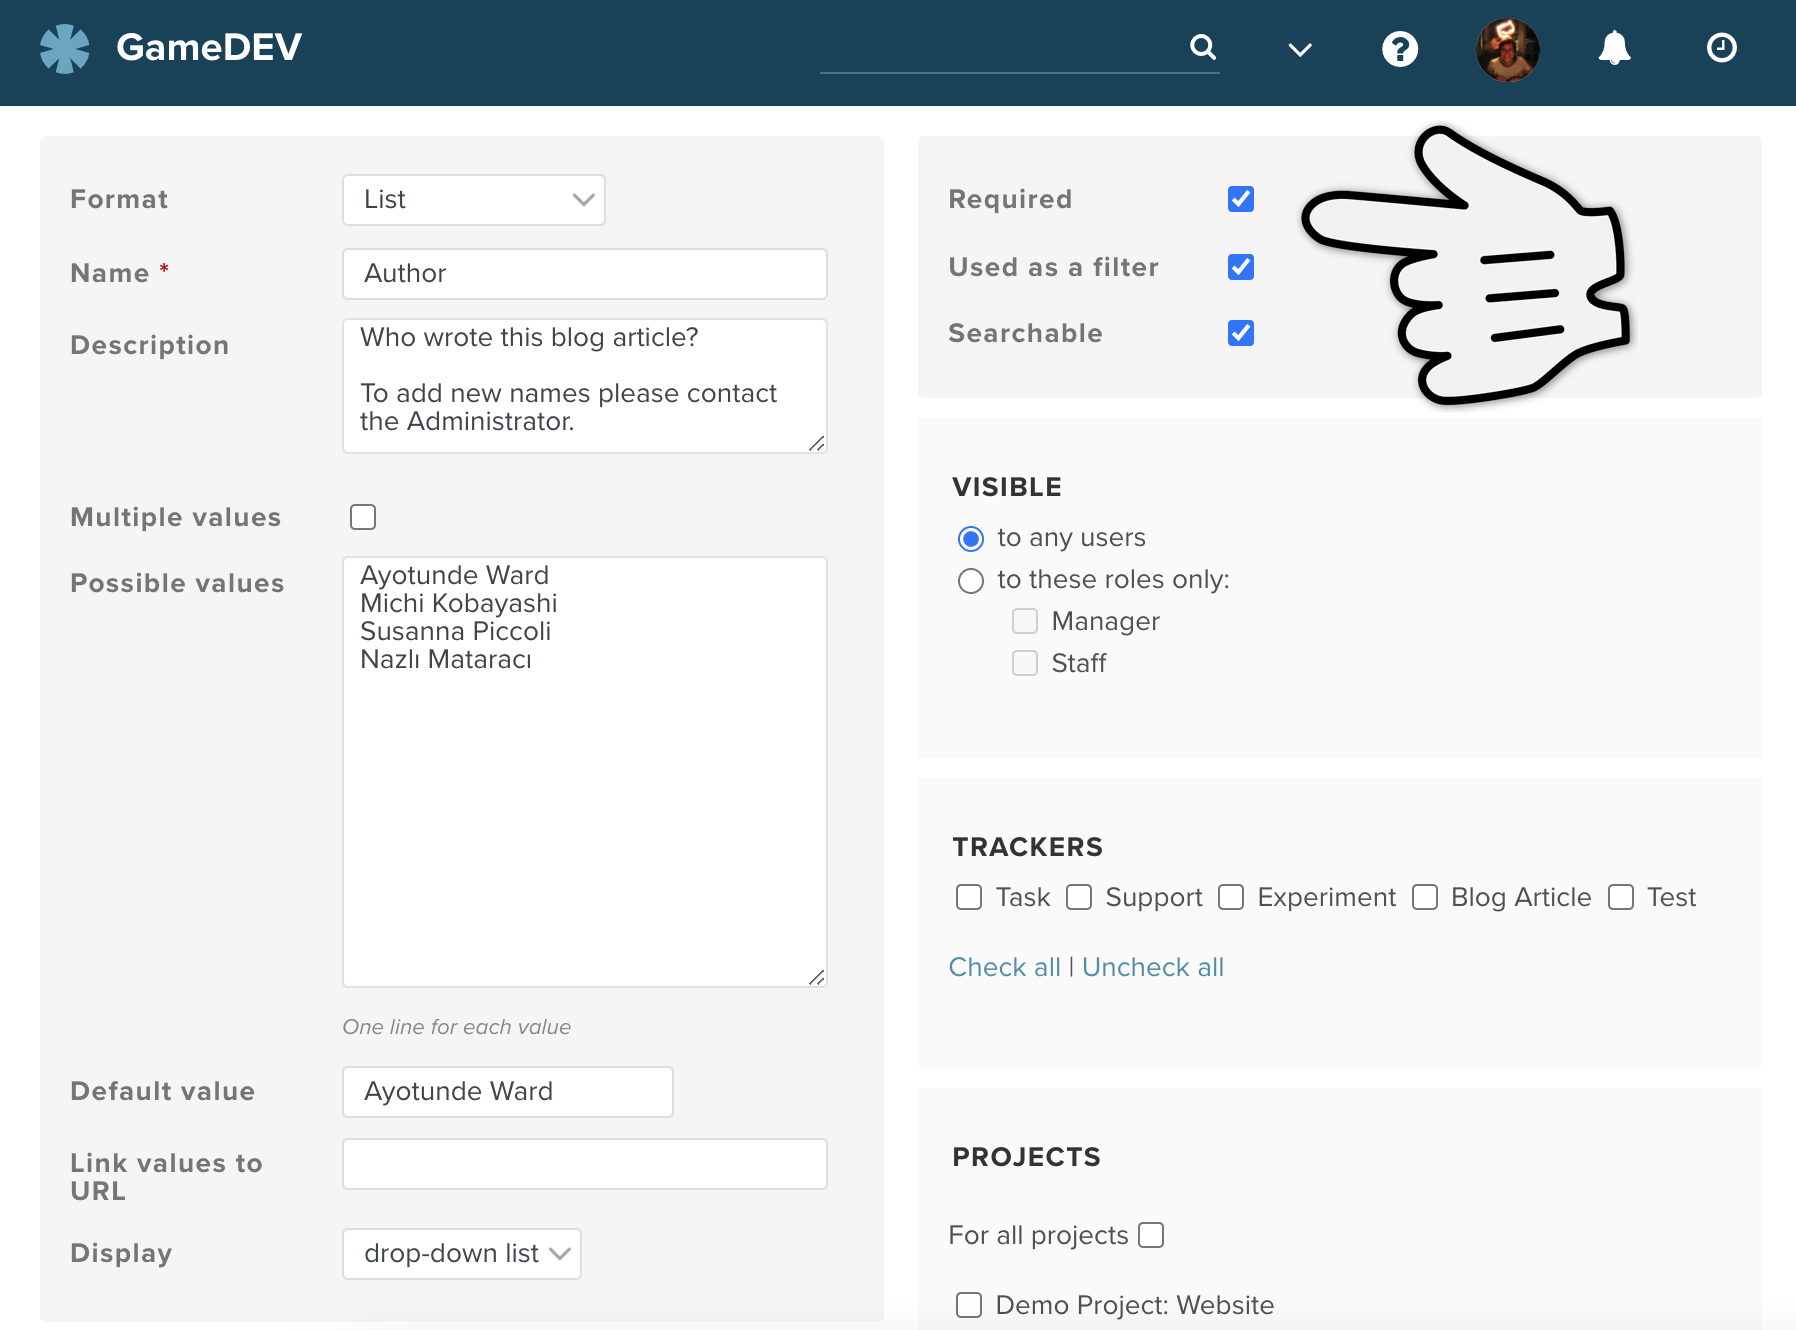
Who should use this field? Depending on who this field will be relevant for, you may want to restrict who can see or use this field. In this case all users who have access to the tracker and project should be able to see and use the new field.
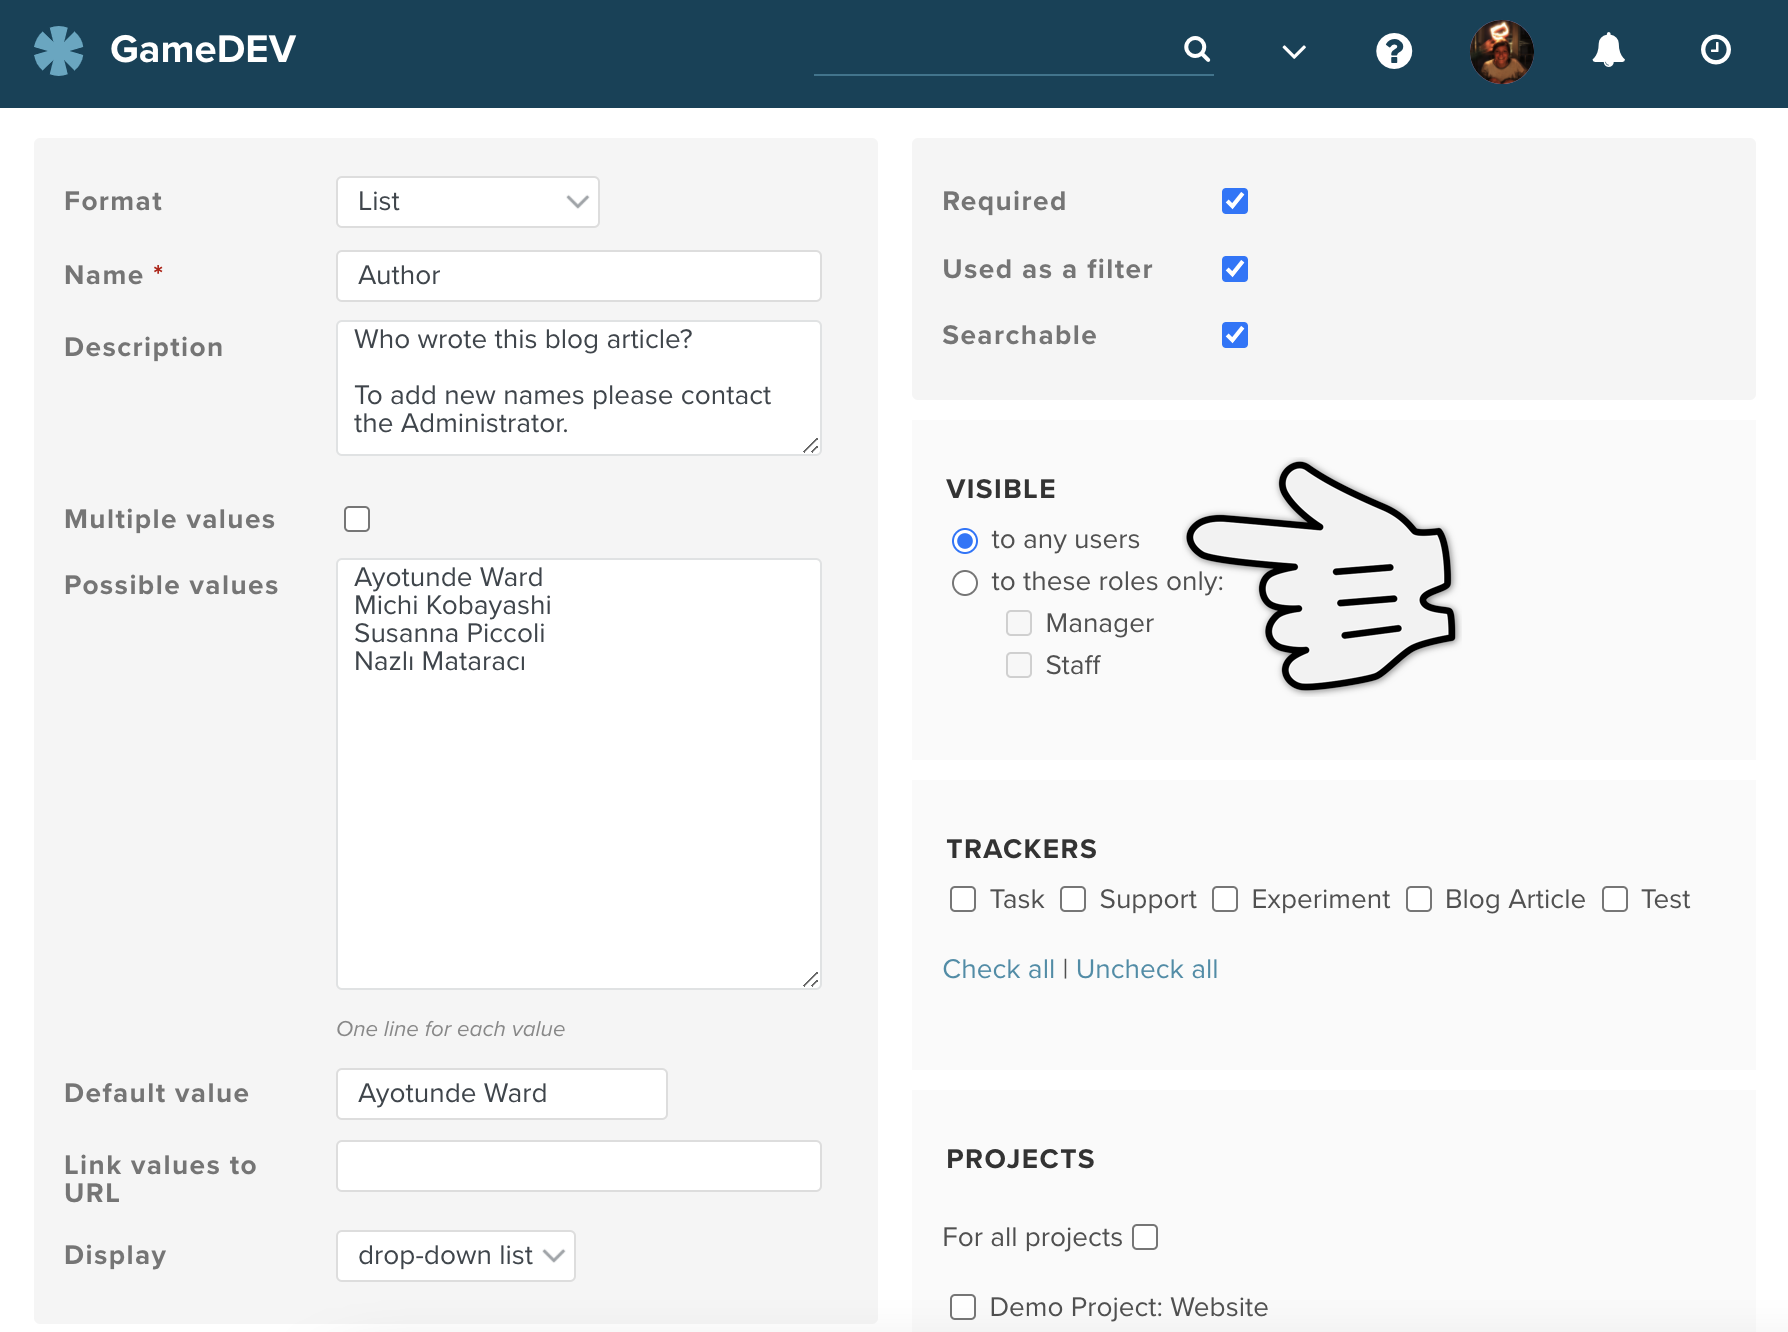
Here you will decide which trackers and projects this field will be shown in. Just highlight the trackers and projects that you want to see and use your new field in.
In our use case, we only want this field to show up in the tracker for "Blog articles" and so we have only highlighted that one. We have blogs in both projects "Rocket Quest" and "Thrust Corp" and so we have highlighted both of these. The tracker "Blog article" is also active in both those projects.
![]()
Finally you can save it!
You will be directed back to the list of custom fields and you will see that your new one will have appeared.
Your new custom field will now be wherever you configured it to be. We created our "Author" field to be used in issues in the project "Thrust Corp" when creating or editing the tracker "Blog article" and there it is:

As we mentioned earlier, there are many different formats for custom fields. We’ll go through what they are here with some explanation of what they can be used for:
| Format | Explanation | Filterable | Searchable | |
|---|---|---|---|---|
| List | → | Users can click on options in a drop-down menu or checklist | ✔ | ✔ |
| Text | → | Users can type a single line of arbitrary text in this field. | ✔ | ✔ |
| Sprint/Milestone | → | Users can choose from sprints or milestones that already exist in your account | ✔ | ✘ |
| Longtext | → | Users can write a multi-line text here. Like the description field in issues the field size can be adjusted | ✔ | ✔ |
| Link | → | URL | ✔ | ✘ |
| Key/Value List | → | As with the format List users can click on options in a drop down menu or checklist. The entries however correspond to a static value, which means the entries can be changed at a later date without losing the old data | ✔ | ✘ |
| Integer | → | Users can enter a positive or negative whole number | ✔ | ✘ |
| Float | → | Users can enter whole or rational numbers (e.g. 1.5, 25.8, 7) | ✔ | ✘ |
| File | → | Users can attach a file (it will also be shown in the "attachments" tab in your project) | ✘ | ✘ |
| Date | → | Users can enter a date | ✔ | ✘ |
| Boolean | → | Users can choose either yes or no in the form of either a drop down menu, checklist or radio buttons | ✔ | ✘ |
| User | → | Users can link other users from the account to the issue. Groups can’t be assigned | ✔ | ✘ |
→ I can’t find the Administration area As only administrators of the account can access the administration area, you won’t see the administration option unless you have administrator rights. You are automatically administrator of the account if you created it. If not you’ll have to ask the administrator of your account to do this for you or give you administrator rights.
→ I want to change the order of the custom fields The order of the custom fields list is the same order that the custom fields will show up in your account. Hover over the three dots in the relevant row and the pointer will become a hand. Grab the row to move it up and down into the order you want your custom fields to be shown.
→ My custom field isn’t showing up If you can’t find a field, it is usually because the wrong tracker or projects have been clicked (or none!). Luckily you can edit and change this whenever you want. Just go to Administration → Trackers and add the custom field to the list of ticked boxes → Save or Administration → Custom fields and add the tracker and/or projects to the new custom field → Save.
→ My custom field entry isn’t showing up in my search Not all custom field formats can be used as filters or be set as searchable. If the option "Used as a Filter" or "Searchable" doesn’t show up when creating the field, then it can’t be used as a filter or be included in a Planio search. You may however just need to go back and put a tick in the right box.
→ I just created a custom field but it’s not included in the custom fields list If you create custom fields for other aspects in Planio (Wiki pages, Contacts, Spent time etc.) they are grouped into tabs on the custom field page.

If you get stuck when adding a custom field to your account, have any other questions, or just want to know more, please don’t hesitate to contact our super friendly support staff.
Planio is a powerful set of collaboration and project management tools which is flexible enough to adapt to almost every situation in the workplace.
Especially if your company hasn't used a tool like Planio before, we recommended to start small and add more features as you go.
Nobody likes complicated -- and neither do we. If you're just starting, why not take a radical approach: Let's strip your Planio down to the bare minimum!
Don't worry - we aren't burning any bridges here. All bells and whistles will still be there when you need them later on.
For starters, we recommend you only use one single project. Not more. Sure, you'll have a lot of stuff to do organise with Planio, and you can create as much content as you like. But have only one project in the beginning. Add more later if you need them.
Let's create a super simple project, shall we?

If you've already invited other colleagues to Planio, be sure to add them to your new project using the Members tab. When selecting a role, choose Manager. If you haven't invited anyone yet, don't worry, we'll do that later.
Trackers let you define a unique workflow for recurring tasks like handling an incoming invoice or approving a purchase order according to predefined steps in a business process.
That's not what you were after when we said simple, right?
Roles are a powerful way to manage access control in Planio. They give you fine-grained control over the "who can do what" in your project.
Our hypothesis: Forget roles for now.
Getting the hang of it? Let's remove some more unused stuff for now.
Feels good, doesn't it?
Don't feel like selecting trackers, categories, milestones, and % done for a simple task? Let's get rid of them and simplify our workflow.
Got it? By setting the fields to Read-only, we've actually removed them from the forms that are used to create and update tasks. It will make those forms much simpler and easier to fill out.
Afraid you'll miss a field later on? No problem, just switch it back from Read-only to the empty selection and the field will be visible again in forms.
That's it, you're done. Welcome to the most simple Planio setup.
What to do next? Here are some ideas:
If you haven't, invite your team members to Planio.
Navigate to your project via the Projects menu at the top and check out the different sections.
But what are they for? Let's see:
Now, what's the best way to adopt Planio in your everyday life? It's really simple actually. It all comes down to one easy habit to adopt: Think twice before you send an email!
Know that reflex to open up your email client and add all your colleagues in CC? Don't do that anymore!
Think about what it is you're writing. If you're looking to get work done, create an issue. If you want to announce something, use the blog. Have a PDF file to share, upload it to documents. Want to write meeting minutes or describe the new workflow for submitting a vacation request, update the wiki. Finally, if you just had an awesome idea and want feedback, write a forum post.
Encourage your colleagues to do the same, and enjoy less email, a better structure, and incredibly improved productivity!
Planio lets you use agile methodologies such as Scrum, Kanban or Extreme programming for your projects. You can read a case study on exactly how Software AG, a customer, uses Planio to implement scrum by clicking here.
Agile methodologies includes a group of software development methods such as Scrum, Kanban or Extreme programming. They’re all based on the idea that requirements and solutions evolve through collaboration between self-organizing, cross-functional teams.
This tutorial will help you set up your account for one of these methodologies.
Once it’s set up, you'll be able to:
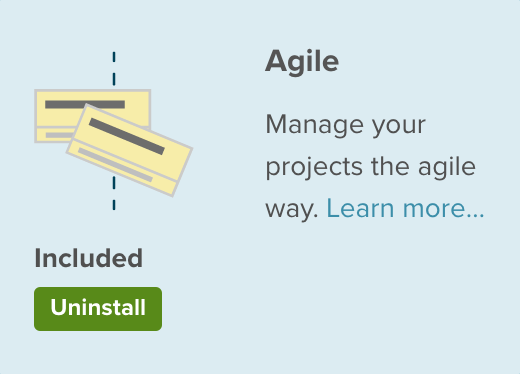
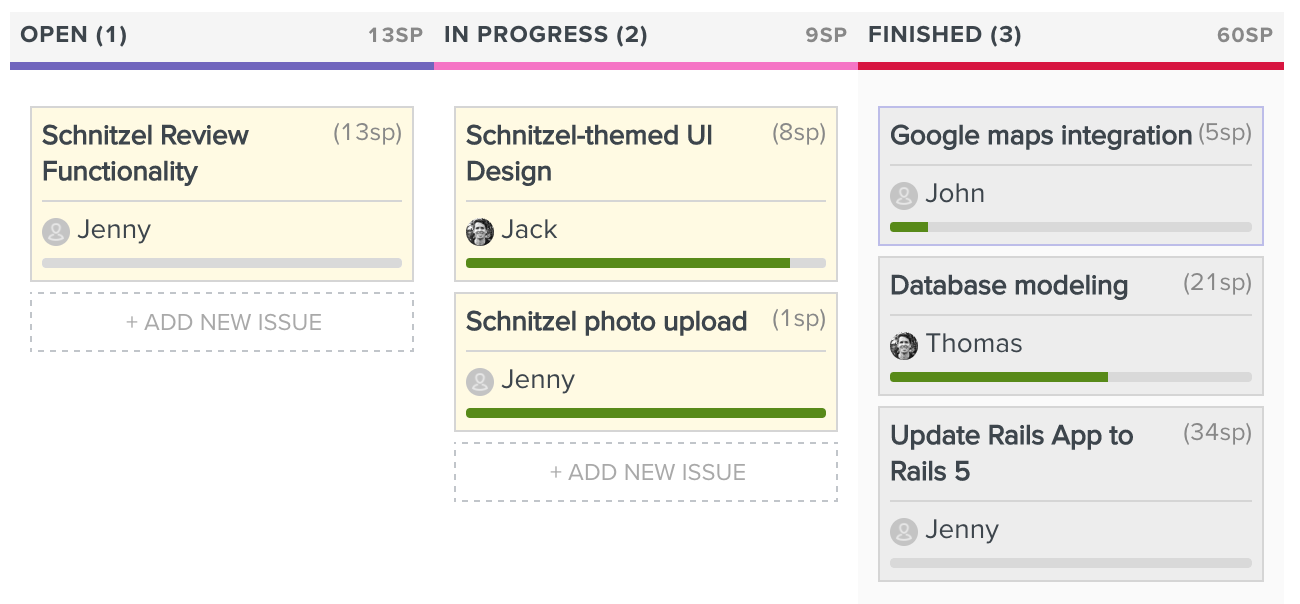
Make sure that the Agile app is installed. Go to the Apps tab and install the Agile app.
We've found that you'll have the most success if you start off with a simple setup. Once you've completed a few sprints with Planio, you'll be in a better position to see which customizations make sense for you.
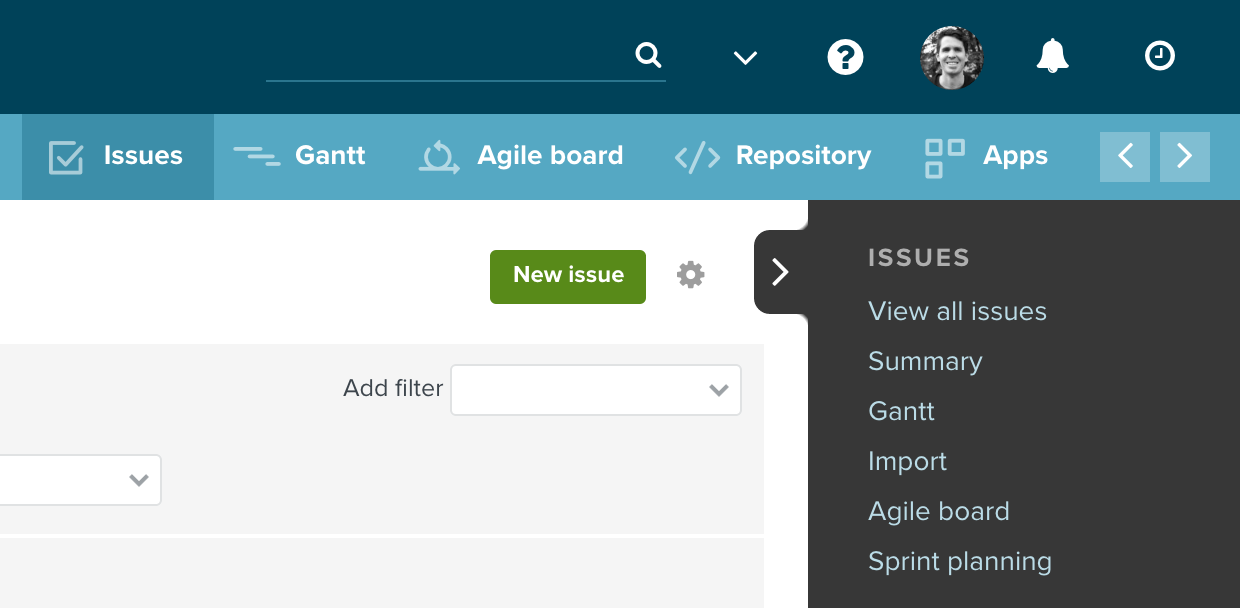
If you don't have any issues in your project, add some issues now. Then, once your project has issues, it's time to plan your next sprint. Go to your project's Agile board, then click on Sprint planning in the sidebar. Next, click on New Sprint.
Give a name to your new sprint such as Sprint #1 and set the start date. Now, you can drag an issue from the Issues without sprint column to the sprint you just created.
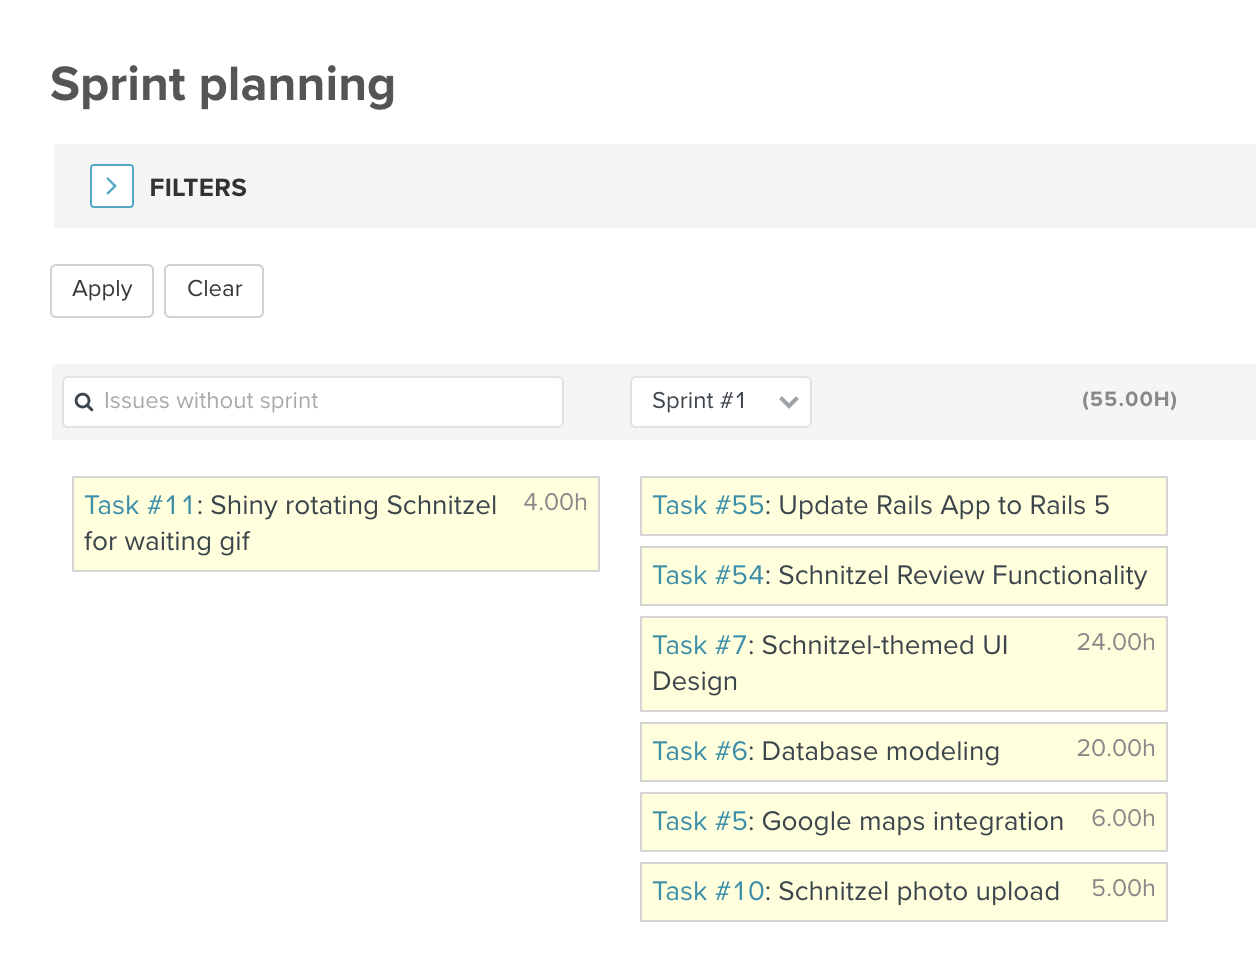
Click on Agile board in the navigation bar and you'll see the issues laid out on the Agile board. By default, you'll see all issues in the project, rather than just the issues for the current sprint.
Therefore, we'll create and save a filter for the current sprint. Click on Add filter in the top right-hand corner and select the Sprint/Milestone. Make sure the Sprint/Milestone is set to the current sprint and click Save.
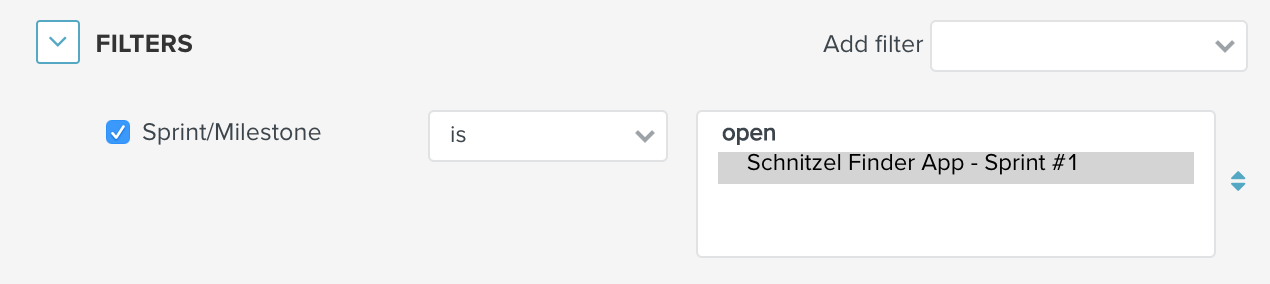
On the next page, you can name this filter, make it visible to all users and set it as the default board, so you don't have to select this filter each time.
It will appear in the right sidebar under My agile boards.
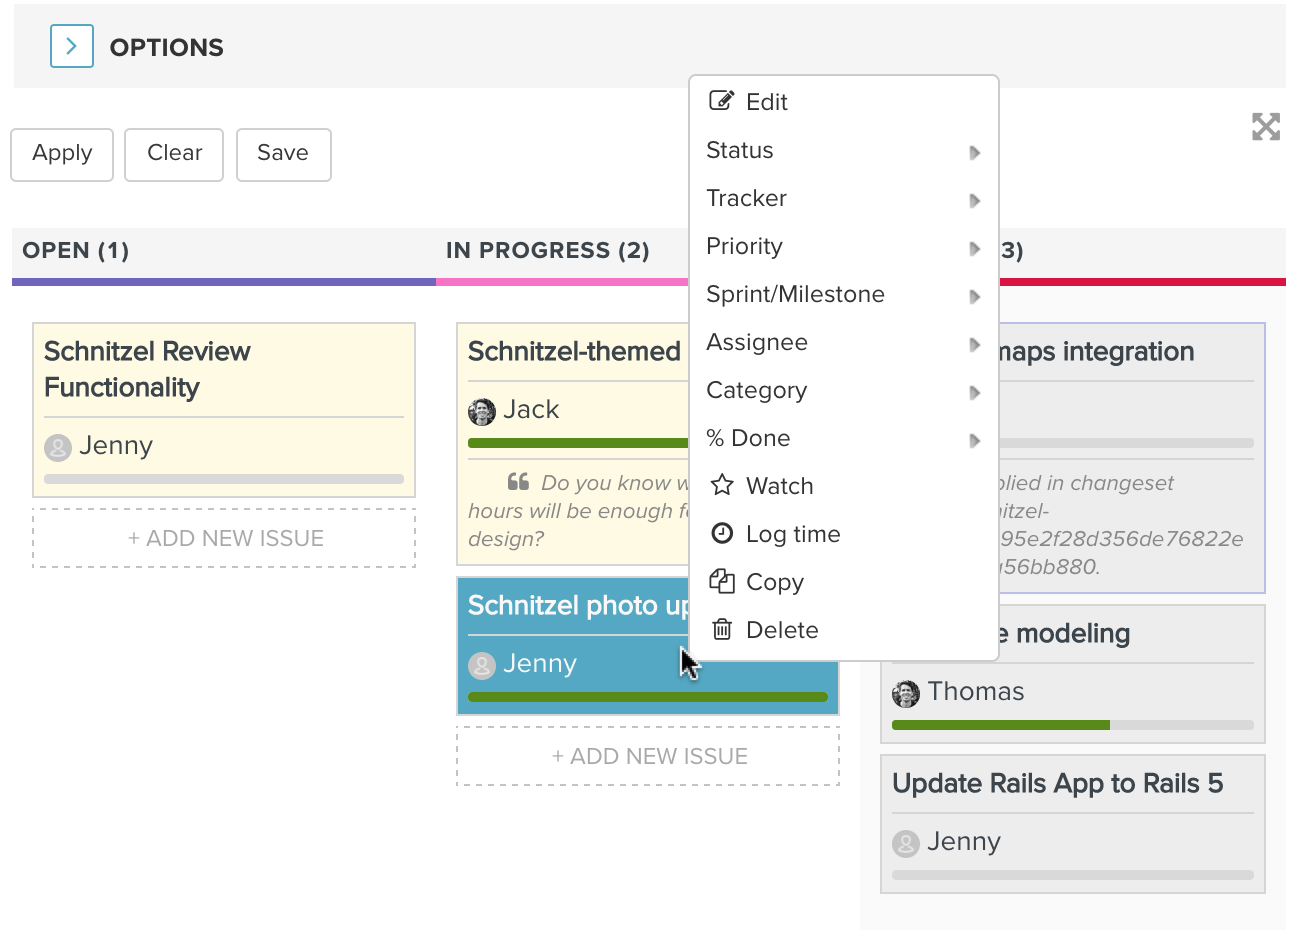
You can now drag and drop issues on your Agile board. You can also update items by right-clicking on them (Windows) or double-clicking on them (Mac).
Estimating stories in terms of hours can lead to unproductive discussions about the exact amount of time a story will take. Mike Cohn gives the example of two runners discussing how long a 5K run will take. For one it may be 25 minutes, whereas for someone else it may be 45 minutes. Everyone, however, can agree that a 5K run is much shorter than a marathon.
In a similar vein, story points let you move away from debating exactly how long a story will take and start talking about the relative investment for each story. In order to avoid points just being seen as hours, some teams use the Fibonacci sequence of 0, 1, 2, 3, 5, 8, 13, 21, 34, 55, 89, etc. Therefore, instead of arguing over whether a story is a 7 or an 8, you can quickly agree that it’s more of an 8 than a 5, but not a 13-pointer.
In Planio, you can switch on story points by going to Administration -> Agile Board and selecting Story Points as the estimate units.

Then, select which trackers should use story points. For example, you could have a tracker called User Stories that is the only one that uses story points. Alternatively, you can use story points for all trackers.
Now, you’ll be able to assign story points to issues when you create them. You can display story points on cards on the Agile Board, and you can have story points as columns in the issue list. You'll also have story point burn-up and burn-down charts.
Click on Add filter, select Sprint/Milestone and set it to the current sprint, so you can see the charts as they relate to the current sprint.
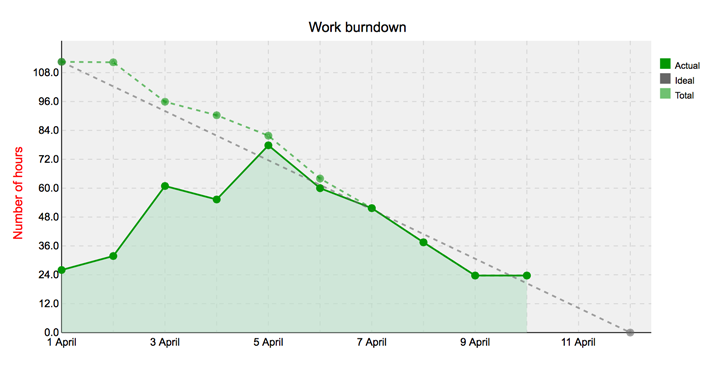
Burndown charts show you how a project is progressing. They highlight the impact of adding new feature requests, and they'll let you know if things aren't going according to plan.
The velocity chart shows you the output of a team per sprint.

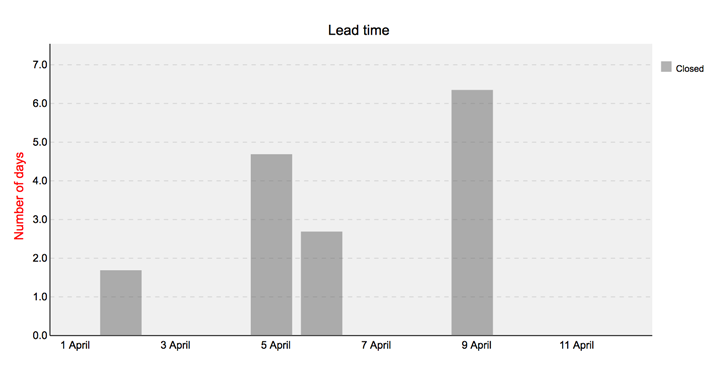
Lead time is the time between an issue being opened and being closed. Teams using a Kanban approach often favor this method over the velocity chart, and they'll focus on improving the lead time rather than velocity.
Cumulative flow shows how issues are 'flowing' through different statuses.
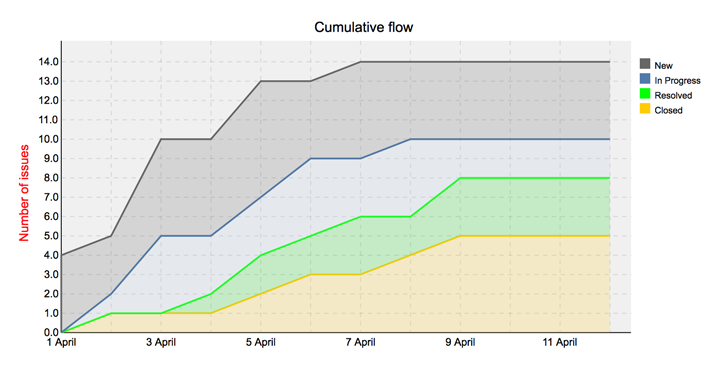
Cumulative flow charts help answer questions such as:
Updating or creating issues while traveling is quick and easy with Planio Inbox - all you need is email access (e.g., a smartphone) and an internet connection.
Each project is assigned a unique email address and every user that can create or update an issue in the browser can also do this via email.
This feature is available as standard in all accounts and projects at no extra cost. It is separate from our Pro Feature Planio Help Desk and works even if you don't have that installed.
Each user in Planio is assigned one or more roles in a project. These roles determine what rights (permissions) you have in your projects.
Usually you will have the permission to create and update issues in your projects and if that is the case, you can also do this via email. Most changes you can make to an issue in the browser, you can also do via email.
Therefore the general rule is:
If you can do it in the browser, you can do it via email. If you can't do it in the browser, you can't do it via email either.
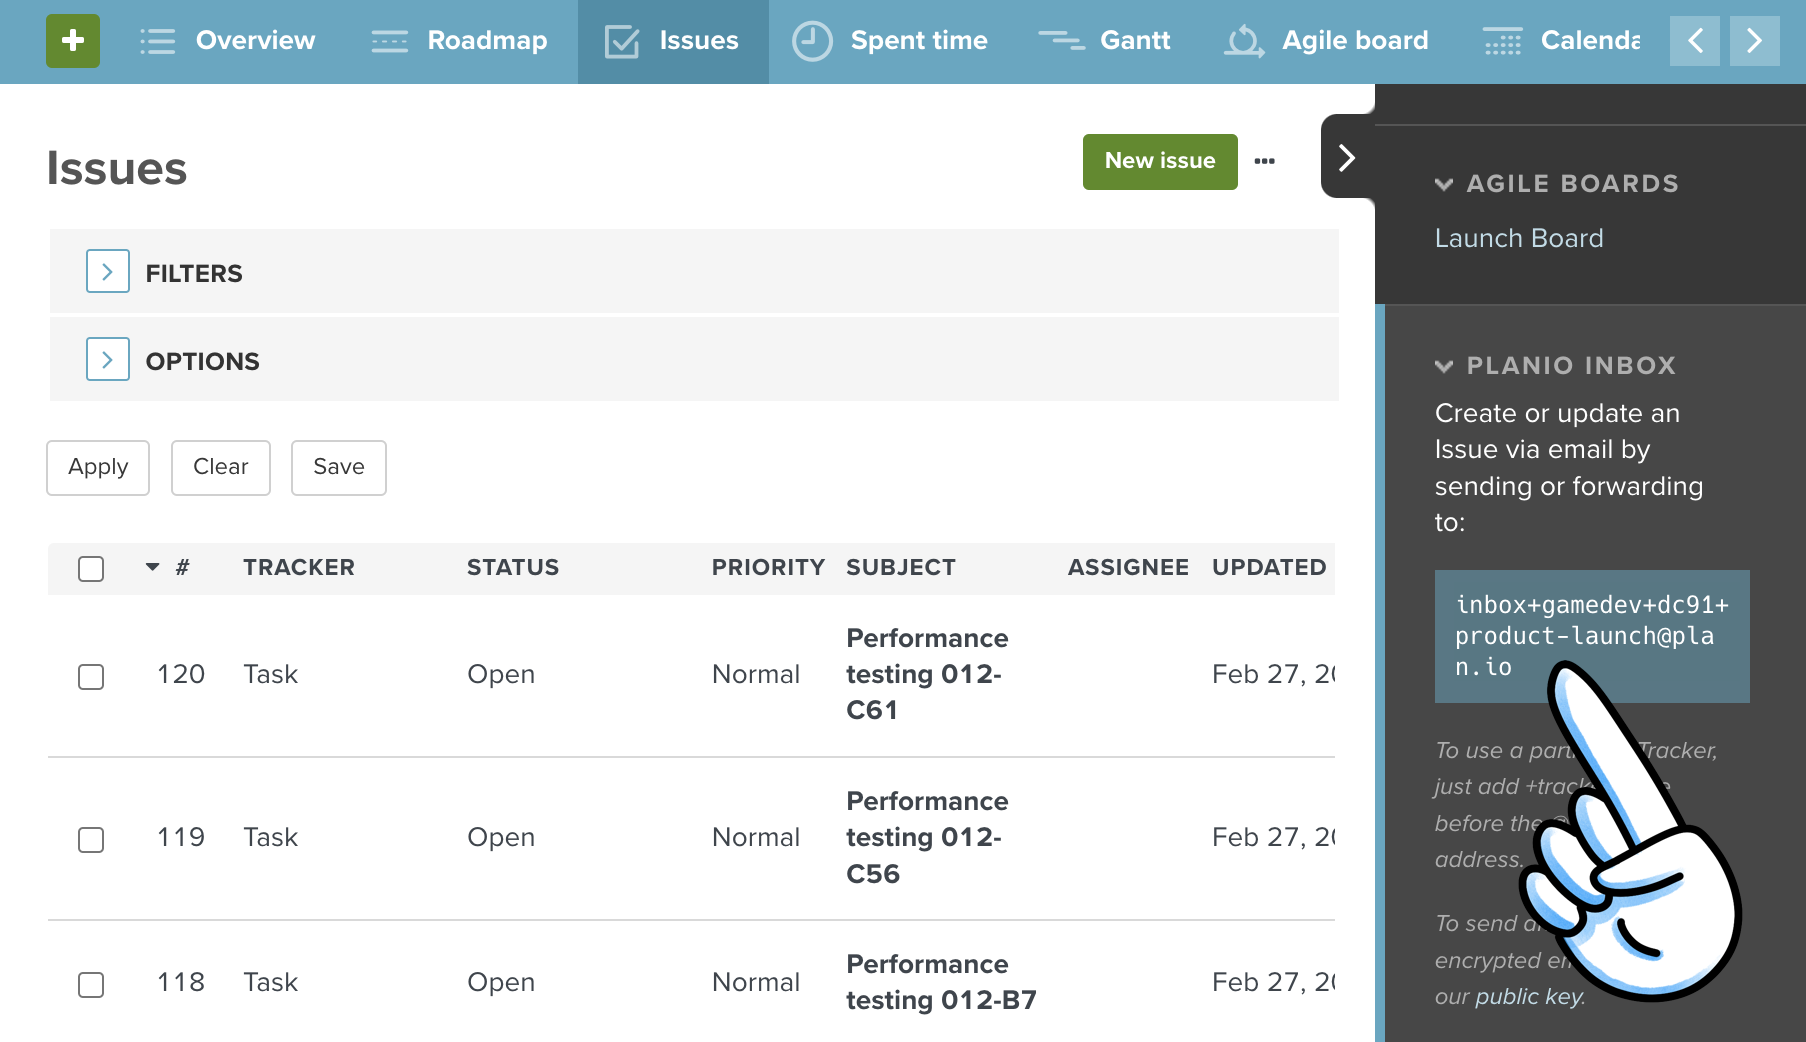
Once you have established that you can create or update issues in a project, you'll need to know what the project's Planio Inbox email address is. This can be found in the browser.
Go to the relevant project → Issues → and then open the side bar (black tab on the right hand side). Here you will see a title "PLANIO INBOX". In the blue box you'll find the email address or Inbox for that project → hover over it and copy it using the copy button that appears.
Go to your email provider or program and in the "To" Section, add the Planio inbox email address you just copied.
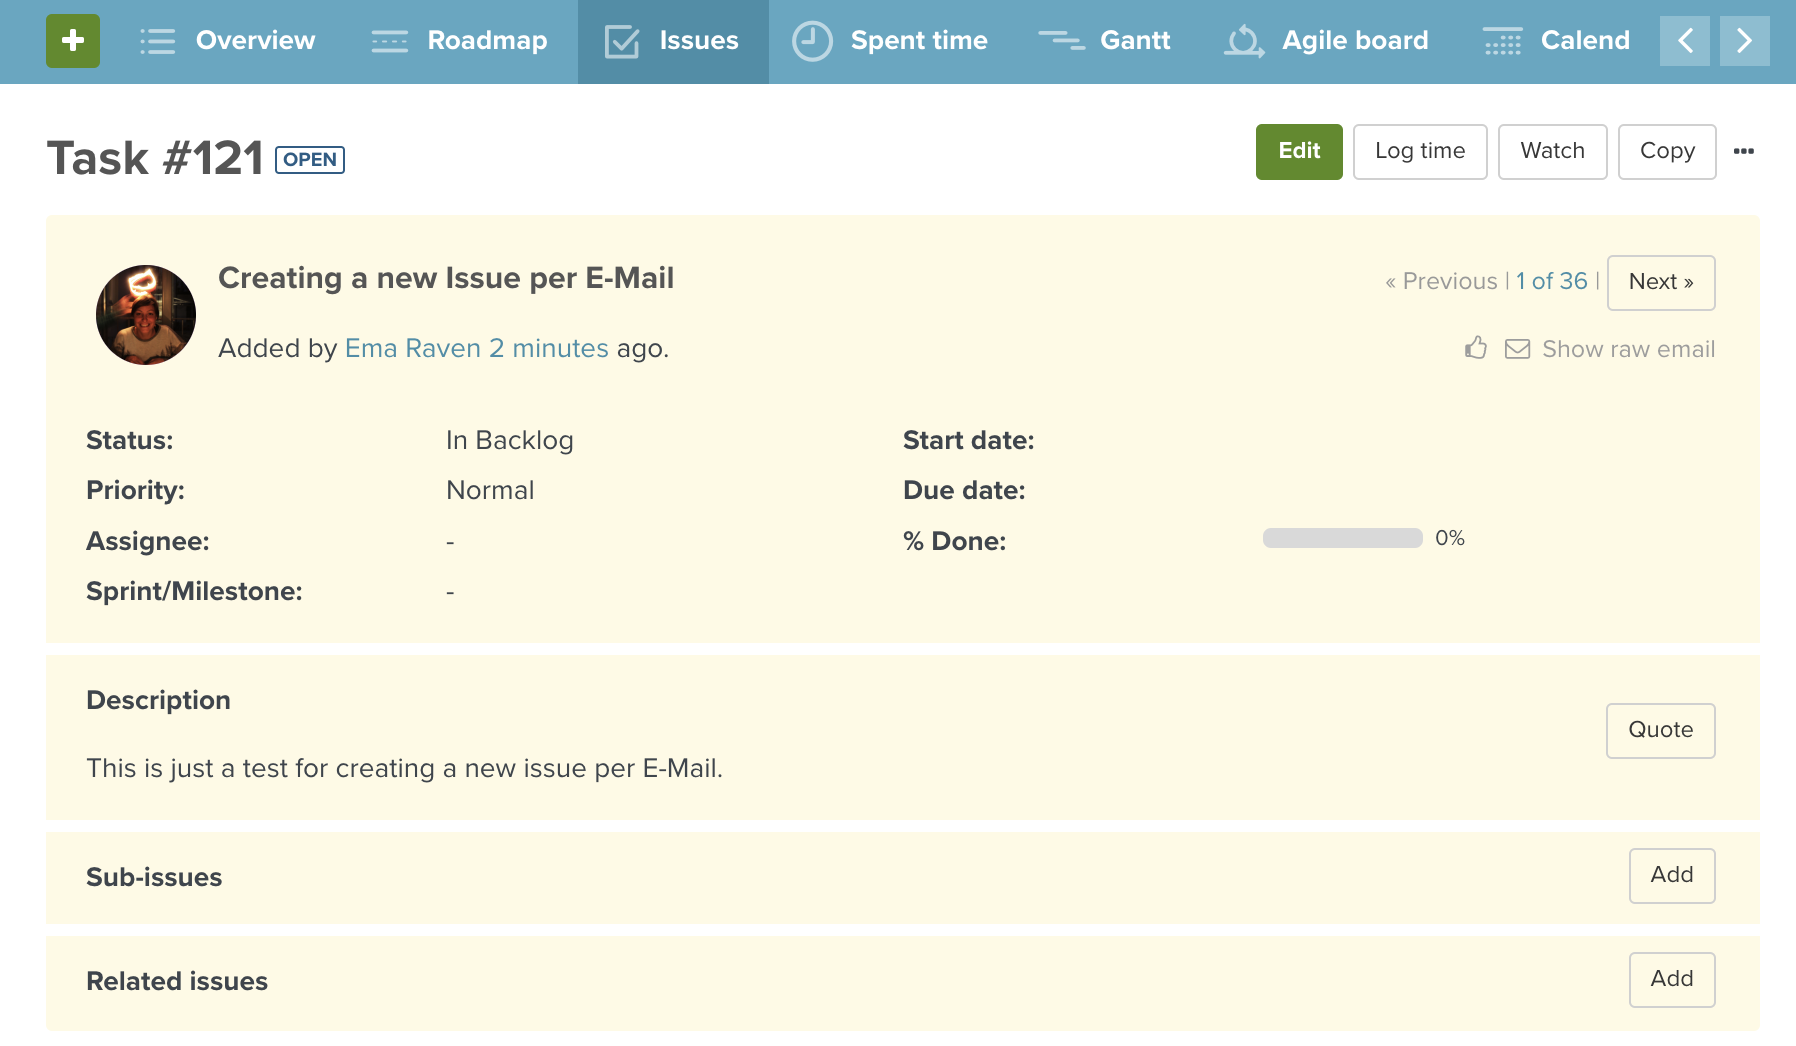
As you are creating a new issue, the email’s subject will be the issue subject. It will be automatically assigned an issue ID just as if you created the issue in the browser.
Remember to use the email address that you have registered to your user account in Planio. This is how Planio knows you are a user and member in that project and are allowed to create issues at all. If you use an email address that is not registered in your account, then Planio will reject the email. (If you are using multiple different email addresses for sending frequently, consider adding them all via your avatar → My account → Emails)
The issue that is created will have your user as the Author.
If you write anything in the body of the email it will become the Description of the issue.
The body of the email can also be used to specify all task fields, such as Status, Priority, custom fields etc.
There are a few rules however to make this work:
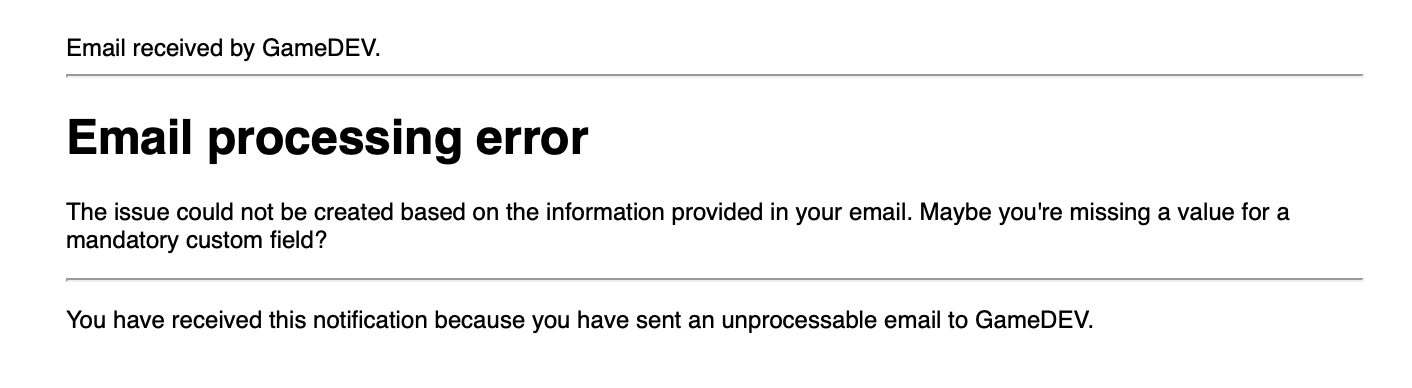
Field Name: Field Value", for example: "Status: In Progress"★ Tip! If you have done something wrong (e.g. forgotten to fill out a required field or made a typo), Planio will send an auto reply email back to you saying the mail could not be delivered. ★
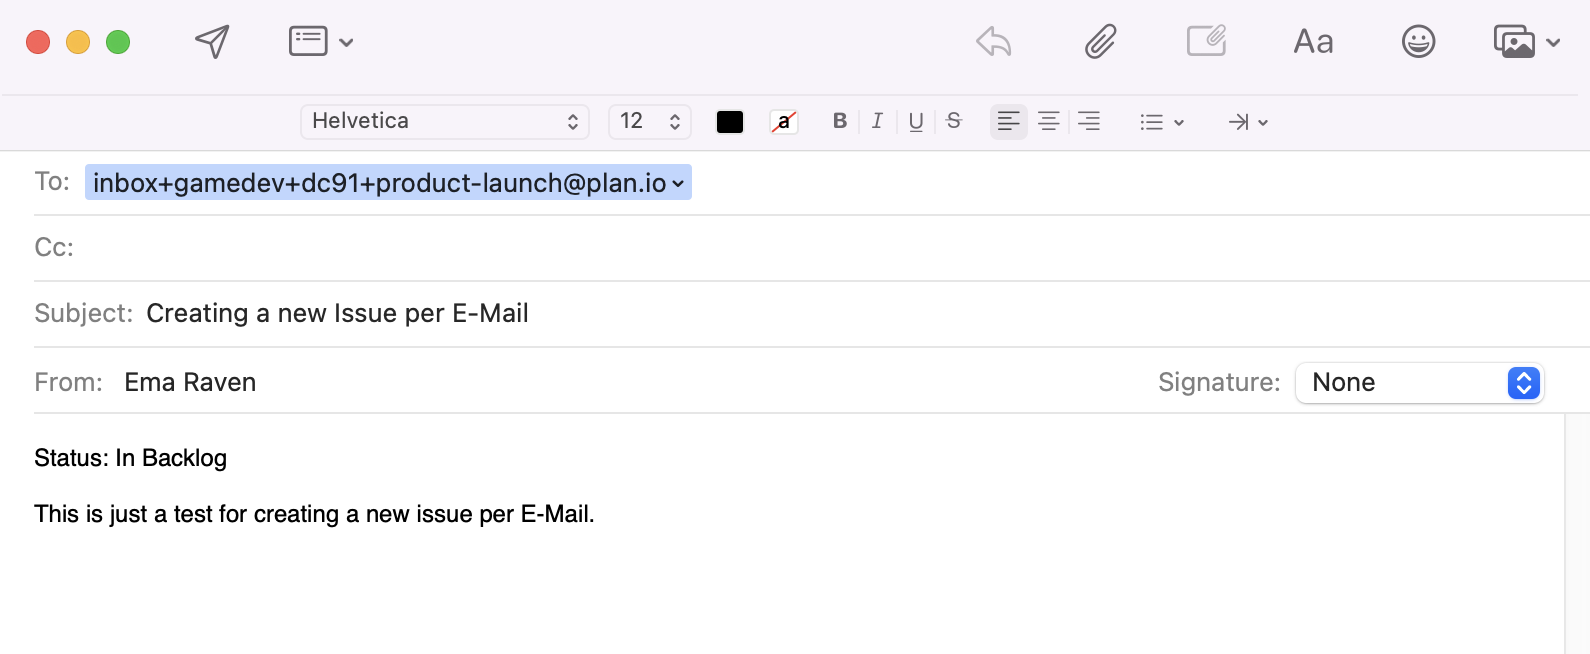
If you don't use the body to change any fields, all standard settings will be used. We'll talk a little more about standard settings in the Hints, Tips, and Troubleshooting section below.
This works just the same as creating a new issue but with some slight changes.
Go to your email provider or program and in the "To" Section, add the Planio inbox address you copied earlier.
As you are updating an issue, the email’s subject must contain the issue ID you want to update. This way Planio knows what issue to update. To make sure Planio recognises it as a Planio issue ID it must be written with a Hashtag before the digits and inside square brackets like so: [#12345]
If you write anything in the body of the email it will become the Notes of that update.
As with creating a new issue, the body of the email can also be used to specify all issue fields, such as Status, Priority, custom fields etc. If you don't use the body to change any fields, no further changes will be made in the issue.
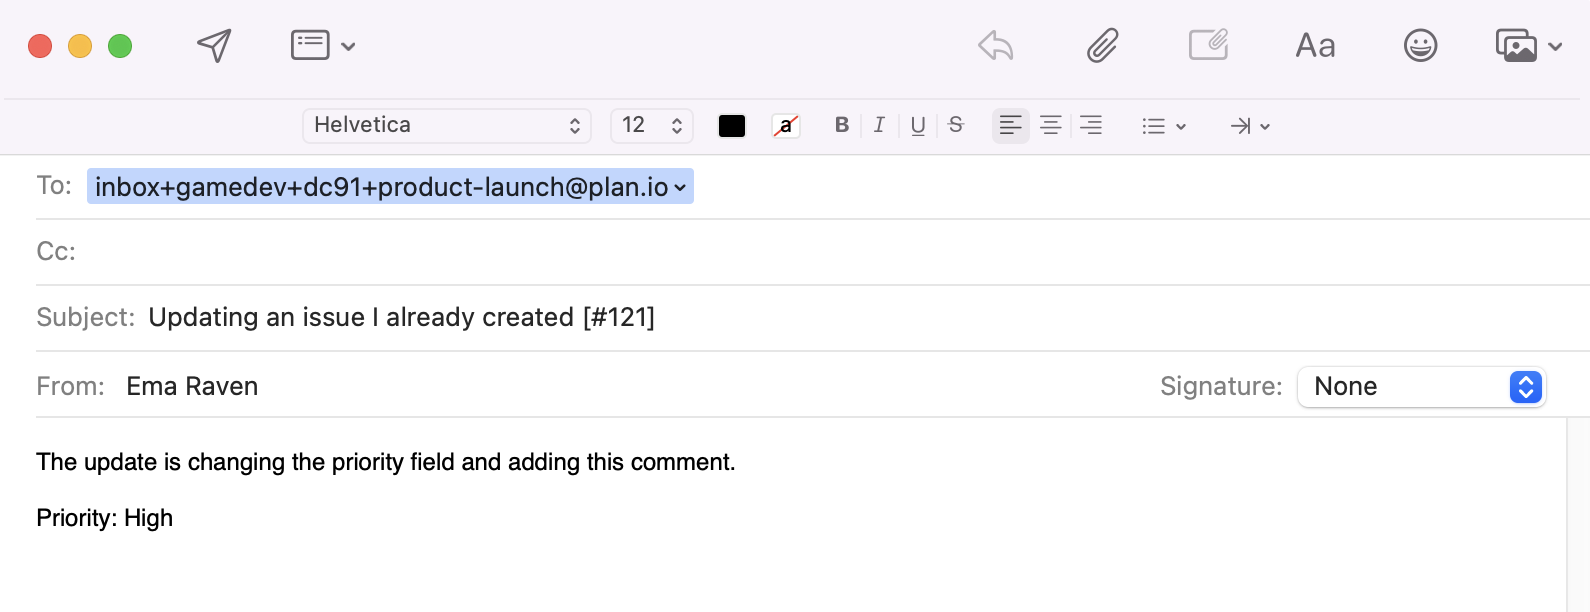
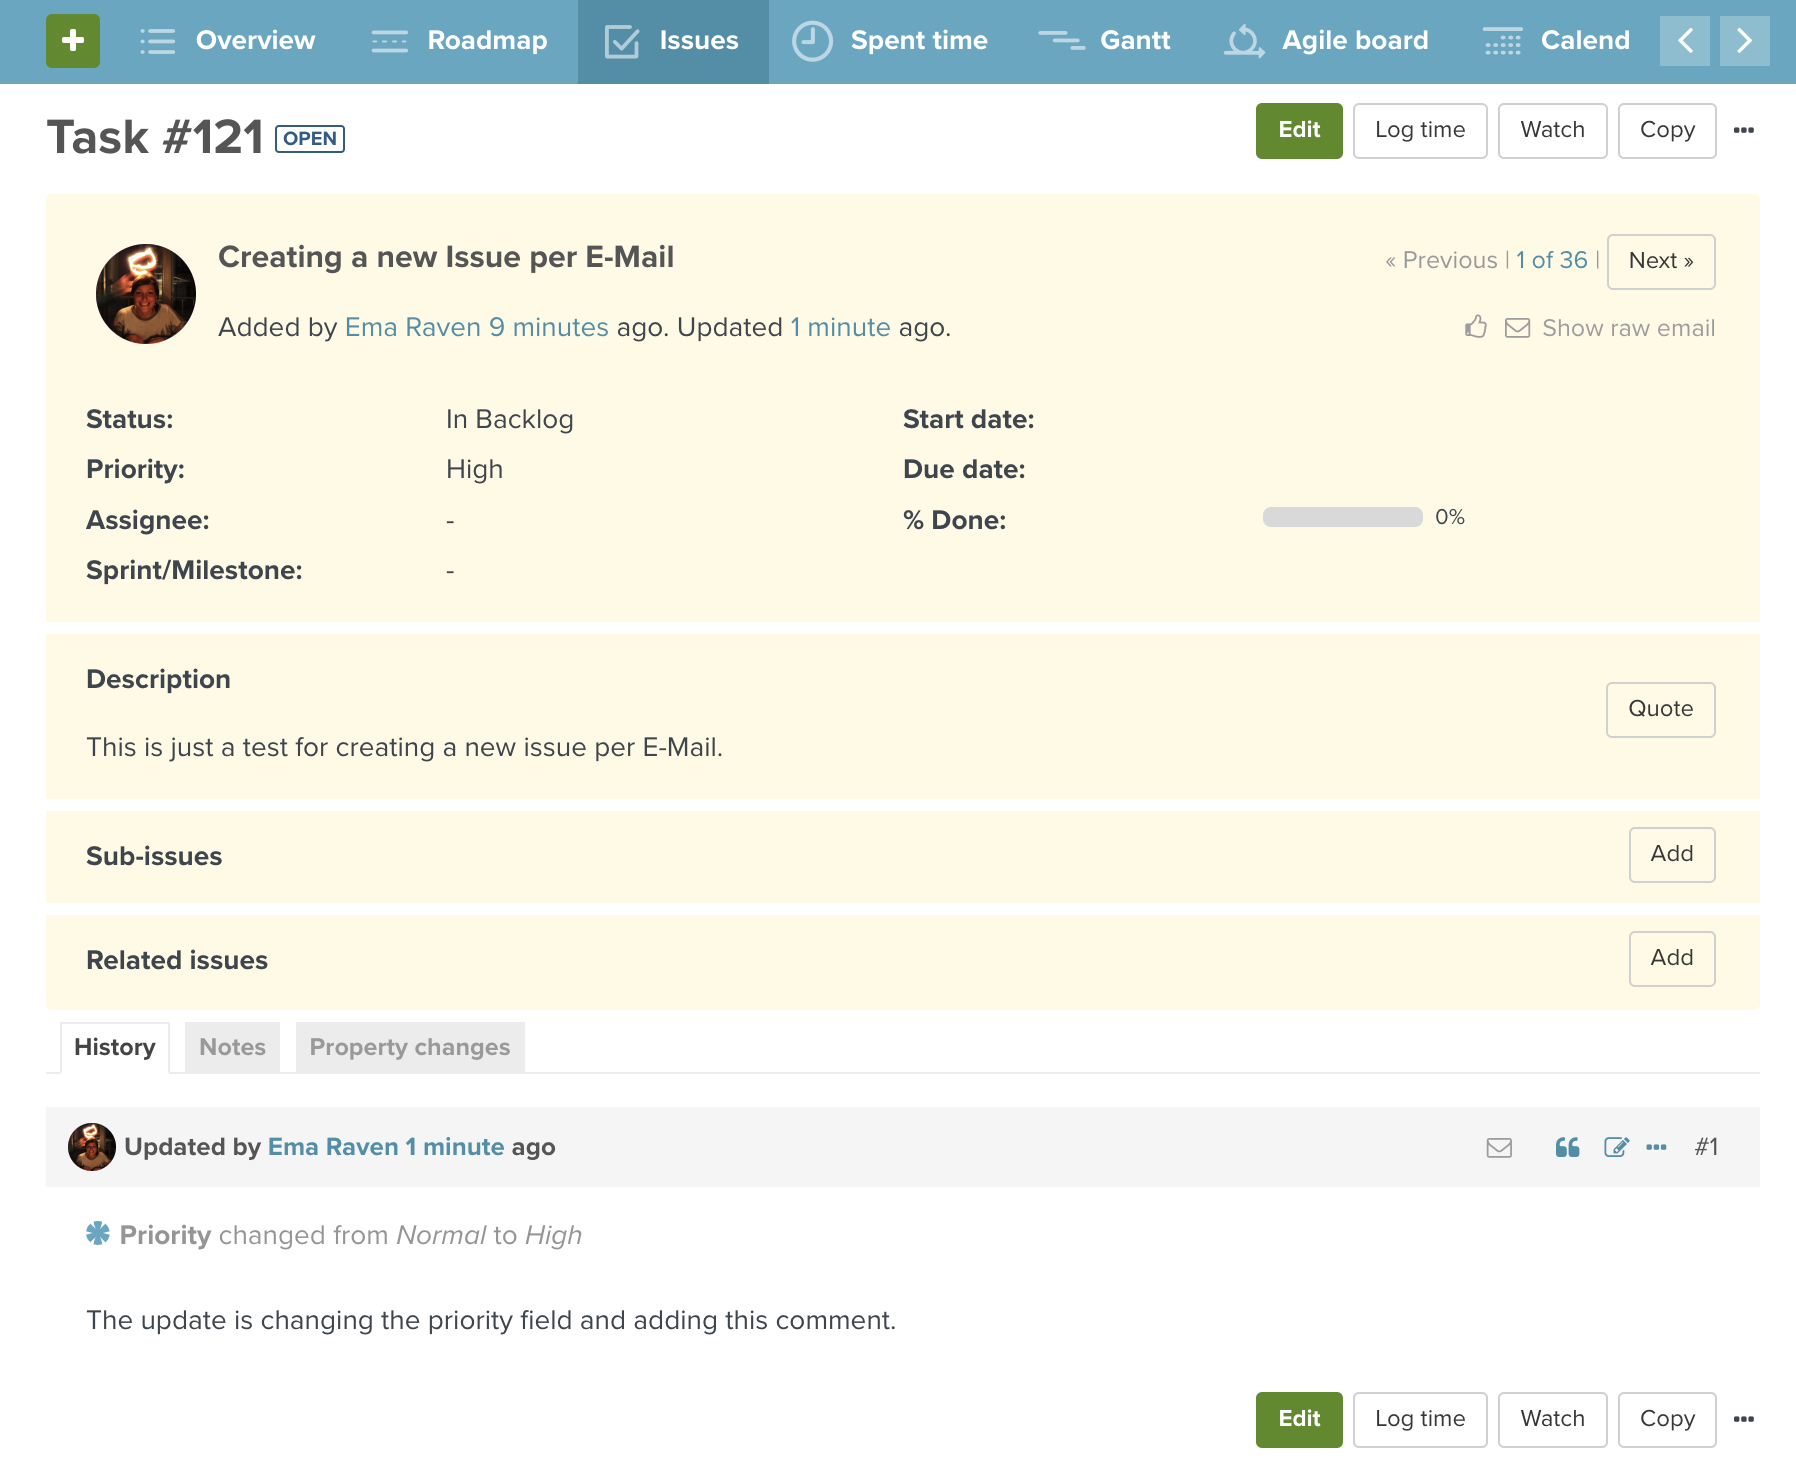
If you have Planio email notifications set up, you receive emails for issue updates to your inbox. In cases where they refer to a single issue you can simply click Reply in your email program to update that issue in Planio via email. As the issue already exists, you will be updating the issue and you can follow the instructions from section 3b.
Here is a useful list for filling out valid fields via email:
| Field name | Valid Value Formats | Example | |||
|---|---|---|---|---|---|
| Project | → | Exact project name | Product Launch |
||
| Tracker | → | Exact tracker name | Bug |
||
| Assignee | → | Full name Email address Login |
Ema Ravenraven@example.comEraven
|
||
| Priority | → | Exact priority name | High |
||
| Category | → | Exact category name | Development |
||
| Start Date | → | Correct format | YYYY-MM-DD | ||
| Due Date | → | Correct format | YYYY-MM-DD | ||
| Estimated hours | → | Whole number Decimal number |
11.5 or 1,5
|
||
| % Done | → | Whole number | 50 |
||
| Parent issue | → | Issue ID | 123 |
||
| Private issue flag | → | For private For not private |
1, yes, Yes0, No, no
|
||
| Files | → | Add an attachment to upload a file to the issue |
|||
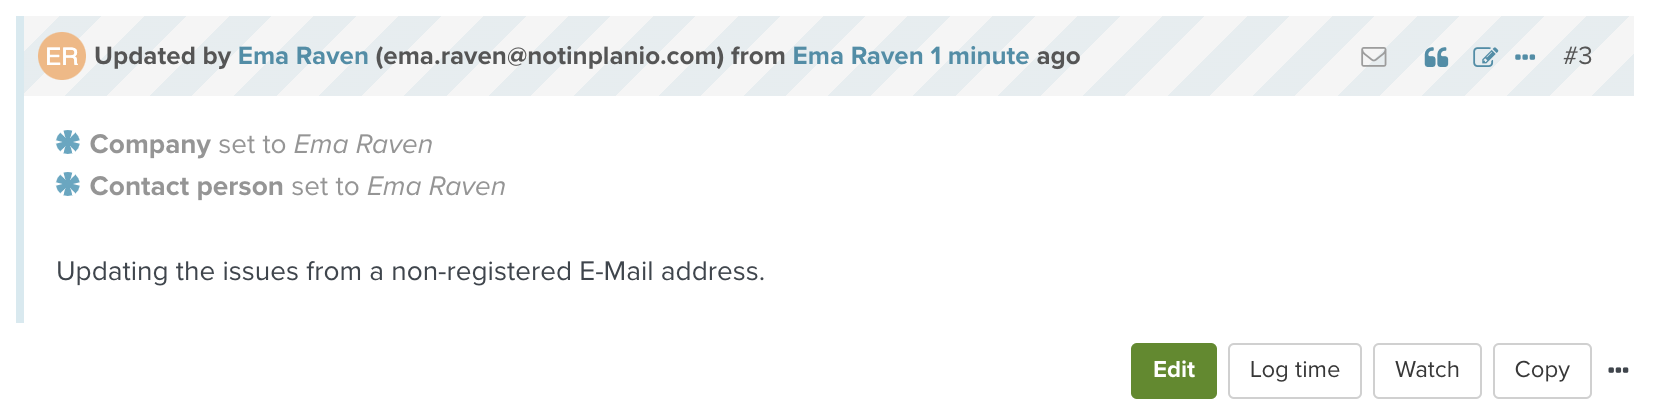
| Watchers | → | Add registered email addresses in CC to add them as watchers. If the email address can be matched to a user, who has no permissions to see the issue, see the field "Company and Contact person" | |||
| Company and Contact person | → | If Help Desk is installed, non-user email addresses in CC will be added with an automatically generated (or already existing) company name and adjoining contact person (with the email address). This is also automatically saved in your "contacts" tab in that project. Email addresses that can be matched to a user, but do not have permissions to see the issue will be added as a company and contact instead of a watcher. | |||
| Files | → | Files can only be added but not deleted or edited via email | |||
| Checklist | → | Not editable via email | |||
| Color | → | Not editable via email | |||
| Story points | → | Not editable via email | |||
| Spent time | → | Not editable via email | |||
| Activity | → | Not editable via email | |||
| Comment (LOG TIME) | → | Not editable via email | |||
Custom Fields
You can also fill out your custom fields via email. Depending on the format of the custom field, you can use the following values:
| Format | Valid Value | |
|---|---|---|
| User | → | See "Assignee" |
| Date | → | YYYY-MM-DD |
| File | → | You can't add a file to a file custom field |
| Text | → | Any free text |
| Long text | → | Any free text |
| List | → | Exact list value |
| Link | → | Any free text |
| Integer | → | Any whole number |
| Float | → | Any whole number or decimal number |
| Boolean | → |
1, yes, Yes or 0, No, no
|
| Sprint Milestone | → | Exact existing Sprint/Milestone |
| Key/value list | → | Exact key value |
→ In the sidebar it says you can set the tracker via email. How does that work? It is true! To make an update or create a new issue with a certain tracker, there are two options. You can either use the syntax we talked about before (Tracker: Bug in the email body) or you can edit the project email address to include the relevant tracker; just add +Trackername before the @ sign. For example inbox+gamedev+dc91+product-launch+bug@example.io
→ I didn't use my official email address so why was an issue created anyway? This can happen if Planio Help Desk is switched on for that project. Plano Help Desk allows for non-registered users to send an email to the project inbox and create or add notes to issues. However that is all you can do - it is not possible to update fields if you are using a non-registered email address. To learn more about Planio Help Desk, take a look here. An email or update from a non-registered email address will have a blue striped header and a blue vertical line on the left hand side.
→ I am using my registered email address so why am I still getting an email saying the email couldn't be delivered? That is usually because you aren't filling out a field that is mandatory. Sometimes there are fields that must be filled out in order to create or update an issue. This is the same in the browser. In Planio you can identify a required field by the small red * next to the field name. Just as in the browser, you will have to fill out the field in the email using the format we talked about above.
→ I can update via email in one project but not the other. Why? You can have different roles in each project and therefore different permissions in each project. Therefore what you may be able to do in one project, doesn't mean you can do it in all projects.
→ Why didn't I get an Auto-Reply email? When creating or updating an issue via email, it works just as if you were doing it in the browser. Auto-Replies are part of the Help Desk feature and only for non users or non-members. As you are a user and member in the project, you would get a Planio notification instead, so long as your notification settings are set up for that.
→ My account is not in English. Can I use my own language to set the fields? You can can always use the English field names, plus the names in the selected language within your avatar → My account.
→ What are the standard settings used if I don't set fields in the email body? Every issue in Planio has to have at least a tracker, status and priority. An administrator will have determined already what they should be when creating a new issue. You can see what they are by creating a new issue in the browser and looking at what is automatically filled out in those fields. If you send an email without setting a field, these are the field values that Planio will use.
If you get stuck when using Planio Inbox in your account, have any other questions, or just want to know more, please don’t hesitate to contact our super friendly support staff.
This is a guide on how you can import contacts and companies from Comma Separated Values (CSV) files using the importer in Planio. You'll be able to move data between different software packages easily.
There are two steps to this process. First, you need to prepare a CSV file for import. Second, you have to carry out the import. We’ll cover both in this guide.
You need to export your contacts in the CSV format. Most contact databases provide one way or another to do so. If you're managing addresses using Excel sheets, you can create a CSV file by clicking on File -> Save As… and then selecting Comma Separated Values as the format from the drop-down menu.
Your CSV file can have the following headers. You’ll find a sample CSV file here: example.csv. Each row corresponds to a newly created contact.
| Values | Notes |
|---|---|
| Company fields | |
| Name | Enter the company name of a company, which is already stored within your Planio project. This field is optional. Alternatively, you may select a pre-existing company for all new contacts when configuring the import. |
| Contact fields | |
| Gender/Salutation | Use either m of f to indicate the person's gender. Alternatively provide commonly used salutations like "Mr." or "Mrs." |
| First name | Enter the contact's first name |
| Last name | This field contains the family name of the person. |
| Email address(es) | You may provide up to three separate columns of email addresses. |
| Phone Number(s) | Enter up to three phone/fax numbers. Enter the type of phone separately from the actual phone number. Planio knows the following kinds of phone numbers: "Work", "Home", "Mobile", "Work Fax", "Home Fax", "Pager", and "Other" |
If you wish to create companies along side contacts, you can select "Create missing values". Then you'll be able to also import further information about the company.
Please note: When importing companies, the importer will not overwrite information within existing companies. If the imported attributes differ from previously stored values, a new company with the same name will be created instead. You may later merge these duplicates, if need be.
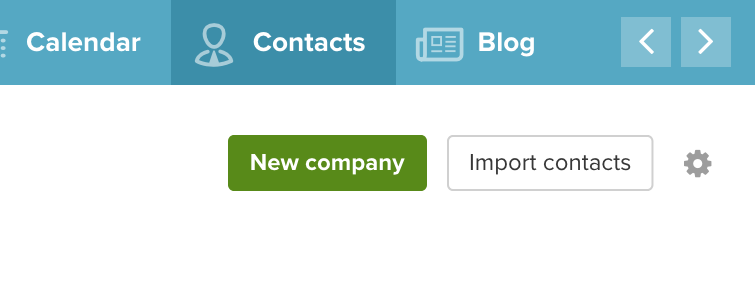
Now, you have a CSV file ready for import. The next step is to import it into Planio. You’ll find the button for the Import in the top right corner on the overall contacts page.
Then, select your CSV file using the file picker.

On the next page, you can select options for importing the CSV File
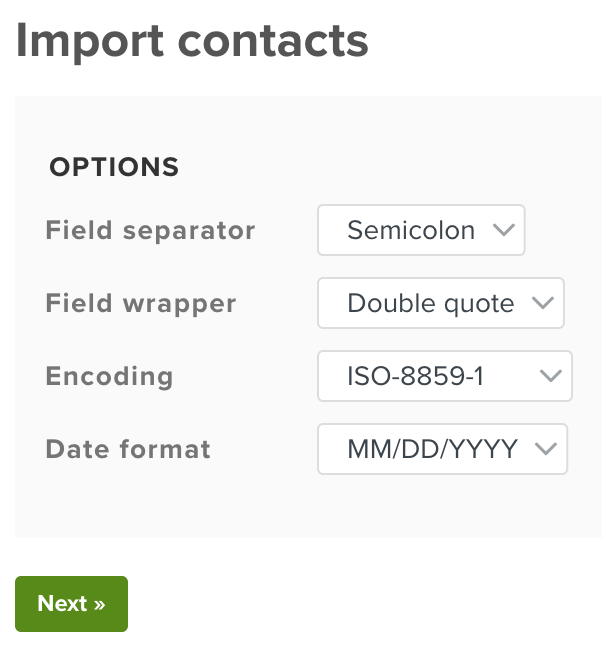
| Option | Notes |
|---|---|
| Field separator | You can select between comma separated values or semicolon separated values |
| Field wrapper | You can select between double quotes or single quotes. |
| Encoding | You can select the encoding for the CSV file |
| Date format | You can select one of five date formats (YYYY-MM-DD, DD/MM/YYYY, MM/DD/YYY, DD.MM.YYY or DD-MM-YYYY) |
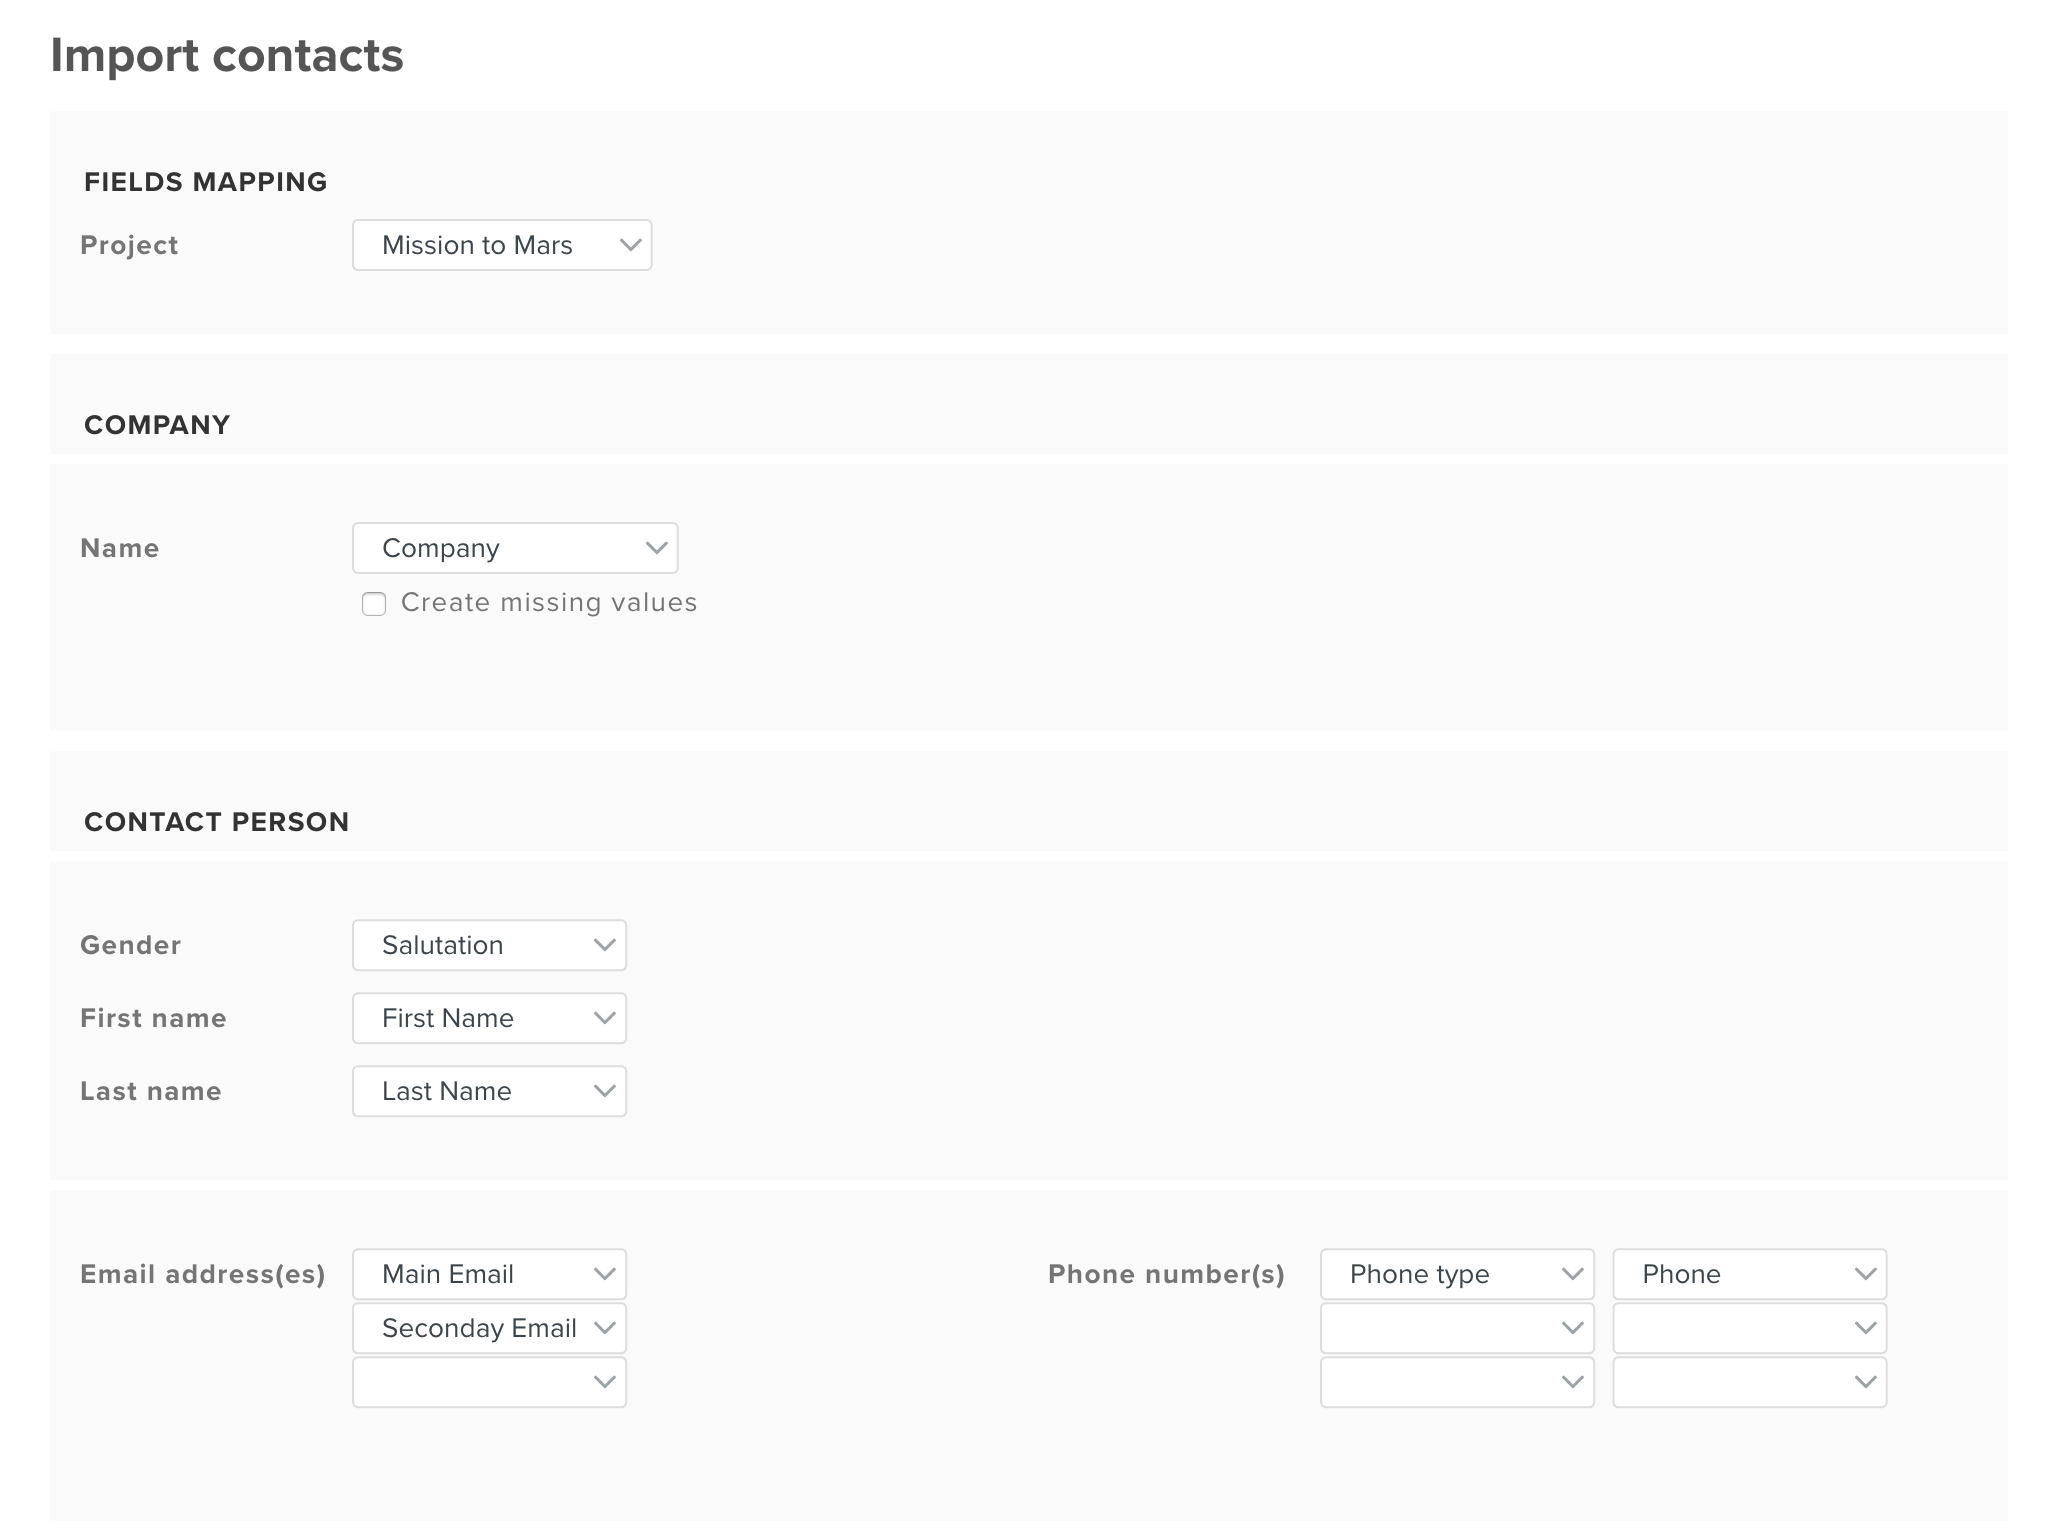
First you have to select a target project for the import. Then, you have to map the values from the CSV files to contact fields in Planio. You can select each value from the drop-down menu beside each attribute. You’ll also see a file content preview further down, so you can make sure you’re importing the right data.
Once you’re done assigning the values to each field, you can click on import to start the import.
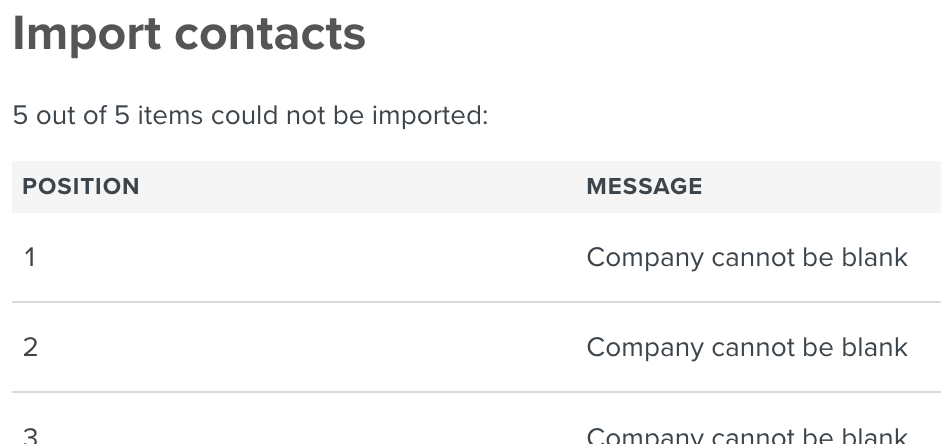
If you encounter any problems, you'll see a page with the errors and the import will not be carried out. You can restart the import once you've fixed the problems in the CSV file.
If all goes well, you’ll see a list of the imported contacts.

That's how you can import companies and contacts into Planio using the CSV importer.
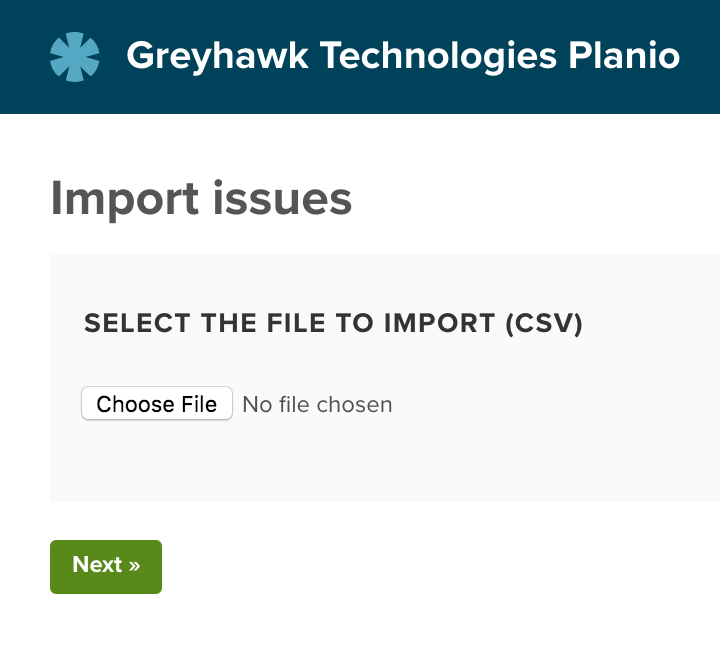
This is a guide on how you can import tasks, issues, tickets or stories from Comma Separated Values (CSV) files using the importer in Planio. You'll be able to move data between different software packages easily. For instance, you could plan a project in Microsoft Project, and then you could import all the tasks into Planio as issues.
There are two steps to this process. First, you need to prepare a CSV file for import. Second, you have to carry out the import. We’ll cover both in this guide.
You need to export your tasks, issues or tickets in the CSV format. You can save most Excel sheets as CSV files by clicking on File -> Save As… and then selecting Comma Separated Values as the format from the drop-down menu.
Your CSV file can have the following headers. You’ll find a sample CSV file here: example.csv.
| Values | Notes |
|---|---|
| Tracker | The tracker of the issue. This is needs to map a name of an existing tracker in your project. You’ll find their names in Administration -> Trackers. If you don't provide this column within the CSV, you may select a tracker for all new issues during the import. |
| Status | The status of the issue. This is needs to map a name of an existing status available for the selected tracker. You’ll find their names in Administration -> Issue statuses. If you don't provide this column within the CSV, the default status will be used. |
| Subject | The subject of the issue. This is required |
| Description | Enter the text describing the issue. |
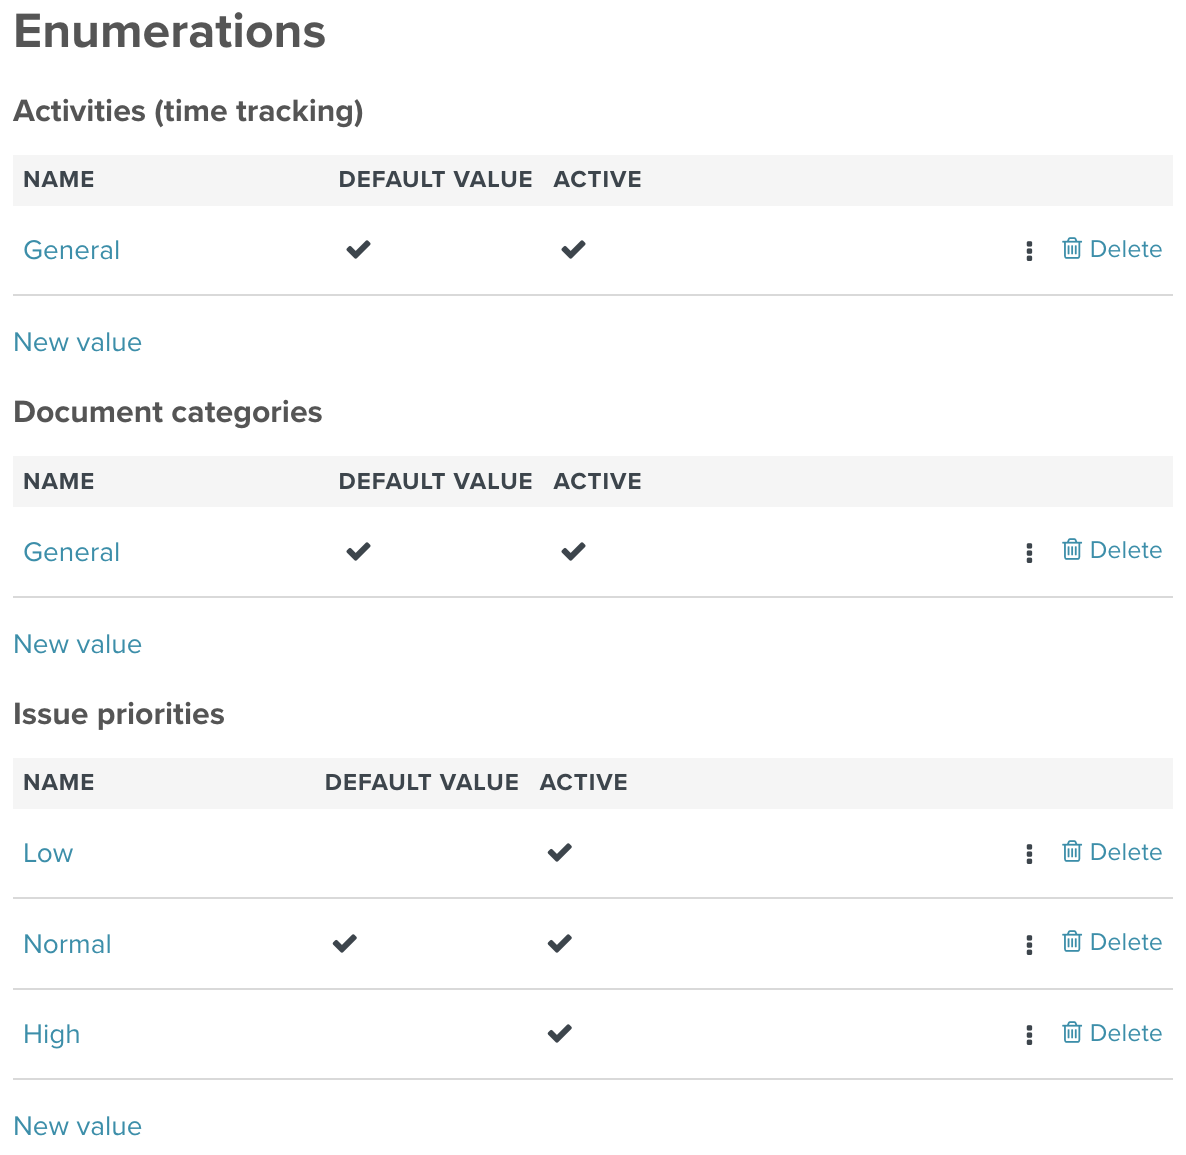
| Priority | Enter the name of one of the priorities listed in your Planio account. You’ll find their names in Administration -> Enumerations |
| Category | The category of the issue. New categories may created automatically during the import, if need be. |
| Assignee | Enter the First and Last Name, login or email of the person to whom you want to assign the issue. You’ll find those details in Administration -> Users. Make sure the person is a member of the project before assigning them issues via the importer. |
| Sprint/Milestone | Enter the name of the milestone or sprint to which the issue should be assigned. New sprints/milestones may be created automatically during the import, if need be. |
| Private | This selects whether the issue will be private for the assignee or not. Enter 1 to make the issue private or 0 otherwise. |
| Start date | Enter the start date in your preferred date format (e.g. MM/DD/YYYY or DD.MM.YYYY). |
| Due date | Enter the due date in your preferred date format (e.g. MM/DD/YYYY or DD.MM.YYYY). |
| Estimated time | Enter a number for the estimated number of hours (e.g. 15). |
| % Done | Enter a number for the percentage done (e.g. 27). |
Please note: You may also import issue relations. This topic is covered below.
Now, you have a CSV file ready for import. The next step is to import it into Planio. You’ll find the button for the Import on the issues page in the sidebar.
Then, select your CSV file using the file picker.
On the next page, you can select options for importing the CSV File
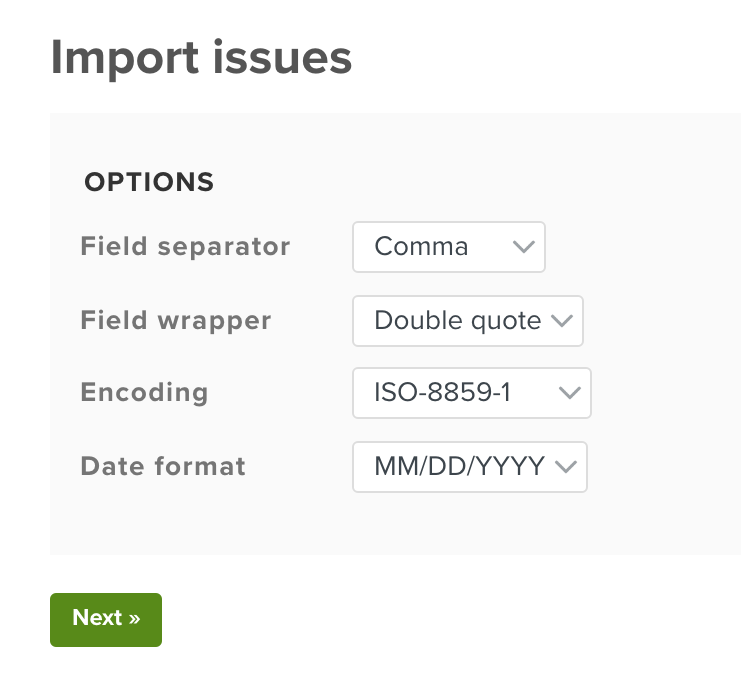
| Option | Notes |
|---|---|
| Field separator | You can select between comma separated values or semicolon separated values |
| Field wrapper | You can select between double quotes or single quotes. |
| Encoding | You can select the encoding for the CSV file |
| Date format | You can select one of five date formats (YYYY-MM-DD, DD/MM/YYYY, MM/DD/YYY, DD.MM.YYY or DD-MM-YYYY) |
First you have to select a target project for the import. Then, you have to map the values from the CSV files to issue fields in Planio. You can select each value from the drop-down menu beside each attribute. You’ll also see a file content preview further down, so you can make sure you’re importing the right data.

Once you’re done assigning the values to each field, you can click on import to start the import.
If you encounter any issues, you'll see a page with the errors and the import will not be carried out. You can restart the import once you've fixed the problems in the CSV file.

If all goes well, you’ll see a list of the imported issues.
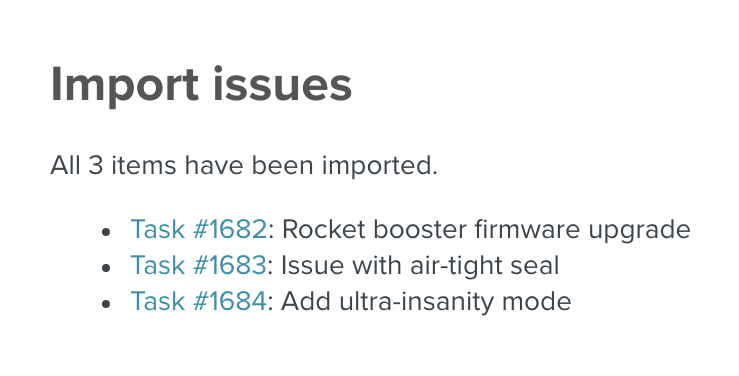
That's how you can import tasks, issues, bugs or stories into Planio using the CSV importer.
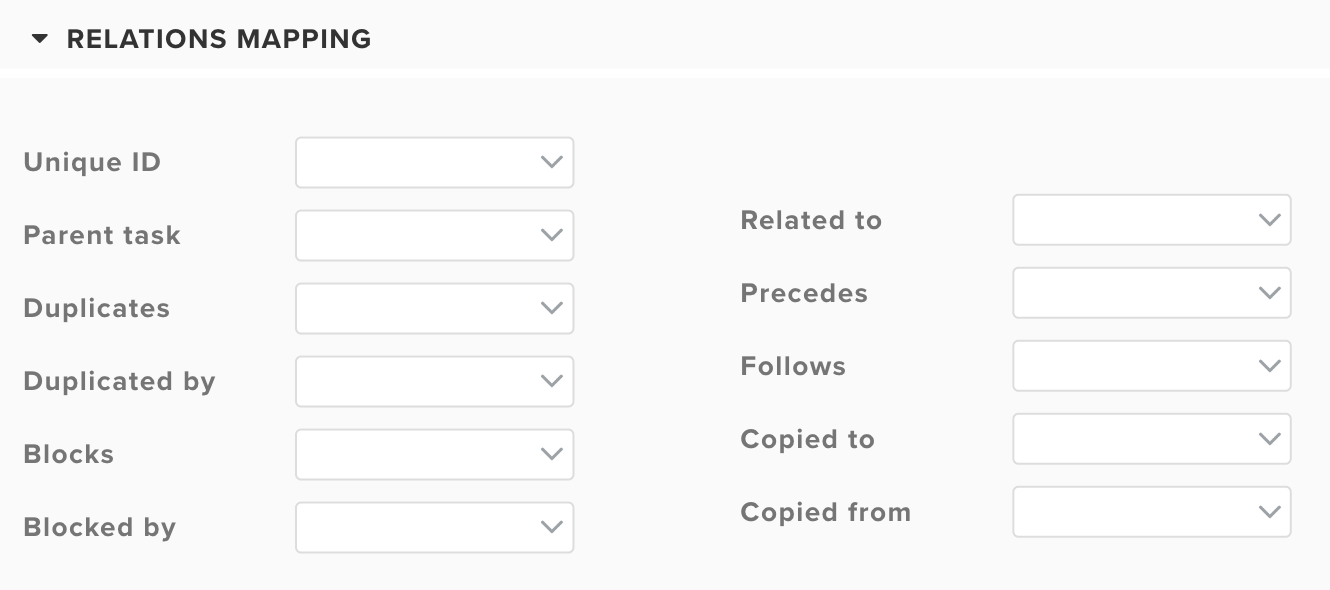
The issue import may also set up issue hierarchies as well as any other issue relation supported by Planio. You may store the relationship information in dedicated columns within your CSV file.
Issue hierarchies may be specified via a parent issue column. Each issue may have exactly on parent issue. To reference already existing issues within your projects, you may use the issue number with a # in front, e.g. #13. To reference issues, which are part of the same CSV, you may either use the row number or you may specify a special "Unique ID" column, which contains the reference text.
Referencing existing issues
| Subject | Parent ID |
|---|---|
| Rocket booster firmware upgrade | #13 |
| Attach booster to rocket | #13 |
Issue #13 would have been created before the import.
Referencing new issues via row number
| Subject | Parent ID |
|---|---|
| Install new rocket booster | |
| Rocket booster firmware upgrade | 1 |
| Attach booster to rocket | 1 |
Please note, that numbering starts with the first non-header row.
Referencing new issues via Unique ID column
| ID | Subject | Parent ID |
|---|---|---|
| ROCKET-101 | Install new rocket booster | |
| ROCKET-201 | Rocket booster firmware upgrade | ROCKET-101 |
| ROCKET-202 | Attach booster to rocket | ROCKET-101 |
Please be aware, that the unique ID may not start with a # sign. Otherwise it would be mistaken for a reference to an existing issue.
Planio supports the following issue relations:
Each issue may be part of many relations, although there are logical restrictions, e.g. an issue cannot block a preceding task. Each relation type should be presented in a different column within the CSV. You may reference other issues using the same three techniques mentioned above. Multiple relations of the same type should be separated by comma.
Please be aware, when using a dedicated Unique ID column, that said ID may not contain commas, since that is used as a separator.
For the follows and precedes relation, you may also add the delay incorporated.
Example defining relations with delay
| ID | Subject | Blocked by | Follows |
|---|---|---|---|
| ROCKET-201 | Rocket booster firmware upgrade | ||
| ROCKET-202 | Paint rocket red | ||
| ROCKET-203 | Attach booster to rocket | ROCKET-201 | ROCKET-202 2d |
The booster may only be attached after the firmware was upgraded and after the paint dried for two day.
Follow the steps described above. When mapping the values from the CSV files to issue fields in Planio, you may also define, which CSV column contains defines which issue relation. When selecting a column for Unique ID, it is assumed, that you're using these value to reference other issues. If that mapping is left blank, it is assumed that row numbers are used.
The rest of the import works as described above.
redmine_directory/files/yyyy/mm/.plugins directory of your Redmine setup if you want to continue using them.bundle install command from the initial setup)At this point you should have a working Redmine with your Planio data and optional Agile and Checklists plugins.
The following modules are developed in-house by us and are only available to Planio customers:
All corresponding data is included in the DB dump and files directory but lacking the plugins it will simply be ignored by your Redmine installation.
If you had been using custom fields for entities provided by proprietary Planio plugins (such as Help Desk or Storage), you will have to delete these as otherwise Redmine will not work properly.
DELETE
  custom_fields, custom_field_enumerations, custom_fields_projects, custom_fields_roles, custom_fields_trackers, custom_values
FROM
  custom_fields
LEFT JOIN custom_field_enumerations ON custom_field_enumerations.custom_field_id = custom_fields.id
LEFT JOIN custom_fields_projects ON custom_fields_projects.custom_field_id = custom_fields.id
LEFT JOIN custom_fields_roles ON custom_fields_roles.custom_field_id = custom_fields.id
LEFT JOIN custom_fields_trackers ON custom_fields_trackers.custom_field_id = custom_fields.id
LEFT JOIN custom_values ON custom_values.custom_field_id = custom_fields.id
WHERE
  custom_fields.type IN ('CompanyCustomField', 'ContactCustomField', 'StorageFolderCustomField', 'StorageFileCustomField');
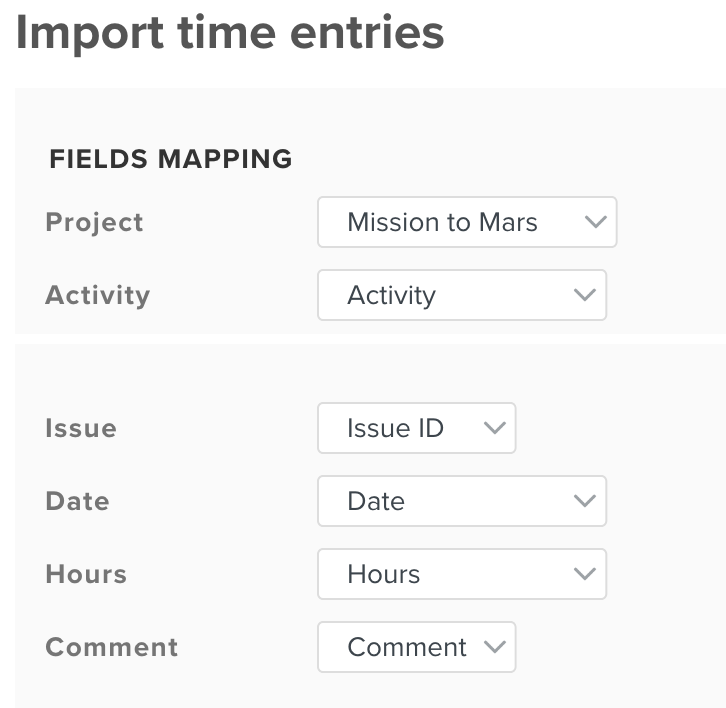
You probably know, that you may book time on issues or projects via Planio Time Tracking. However, if you've decided to track your time outside of Planio, it's also possible to import your time entries from Comma Separated Values (CSV) files using the importer in Planio.
There are two steps to this process. First, you need to prepare a CSV file for import. Second, you have to carry out the import. We’ll cover both in this guide.
You need to export your time entries or time bookings in the CSV format. You can save most Excel sheets as CSV files by clicking on File -> Save As… and then selecting Comma Separated Values as the format from the drop-down menu.
Your CSV file can have the following headers. You’ll find a sample CSV file here: example.csv.
| Values | Notes | |
|---|---|---|
| Activity | This field is used to determine the kind of activity. This should map to an existing activity and it needs to be enabled within the target project. You’ll find their names in Project page -> Settings -> Activities. | This field is optional. Alternatively, you may select a fixed activity for all new time entries when configuring the import. |
| Issue | A time entry may belong to a single issue. Fill this column with the issue ID (e.g. 4711). |
This field is optional. If left blank, the time entry will be associated with the overall project. |
| Date | Enter the date in your preferred date format (e.g. MM/DD/YYYY or DD.MM.YYYY). | This field is mandatory. |
| Hours | Enter a number for the spent time in hours (e.g. 15). | This field is mandatory. |
| Comment | Enter a comment describing the work. | This field is optional. |
Now, you have a CSV file ready for import. The next step is to import it into Planio. You’ll find the button for the Import on the spent time page in the sidebar.

Then, select your CSV file using the file picker.

On the next page, you can select options for importing the CSV File

| Option | Notes |
|---|---|
| Field separator | You can select between comma separated values or semicolon separated values |
| Field wrapper | You can select between double quotes or single quotes. |
| Encoding | You can select the encoding for the CSV file |
| Date format | You can select one of five date formats (YYYY-MM-DD, DD/MM/YYYY, MM/DD/YYY, DD.MM.YYY or DD-MM-YYYY) |
First you have to select a target project for the import. Then, you have to map the values from the CSV files to time entry fields in Planio. You can select each value from the drop-down menu beside each attribute. You’ll also see a file content preview further down, so you can make sure you’re importing the right data.
Once you’re done assigning the values to each field, you can click on import to start the import.
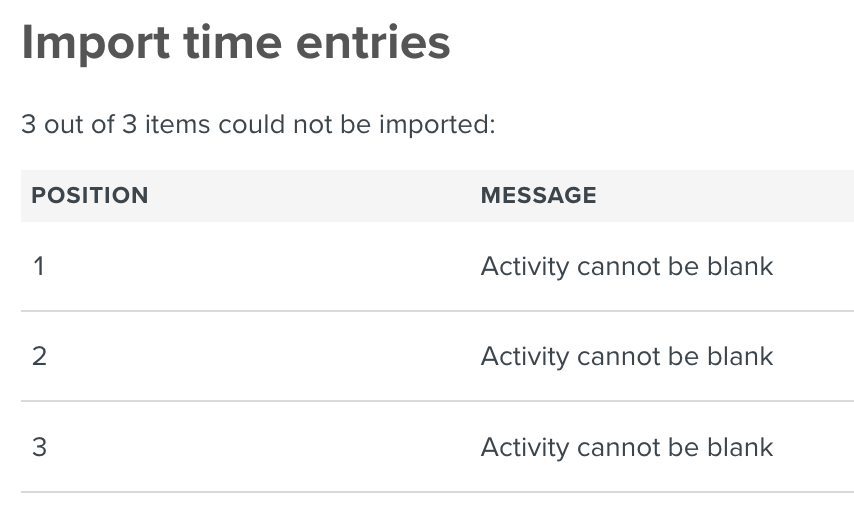
If you encounter any problems, you'll see a page with the errors and the import will not be carried out. You can restart the import once you've fixed the problems in the CSV file.
If all goes well, you’ll see a list of the imported time entries.
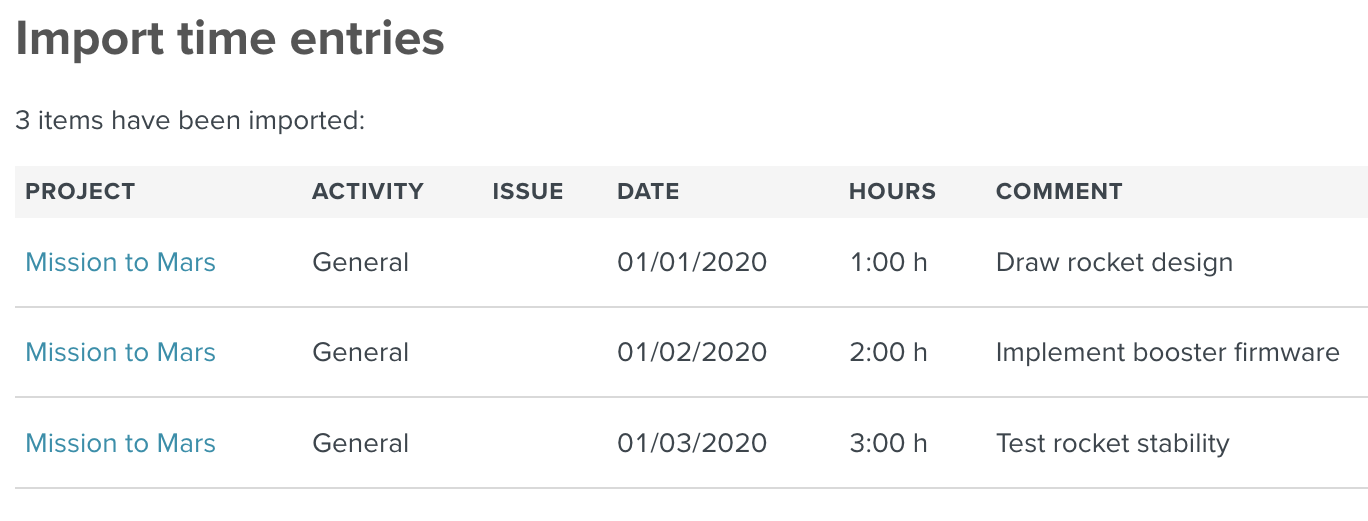
That's how you can import time entries or time bookings into Planio using the CSV importer.
Issues in Redmine can be tasks, ideas, software bugs or support tickets. Redmine is highly configurable, so you can create custom issue types for specific situations.
Issues are the atomic element of any Redmine account. You need to create a project before you can create issues, because every issue is connected to one project.
For example, at Planio we have separate projects for English support tickets and German support tickets, because different team members are working on them. We also have projects for different areas such as marketing and the Planio website.
Let’s create a new issue:
As you progress through a task, you can update the issue with the latest status. You can also re-assign it to someone else and you can add notes with questions or ideas. You can also upload files as attachments.
You’re walking around town, getting things done. You realize that you didn’t add the new office party as a task in Redmine.
No problem. You can quickly email your project's Inbox with some details, and an issue will be automatically created in Redmine.
You’ve created a bunch of issues, and you want to start to get an overview of the issues.
The issue list is your central hub for seeing the latest status in a project.
In the beginning, it will be easy to see all the issues on one page. However, as you start getting a lot done with Redmine, the amount of issues will grow.
At Planio we have over a quarter of a million issues in our own Planio account. That’s a lot of issues!
Happily, Redmine comes with powerful ways to drill down into issues, so you can pull out only the relevant issues.
The options let you quickly pull out the information that is relevant to you.
You can save a particular filter for quick access in the future. For example, if you want to see all the high priority issues that are assigned to yourself, you can save that as High Priority Issues and you’ll be able to access it quickly in the sidebar.
You have a task to get done? Create an issue and assign it to yourself. Once you’ve done your part, you can assign the task to someone else for review or finishing.
You can use the Task tracker, which is the default tracker. Trackers are just different types of issues. By default, Redmine comes with 3 different trackers. If you don’t know what you should choose, Task is a good choice.
You can tell the person you’re assigning the task to information such as the priority (high, normal or low), and you can set a due date.
Setting a start date and a due date means you’ll be able to visualize the task on the Gantt chart. The assignee will also get email updates if the task isn’t completed on time.
The category field lets you group similar tasks together, which can be handy for finding and reviewing later.
Finally, you can add the task to a particular sprint or milestone, which is a good idea if you want to use Redmine’s project management features.
You have an idea? You can quickly store it in Redmine as an issue. You just click on New issue, give it a subject line and then describe your idea in the description.
Often, you’d like other people to get updates on the issue even if they aren’t assigned to it. For example, you want them to hear about your amazing new idea.
Therefore, you can set them as watchers for that issue. They’ll get emails notifying them of any new updates on the issue.
Perhaps you’ve found a bug in your web application. You could create an issue in the web app’s project within Redmine and assign it to one of the developers. You can describe the bug, and perhaps include a screenshot as a file attachment.
If you’re an advanced user, you might even consider creating custom fields for bug tracking. For example, you could have a custom field for the OS or browser version. That would let you quickly filter out all the bugs for a particular device or browser.
You can set up Redmine, so that your users can email support@yourcompany.com and their email will show up as an issue in Redmine. This makes it easier to manage the responses.
You can also turn Redmine into a fully featured Help Desk via plugins. For example, we include our own Help Desk in Planio.
When the Help Desk is activated, you’ll see extra fields in issues for the company and contact.
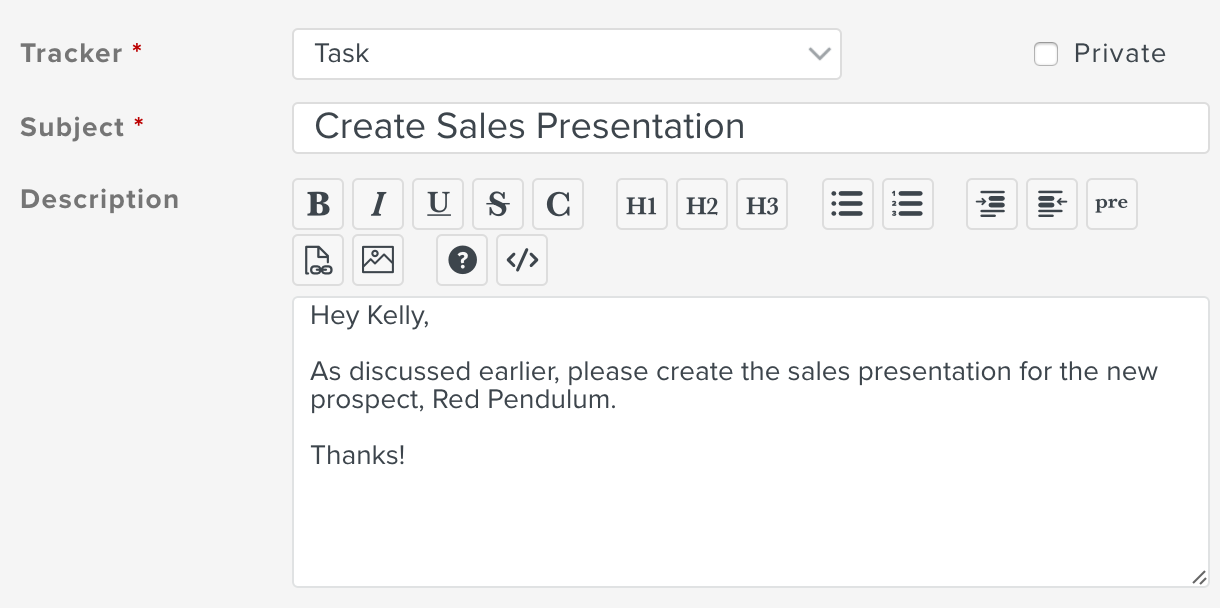
Let's have a look at how to create new issues and introduce the different fields you’ll encounter when creating one.
Issues can be comprised of much more than their four required fields (tracker, subject, status and priority); in fact, there are a ton of useful fields that can really bring your Planio issues to life.
Let’s explore issues by walking through the process of creating a new issue.
Please note that based on your role and the enabled modules in your project not all of the shown fields may be available.
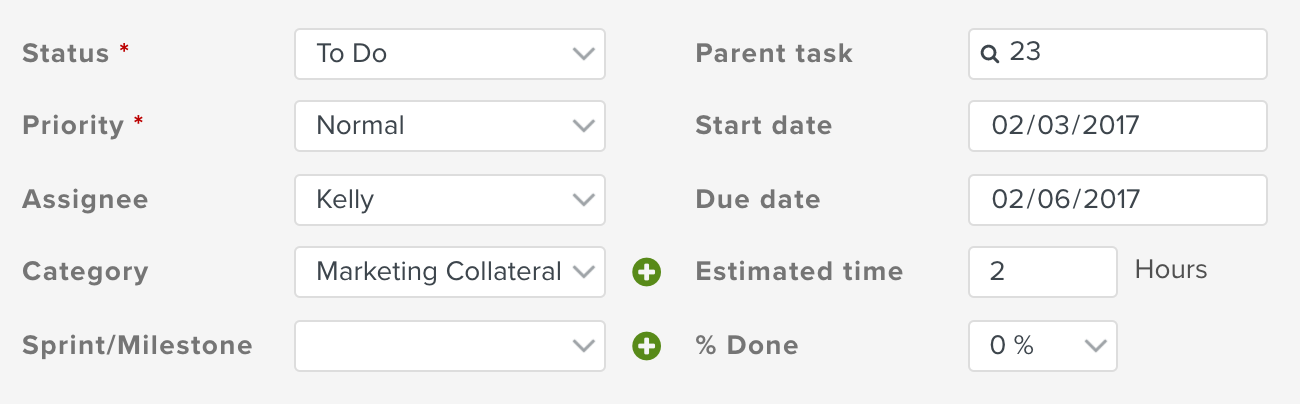
yyyy-mm-dd format or click the icon to launch the mini-calendar.yyyy-mm-dd format or click the icon to launch the mini-calendar.Please note that if you don't have issue categories or milestones yet, the fields will not be shown. You can create them within your project Settings.
Planio lets you work together with your customers even when they haven't got their own user account. If an issue is associated with a customer company and contact, you can optionally send issue updates to your customers via e-mail. Their response will automatically update the respective issue in Planio. Both companies and contacts can be managed in the Customers tab within your project.

Do you think your colleagues might be overwhelmed with all those issue fields and options? Learn how to strip down your Planio to a productive bare minimum.
Planio is powered by Redmine and as such it offers the same great possibilities to make Redmine projects public on the Internet. You can choose whether your projects should be accessible to anyone – without the need to login – or whether you'd like visitors to sign up first and leave their email address. You can also choose to manually confirm signups or confirm them automatically by sending an activation link in an email.
Making your projects public is a great way to provide a help desk for your customers. Allow them to view FAQs or tutorial guides in the wiki (like we do at Planio) or let them sign up to discuss in forums or create issues.
Public projects in Planio are also great for collaboration on Open Source projects, for instance. You could also use it to host public Git or Subversion Repositories.
Sounds fun? Follow this guide to learn how it's done.
A public project on on your Planio powered Redmine account is essentially that: An open project that is available to the public.
Normally, only the explicitly named members of a project in Planio can access it and outsiders cannot see what's going on.
Let's change that! Here's how:
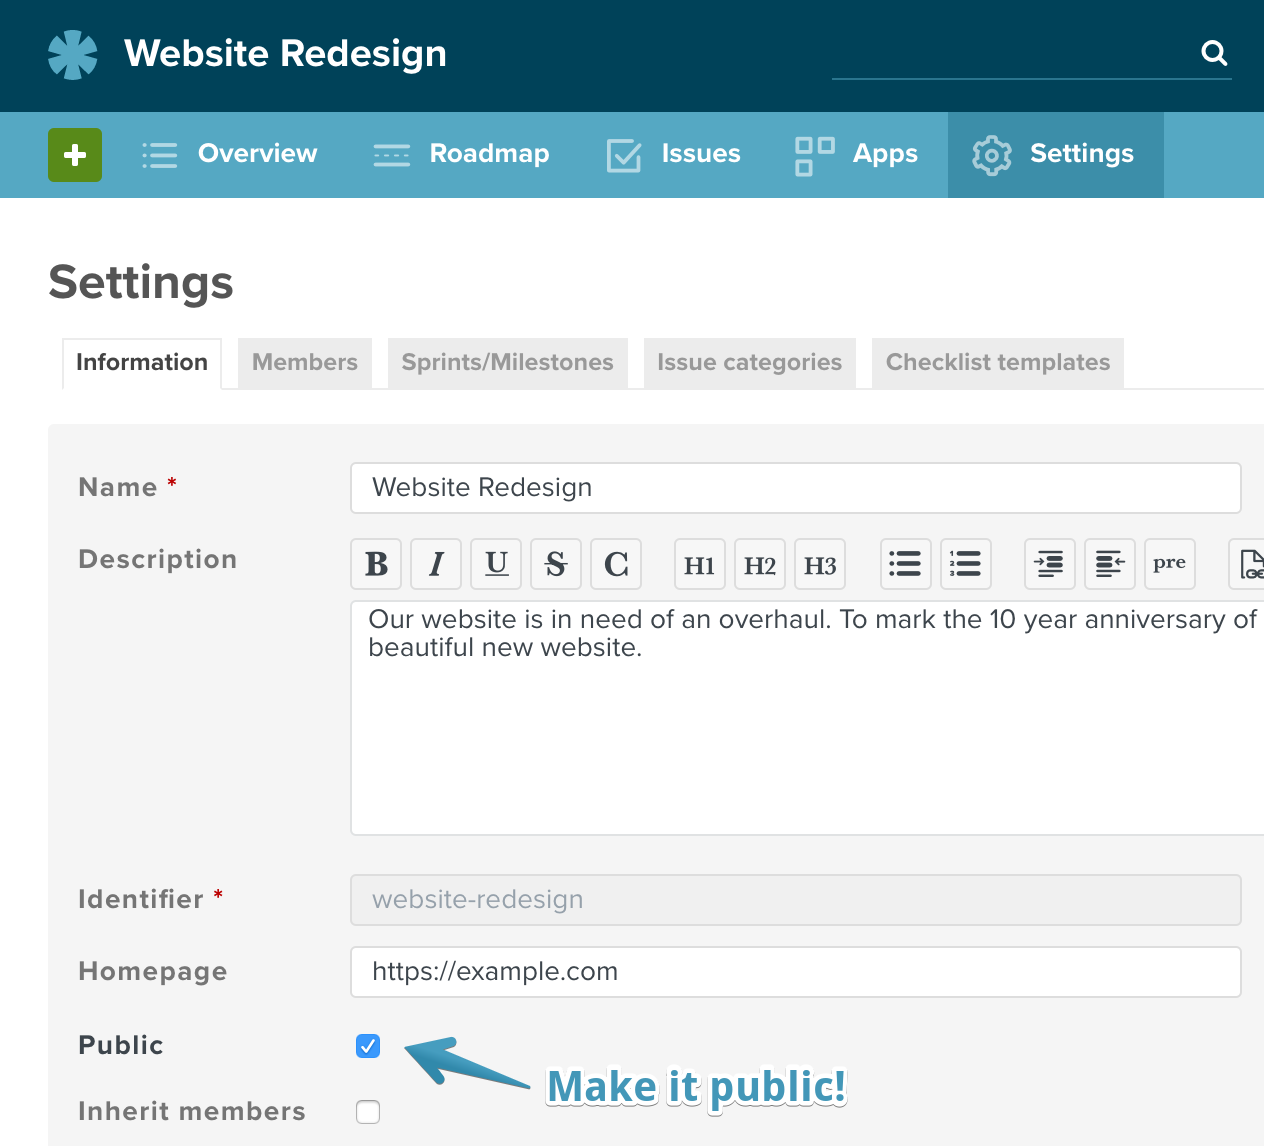
Congratulations! You now have a public project.
Would you like to make all projects public by default? No problem:
Public projects are open to all users in your Planio account. But you can take this a step further and allow access to people who have not even logged in. This will publish your public projects on the Web, making your content accessible to anyone and also allow search engines to index it.
Here's how:
Be careful though with this option. You should not have any secrets in your public projects now – the whole World will be able to see them!
Next, we'll learn how exactly these changes impact your projects and who will be able to see and do what.
Now that you've made your project public, let's see how this changes the access permissions to it.
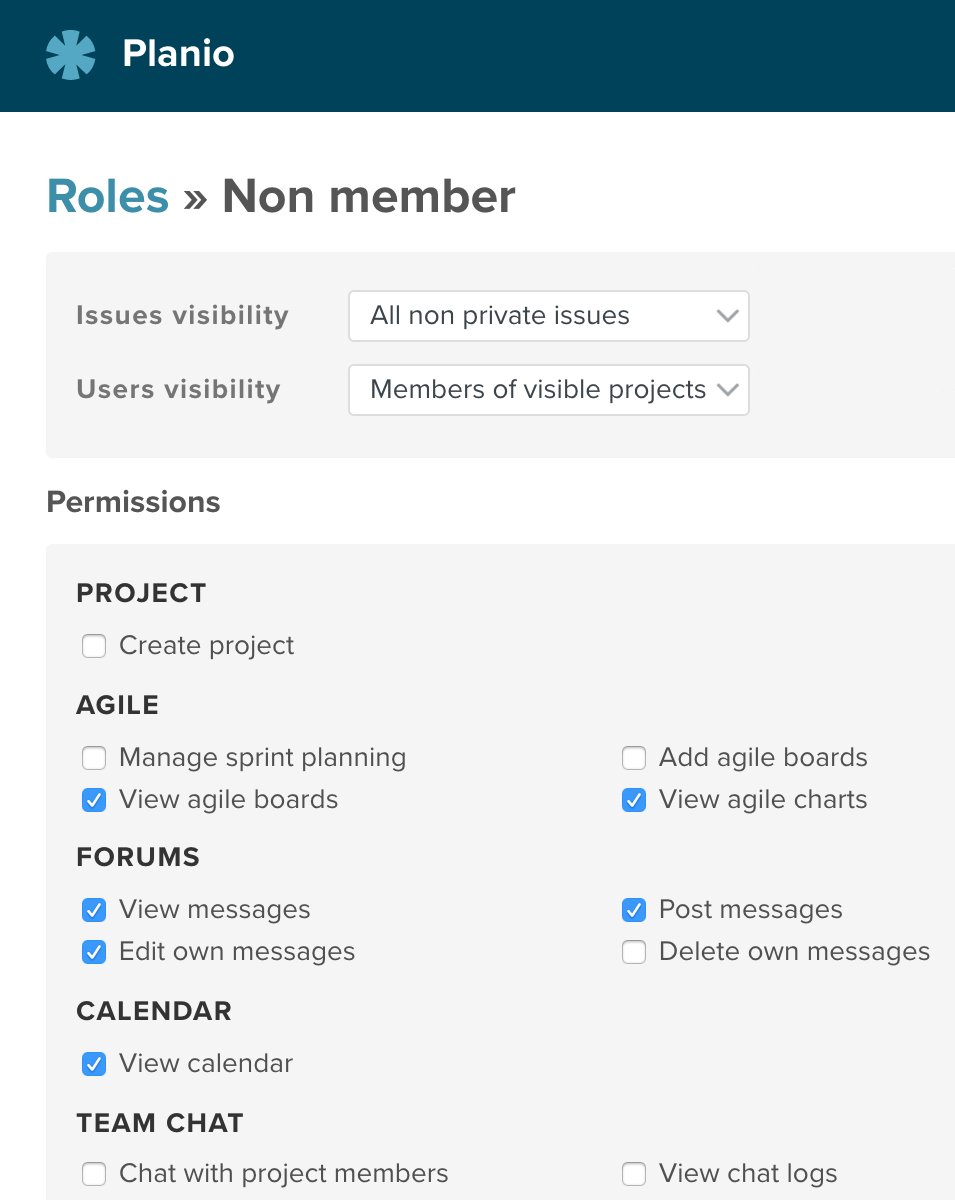
Please navigate to your avatar -> Administration -> Roles and Permissions for a moment. You'll see two special roles in addition to your own individual roles which you can define yourself:
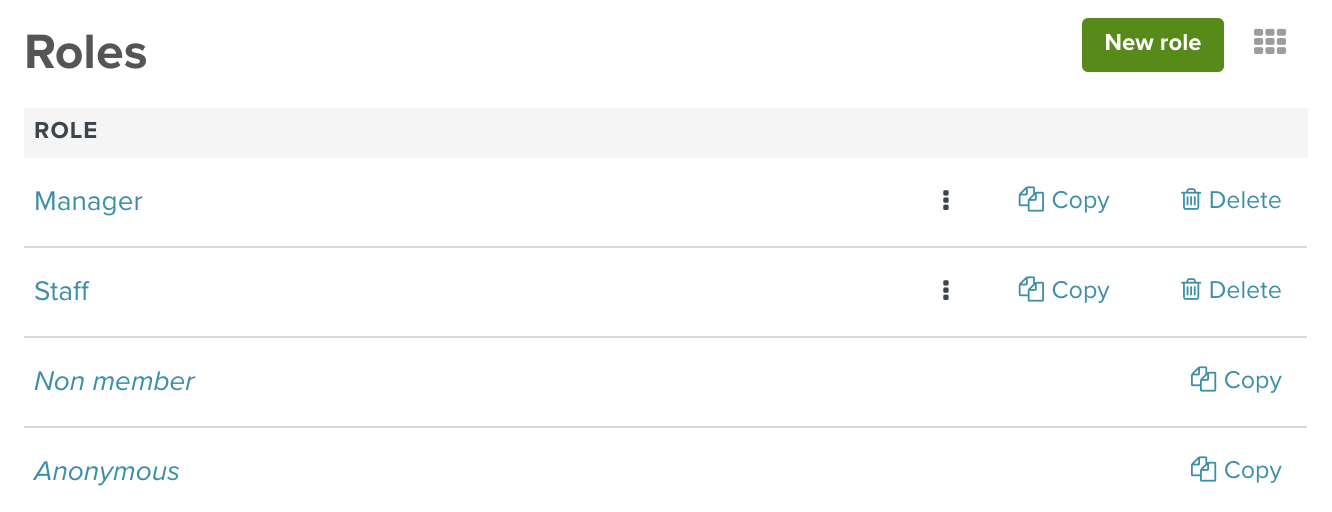
Click on the Non-Member role to pull up its permissions. What you configure here will govern what any user in your Planio account will be allowed to see and do in your public projects.
Specifically, this means that you won't have to add users to this public project anymore to give them access to it. Any user who does not have a specific role in the project automatically gets the permissions set in the Non-Member role. Users who are members in a public project will have all permissions from both the Non-Member role and their explicit membership roles combined.
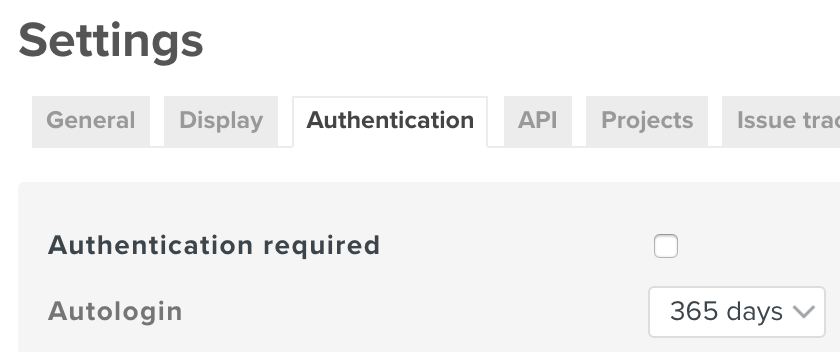
The Anonymous role is only relevant to you if you unchecked the Authentication required checkbox above. Similar to how the Non-Member role defines what logged in users can see or do, the Anonymous role specifies what anonymous users – who are not even logged in – can see or do.
We generally recommend to only give view permissions to the Anonymous role. Commenting or even creating content should only be done by logged in users.
We'll learn how to ask users to register for an account in a minute. Read on!
If using the Anonymous and Non-Member roles isn't specific enough for your use case and if you would like anonymous users or non-members to have different permissions in different projects, you can also add Anonymous and Non-Member as if they were real users – using the regular roles.
Let's take a look:
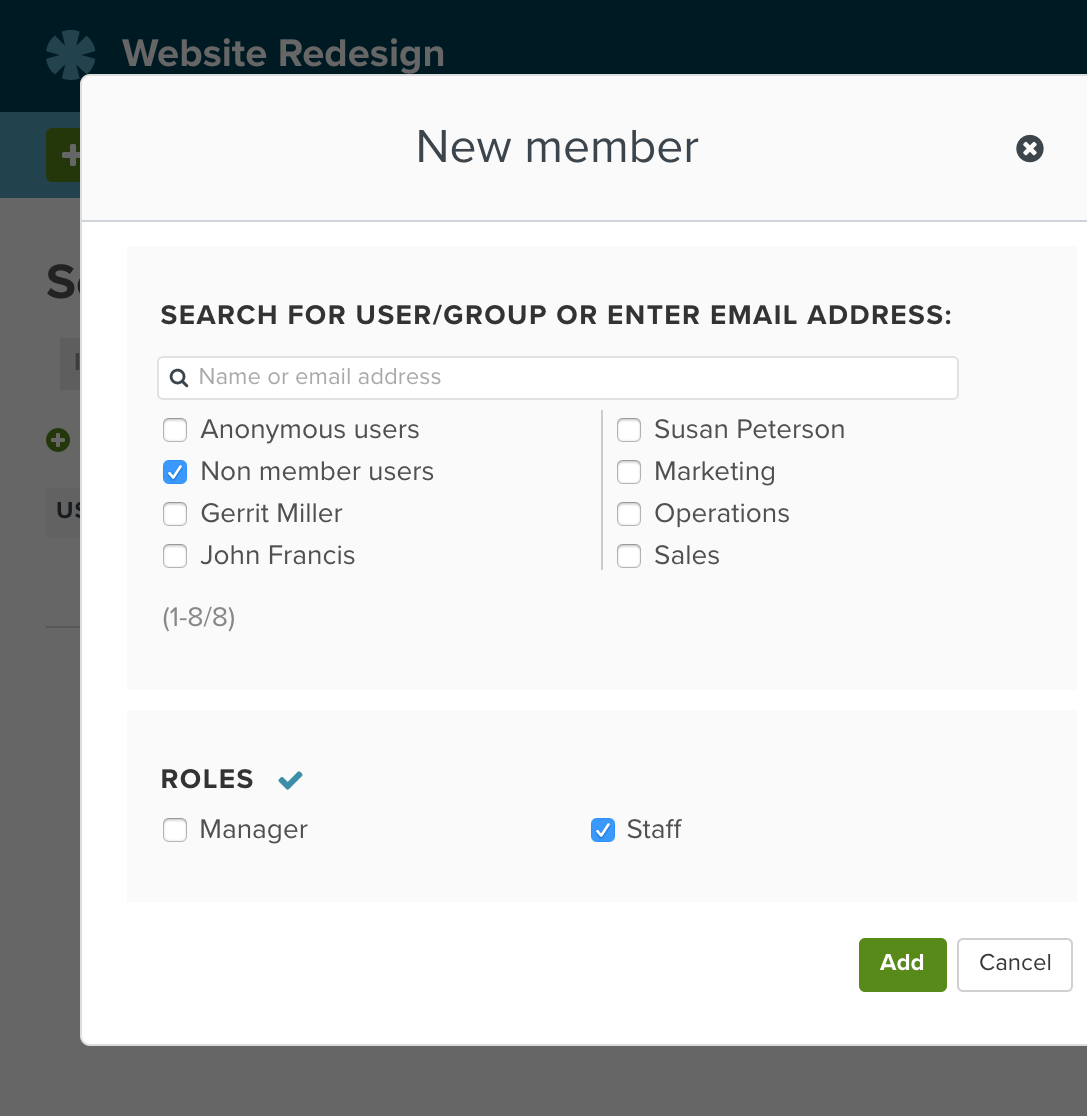
You'll find Anonymous and Non-Member among the list of regular users and groups. Now, you could add your Non-Member group with a role of Staff for instance. The result would be that non-members will be able to see and do exactly the same as normal members with a role of Staff.
It's quite advanced, we agree. In most cases it will be sufficient to configure your Non-Member and Anonymous roles' permissions.
Earlier we said that it's recommended to only allow view permissions to anonymous users – you most probably don't want to end up receiving spam comments on your Planio without even knowing who posted them!
In this section, we'll show you how anonymous users can register for an account on your Planio using their email address.
Let's set some settings first. Please navigate to your avatar -> Administration -> Settings -> Authentication. You'll be presented with a screen like this:
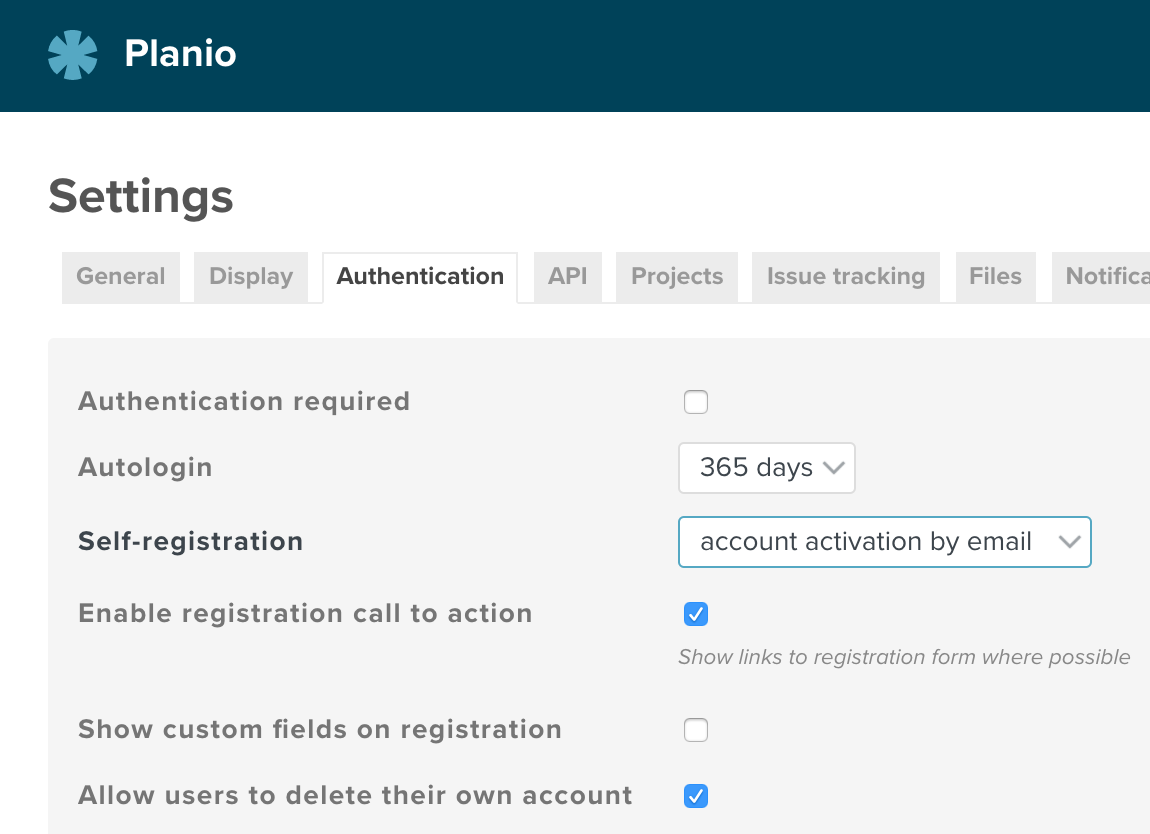
Let's take a look at the options for the Self-registration setting:
We recommend to use account activation by email or manual account activation depending on your personal preference.
Once registered, your new users won't have project memberships yet, so make sure to configure your Non-Member role. For example, you could allow anonymous users to view blog posts and non-member users to comment on them.
Once self-registration is enabled on your account, anonymous users will find a menu item called Registration within the avatar menu on the top right.
But if you really want to build a community and encourage participation in your Planio account, that may not be enough.
You might want to check out these two options in your avatar -> Administration -> Settings -> Authentication:
Next up, we'll learn how to customize your user's experience with your Planio account. Here's how to make them feel right at home:
Please navigate to your avatar -> Administration -> Settings -> General. Here, you can set an Application title – e.g. company name – and a Welcome text. Welcome texts allow for regular wiki markup, so you can use formatting options and even embed your company logo.
Below you'll see a customized welcome page as it's shown to anonymous users:
You can also write blog posts within your public Planio projects and assign the View blog permission to your Anonymous role. They will be shown on your public Planio account and users will even be able to subscribe to them using their feed readers.
If you work on an Open Source project with Planio, you can easily publish your Git or Subversion repository to the Web as well. Simply grant the Browse repository and/or View changesets permissions to your Anonymous role and anyone will be able to clone or check out your repo using its HTTPS URL.
There are numerous other possibilities within the features of Planio. Just check out the Apps in your project and the permissions you can grant your roles.
If you'd like to take things even further, you can get your Planio account re-designed using your own logo and colors and we also offer the possibility to run your Planio account on your own Internet domain.
Both extras are included for free within our Enterprise plan and are available for 15 Euro* per month each (+ 100 Euro* setup for the design) in all other plans. Get in touch with us to activate these extras for your account.
*) Prices are subject to VAT depending on where you are based.
Need some examples? Here are some Planio accounts that use public projects:
Want to add your Planio account to the list? Get in touch and we'll list it here!
This guide explains how to set up subversion pre- and post-commit hooks with your Planio repository. Using pre-commit webhooks, project managers can influence the commit life cycles of repositories, by for example enforcing a certain commit message format, limiting commit rights for certain portions of the subversion repository, or by enforcing other custom rules. Post-commit hooks are useful to trigger actions like CI runs, that should happen after a successful commit.
In your project, navigate to Settings → Repositories. Find the repository you're concerned with and click Edit. This form has a new row labelled Repository hooks, where a click on Edit leads to the list of commit hooks for that repository. Please click Add in order to create a new hook.
First of all, choose the type of hook you intend to create. Currently, the following hooks can be created:
| Type | Stage | Description |
|---|---|---|
| Insert ticket subject | post-commit | Changes the commit message by inserting a referenced tickets' subject after the reference: #1234 => #1234 [Ticket subject]
|
| Require valid ticket reference | pre-commit | Denies commits that do not mention a valid ticket reference in their commit message. Valid ticket references are of the form #1234. The referenced ticket must be visible to the committing user. |
| Web hook | pre-commit | Sends an HTTP POST request with commit information in JSON format to a user defined URL. The commit is accepted or denied based on the remote servers' response. You can define which response codes should be considered successful. If the commit is rejected, the response body will be passed to the committing user if the response has a content type of text/plain. Otherwise, a generic error message ("Commit denied by repository configuration") will be given. |
| Web hook | post-commit | Sends an HTTP POST request with commit information in JSON format to a user defined URL |
You can set up multiple hooks for the same repository, and reorder them using the drag handles in the table. Hook execution stops at the first failed hook, later hooks are not executed.
The JSON payload we POST to your configured web hook URL contains information about the project, repository, and the actual commit.
Sample payload:
{
  "project":{
    "name":"Demo",
    "identifier":"demo",
    "id":10
  },
  "hostname":"demo.planio.com",
  "repository":{
    "id":45,
    "name":"hooktest",
    "full_name":"demo.hooktest",
    "html_url":"https://demo.planio.com/projects/demo/repository/45",
    "url":"https://demo.planio.com/projects/demo/repository/45",
    "issues_url":"https://demo.planio.com/projects/demo/issues.json",
    "size":90824,
    "svn_url":"https://demo.planio.com/svn/demo.hooktest"
  },
  "before":"1",
  "size":1,
  "commits":[{
    "committer":"jk",
    "message":"test commit",
    "added":[],
    "modified":["changed/file.txt"],
    "removed":[],
    "prop_changed":[]
  }],
  "head_commit":{
    "committer":"jk",
    "message":"test commit",
    "added":[],
    "modified":["changed/file.txt"],
    "removed":[],
    "prop_changed":[]
  }
}
Elements in the project and repository structures should be self-explaining. The remaining top level elements are:
before - highest revision number before this commithead_commit - the last (and in the case of SVN, only) commit that is contained in this payload.commits - list of all commits contained in this payload (always one for SVN)size - number of commits contained in the payload (for SVN this will be always 1)For consistency reasons we decided to stick to the payload format of the post-receive web hooks which we already have in place for Git repositories - that's why there are the seemingly redundant commits list and separate head_commit elements, which are more useful in the case of Git.
For each commit, the login of the committing user, the log message as well as the list of added / removed / modified paths, as well as paths that had properties changed, are given.
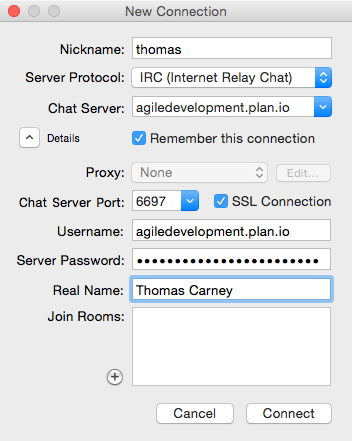
Pidgin is a free IRC client for Windows, which you can use for Planio team chat on your desktop.
Download and install Pidgin for Windows.
Click on the Add button on the welcome screen to add a new account.

In the basic tab:

In the Advanced tab:

Click on 'Add' and you'll be automatically connected to the project chatroom.
Let’s install chat on your Android phone. We'll use AndroIRC in this tutorial.
You can install AndroIRC from Google Play Store.
Once you've installed the app, click on the settings icon and select settings.

Select Servers and then again select settings and select New server.
Here's we'll fill out the connection and authentication settings with our Planio chat credentials (see above):

Go back to the home screen and select the Plus sign to add your new server. Select it from the list and connect. You'll automatically join the chat room.
Let’s install chat on your iPhone so you can chat with your team members and get notifications on the go.
Open the app store and search for the Colloquy app. The app is a paid app. Install the app and open it.

Select Add an IRC connection.

Now, we'll fill out the connection fields:

Scroll down and select Advanced

Here's we'll fill out the connection and authentication settings with our Planio chat credentials (see above):

Click back to New Connection and then click on Connect.
You can enter the room and start chatting on your iPhone.
You can keep up to date with your project from your desktop using the free Colloquy app for Mac.
Download and install Colloquy from the Colloquy downloads page.
Open up Colloquy. It will prompt you to create a new connection. If not, you can select File -> New Connection.
Select the Details button and enter your credentials. You'll find these credentials on in your Planio project in Chat logs.
Click Connect and you’ll be automatically joined to your project chat room.
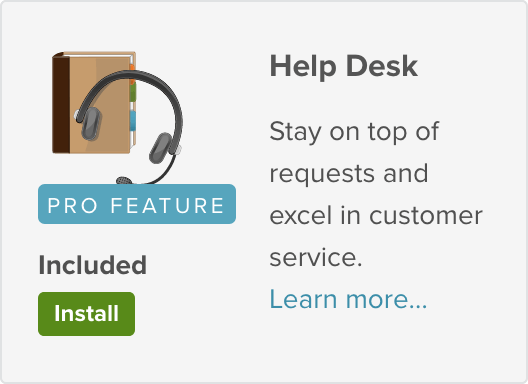
Planio Help Desk will help you provide better customer service. It brings all your customer interactions into one place, so you'll keep an overview on all support questions.
Sign into your Planio account and create a project for customer support.
We recommend that you create a project just for customer support. If you provide support in several languages, it's best to create a separate project for each language.
Go to Apps tab and install the Help Desk app if it isn’t already installed.
Once the Help Desk App is installed, we need to set up the support email address.
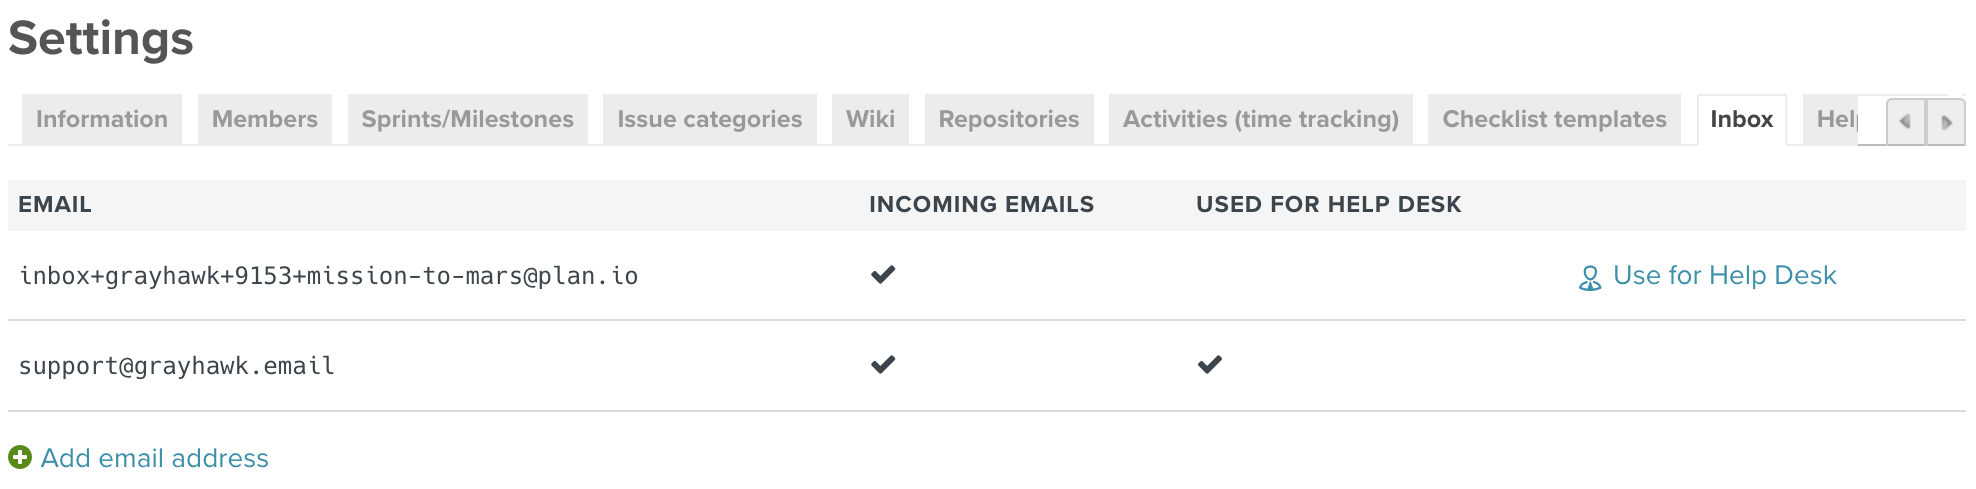
Go to the Settings tab, and click on Inbox. When you follow Add email address you can enter your support email address in the Address field. It can be any email address you own. For example, at Planio we use support (at) plan.io.
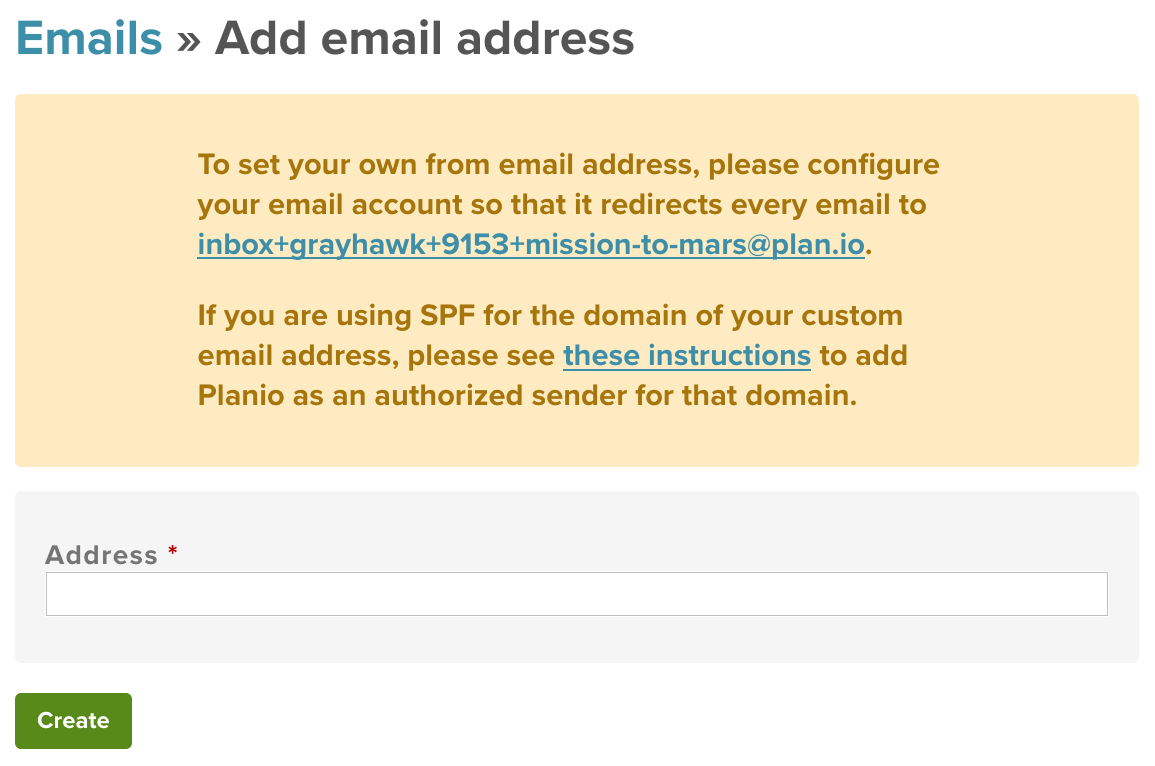
Now, you have to set up email forwarding for this address. Any emails sent to the address in this box need to forward to the unique Planio Inbox email address, which you'll see just below the "From email address" field.
Here are links to tutorials on how to do this for GSuite (formerly Google Apps) and some of the big domain registrars such as Godaddy or ENOM:
It can take a few minutes once you’ve set up the email forwarding before it's active.
Finally, after the forwarding was confirmed successfully, you may activate your new address for use in Help Desk.
Now, you can send an email to the support email address, and it will show up as an issue in the support project.

You can see the issue by clicking on the Issues tab. The subject line is set as the subject, and the body of the email is set as the description.
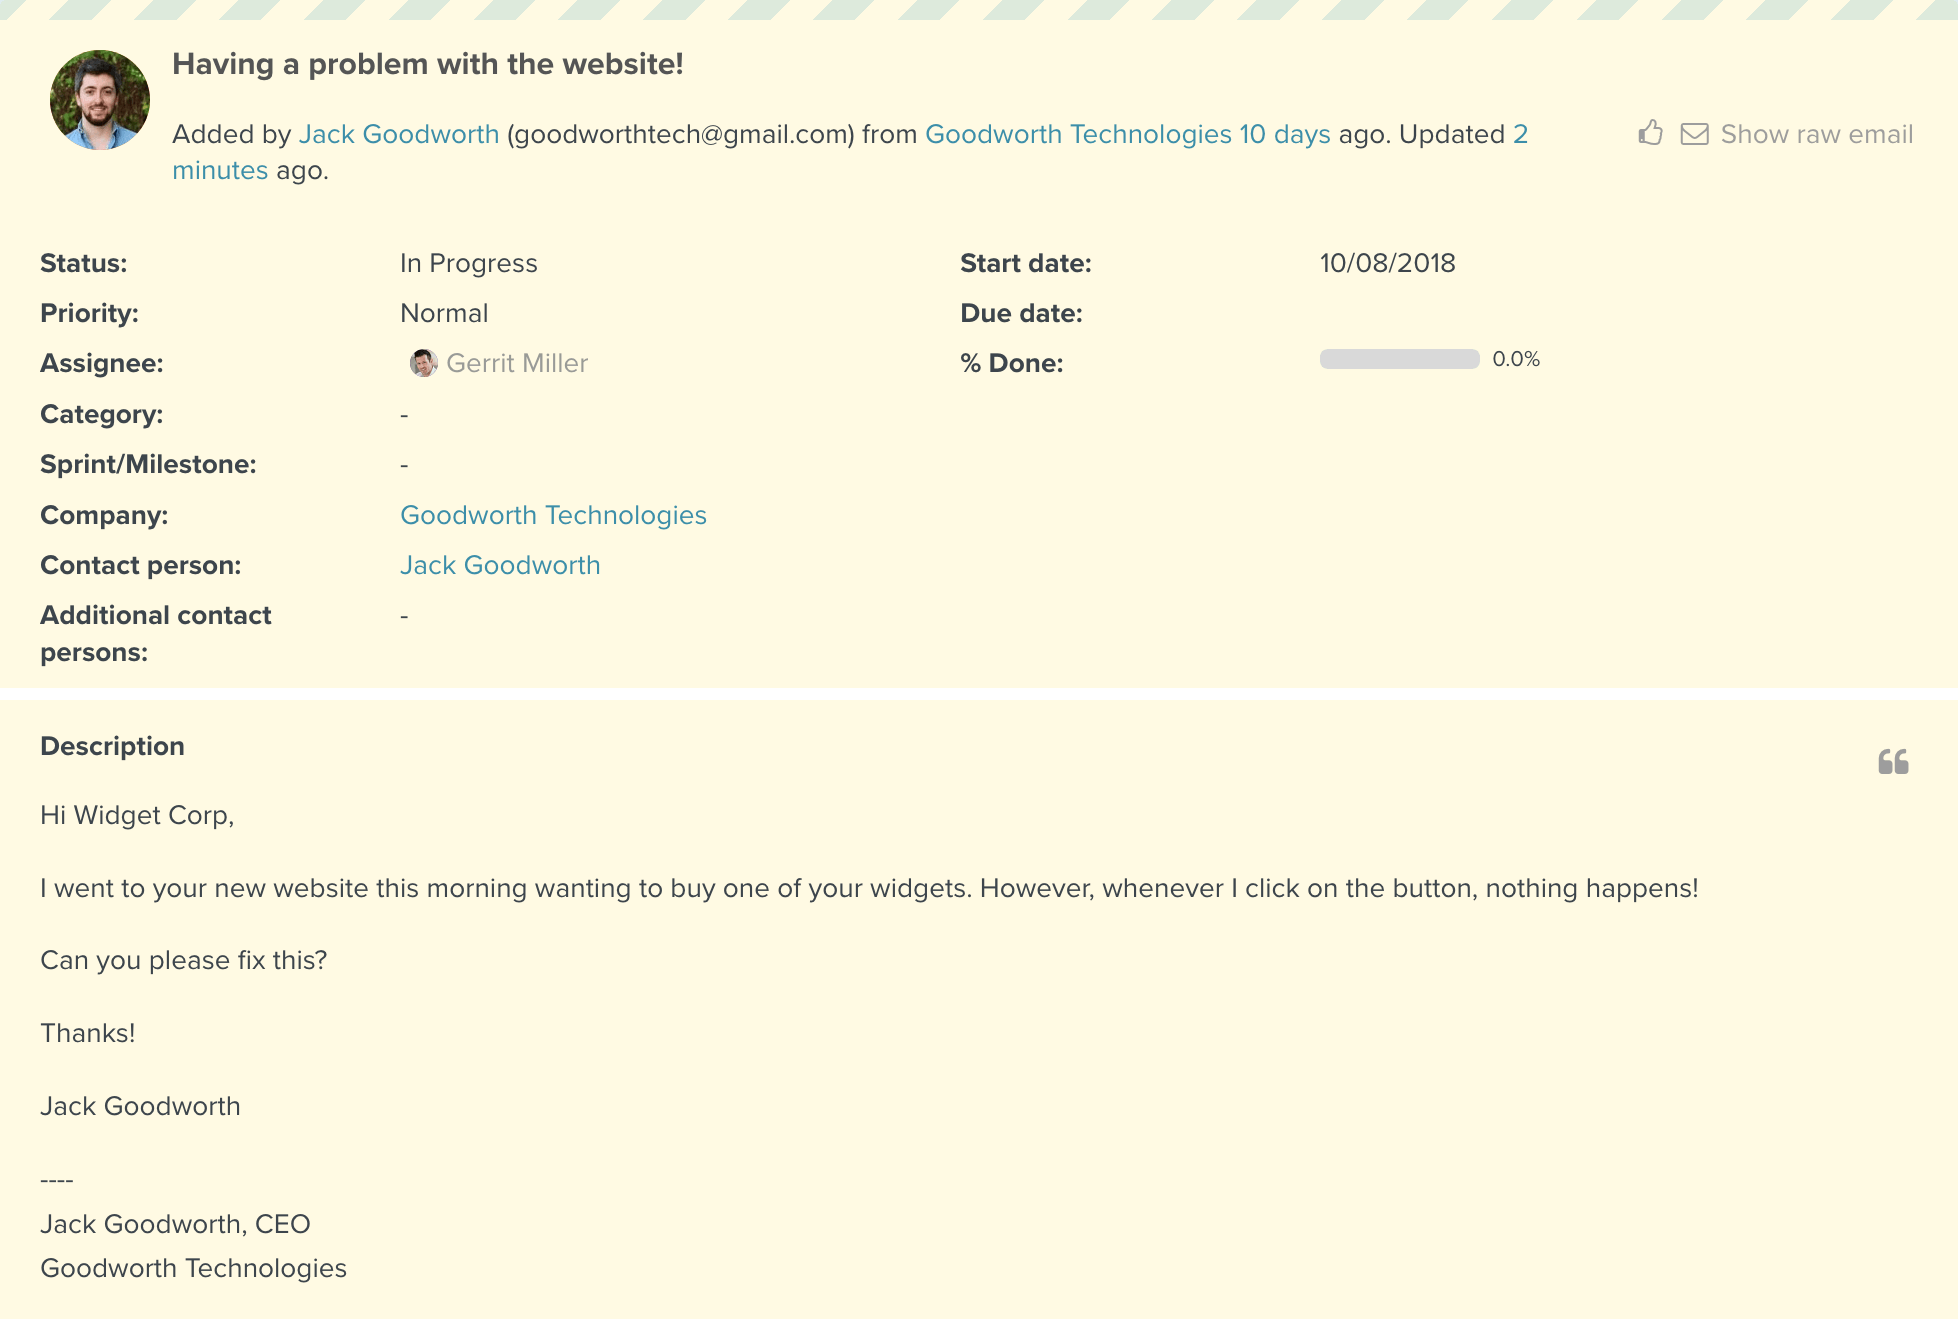
If customers use an email address that isn’t saved in Planio, that email address will be added as a new customer in the Contacts tab, so you’ll be able to track all correspondence with that person. This means you can manage all customer relations from within Planio automatically.
Planio also sends an automatic email confirming receipt of the email to the customer.
Click Edit and scroll down to the Notes section. Select the External notes option, and write your email.
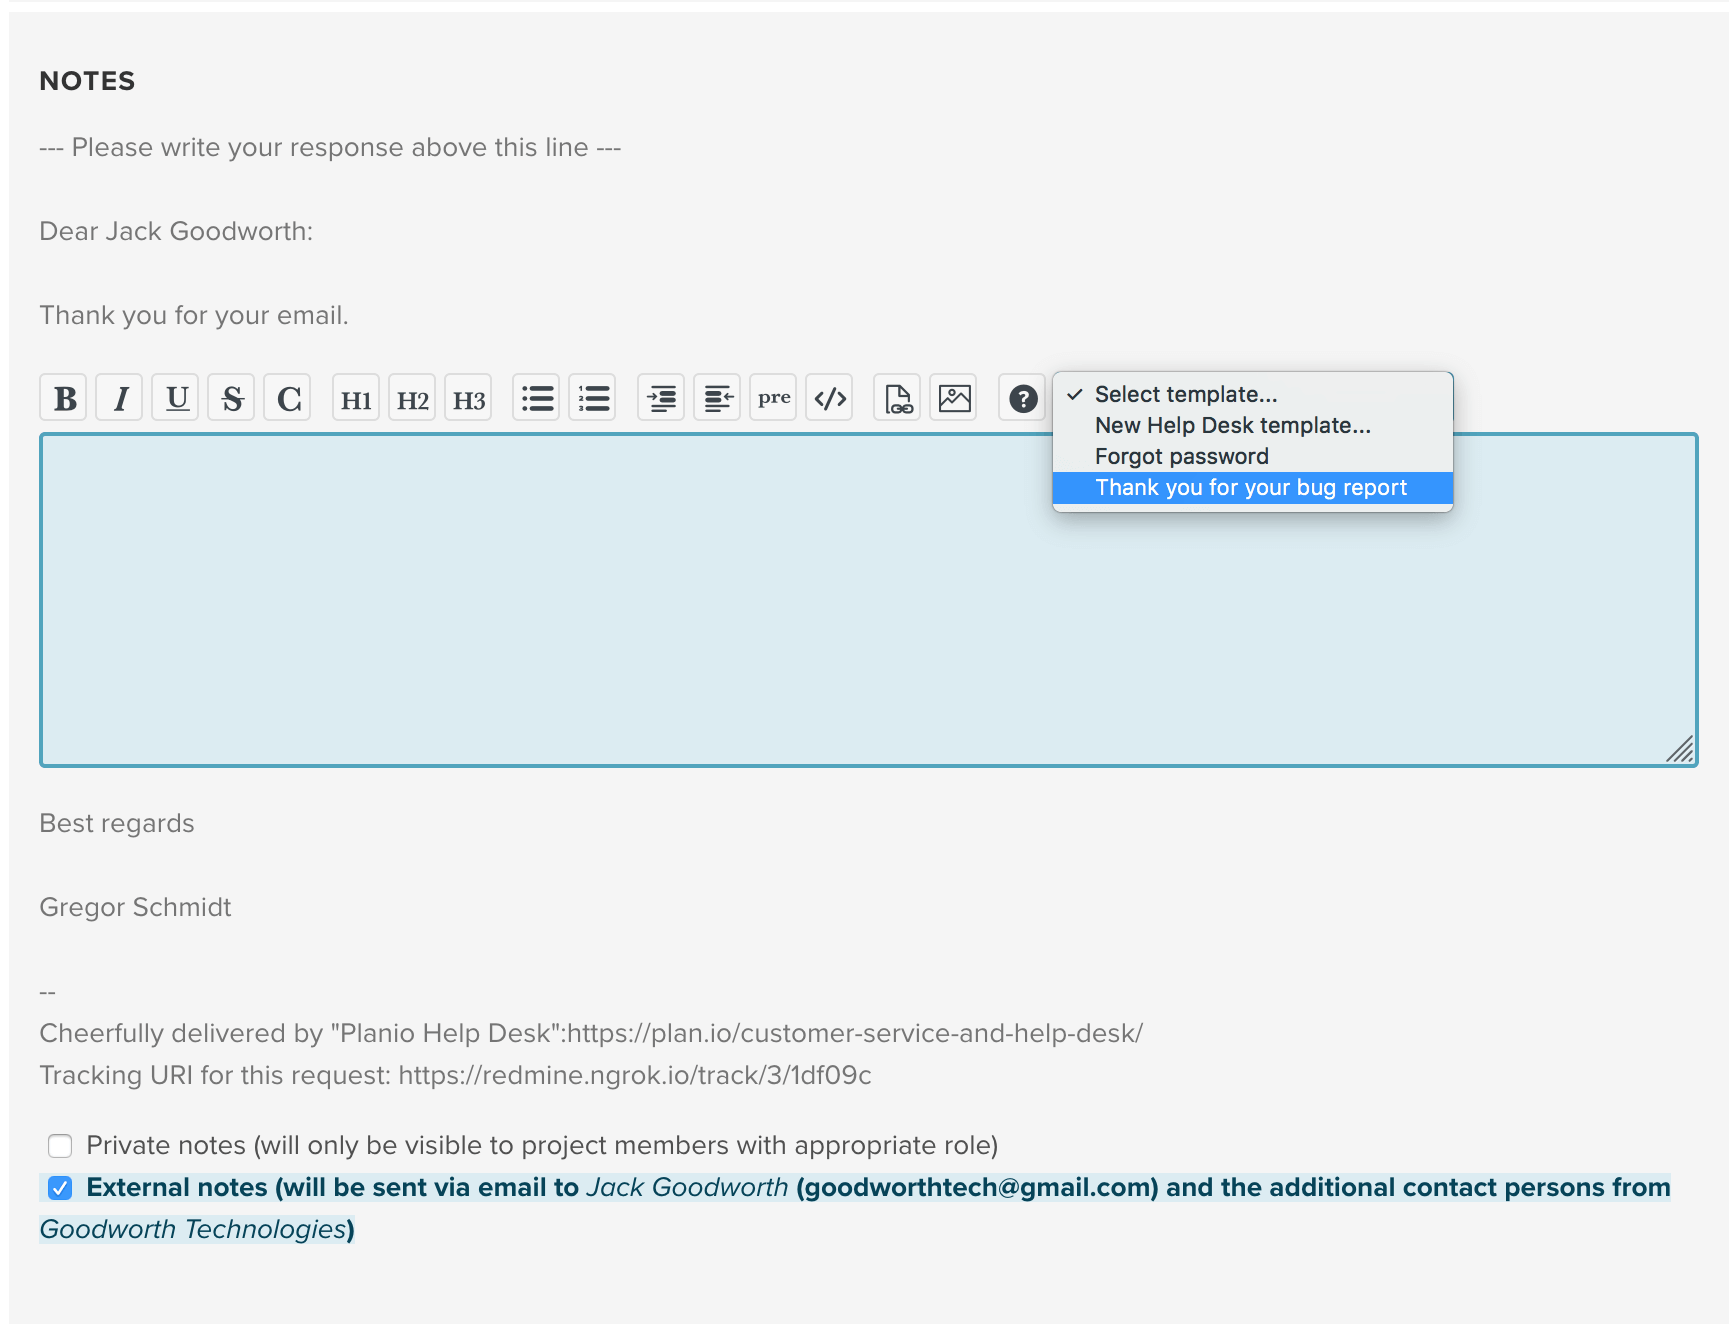
You don’t have to write "Hi Jack" or conclude the email. Those parts are automatically included via header and footer templates. We’ll see how we can update them below.
Click Submit to send the response to the customer.
They’ll receive an email with your message along with a greeting and an email signature. An added bonus is that your customer will have a tracking link, so they can track the progress of the request. This is particularly useful if the issue can’t be resolved right away. For instance, you could keep them updated, and they can see the various updates all on one page.
Now, let’s dive into the more advanced features of the Planio Help Desk.
Click on the Settings tab and then on the Help Desk tab.
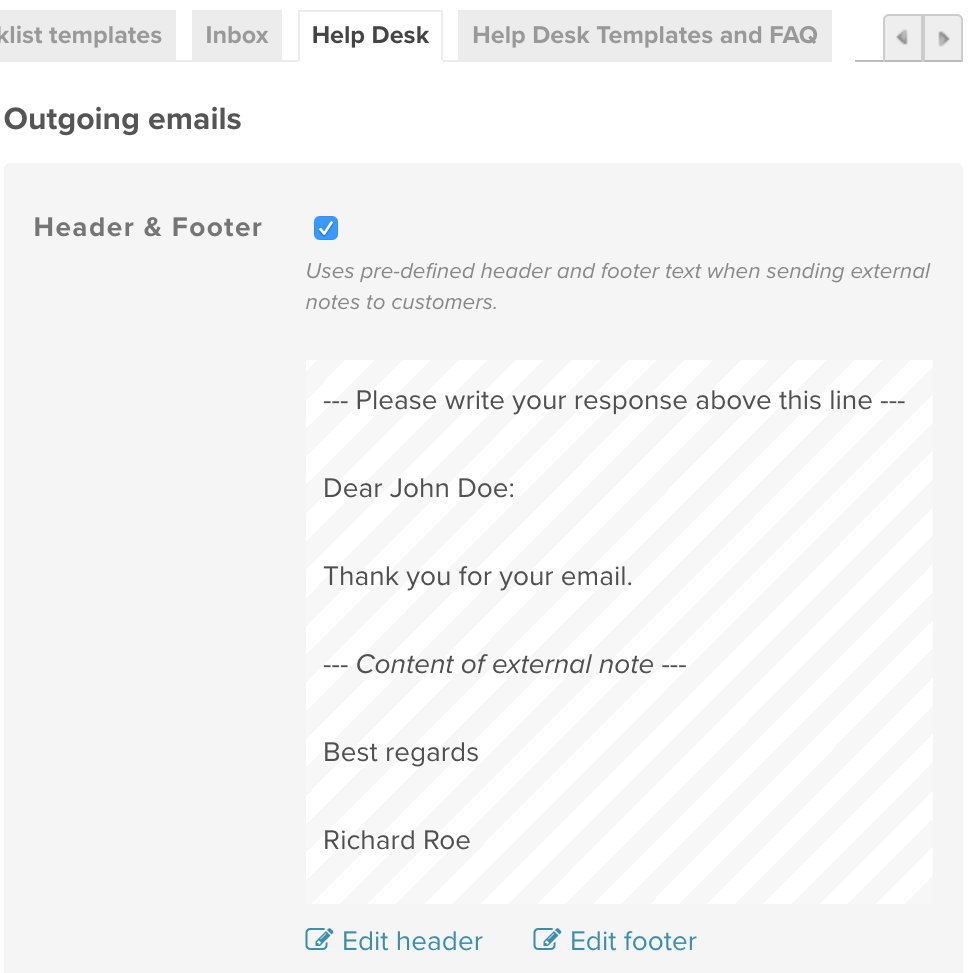
You’ll see the Outgoing emails section on the right. Here, you can update the existing templates for the header and footer. For example, let’s update the footer. Click on Edit footer below it.
You’ll see “Best regards”, and the current_user.name inside of curly brackets.
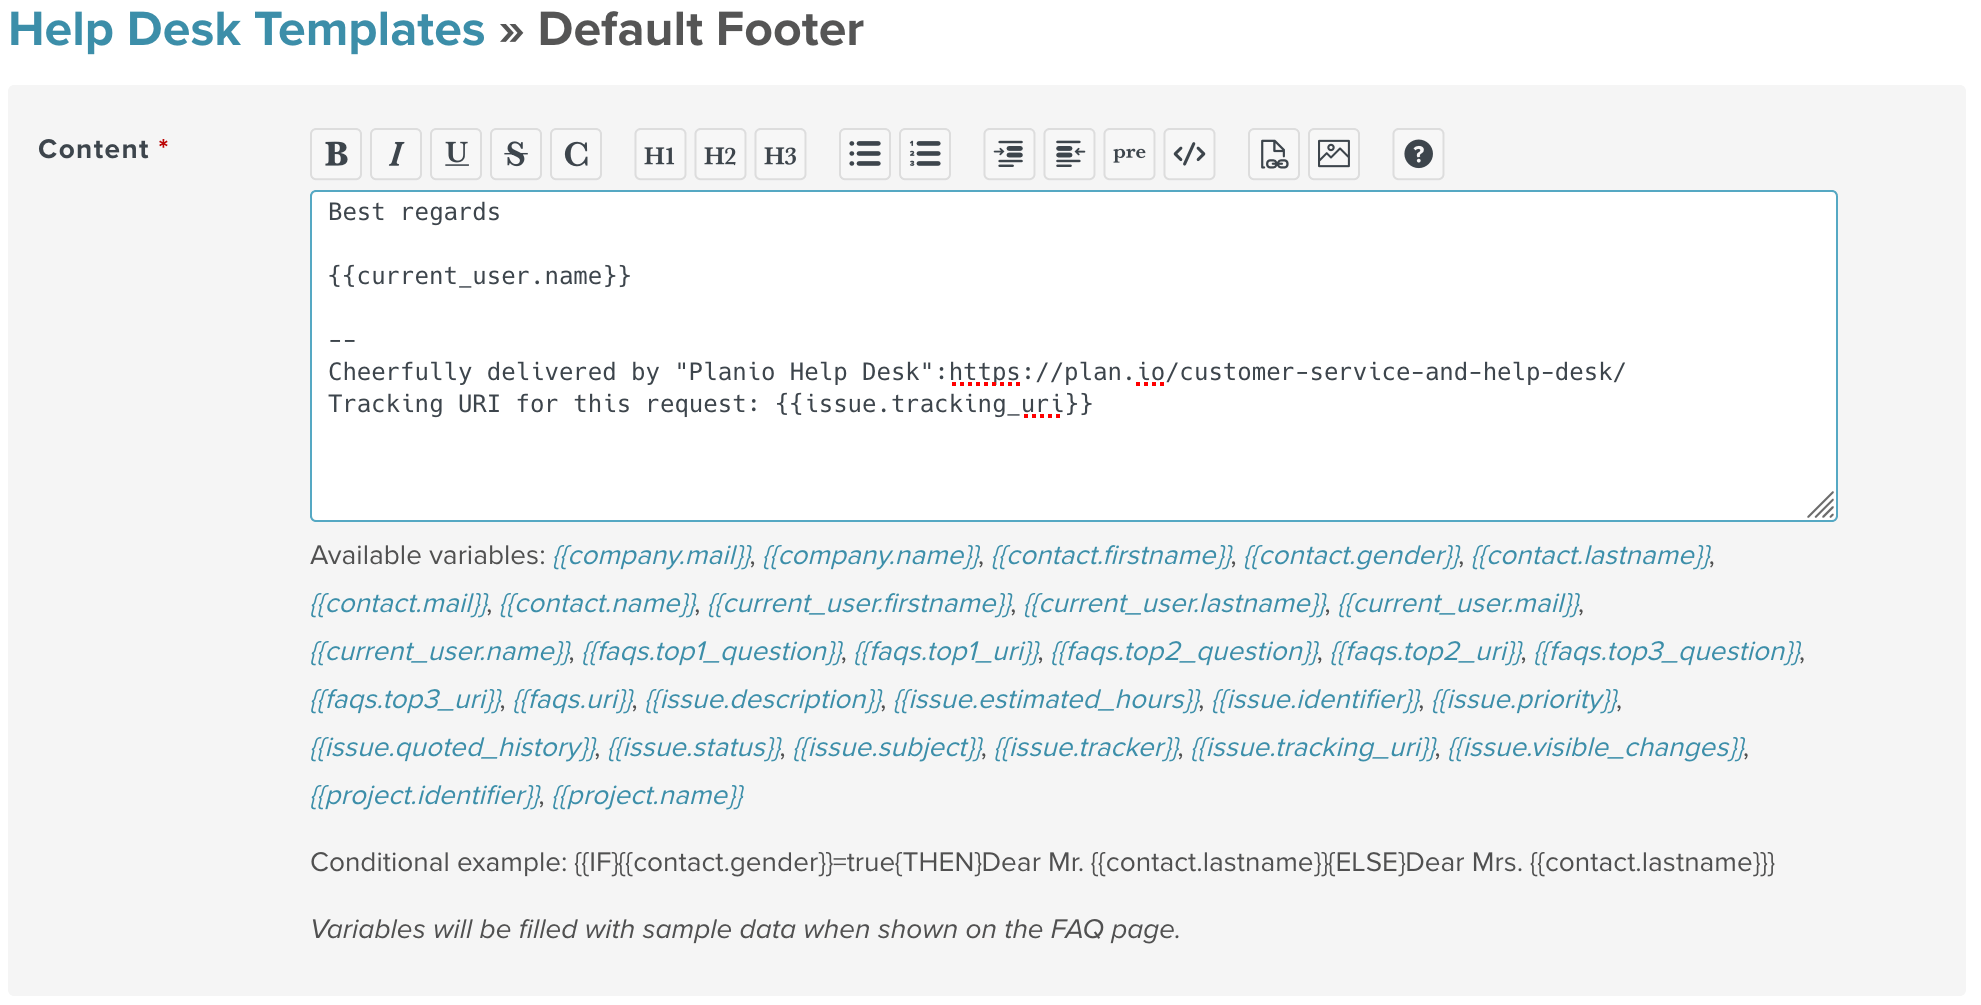
This means that the name here will depend on the person answering. You can make any changes you want to the text, and there is a list of variables you can choose from. For example, you could put the project name after the name. You can also use the variables {{faqs.top1_question}}, {{faqs.top1_uri}}, and so on to include links to the most commonly asked questions.
You can also create answer templates to frequently asked questions. You'll be able to access these templates in a dropdown menu when you're replying to customers in the issues section. These will appear in a dropdown menu when you’re replying to customer emails.
Within the Help Desk templates and FAQs project settings, you may create and edit internal templates as well as publicly visible FAQ entries. With their help your customers can quickly find answers to commonly asked questions themselves. You can also include a link to your top most commonly asked questions in the email sent automatically when customers submit a support request.
Using Userlike for chatting live with your website visitors is great, and it's an awesome way to provide support or explain your product.
Normally, Userlike sends you an email after each chat session with a chat log, so you can keep it for future reference.
We thought it would be great to store these chat logs in Planio Help Desk as issues instead, so you'll have everything neatly organized by contact and so you'll be able to see support issues from Planio side-by-side with Userlike chats.
Setting it up is really easy:
If you haven't already, set up Planio Help Desk in one of your projects. We have an in-depth guide about how to set up Planio Help Desk, but if you want to get started quickly, just do the following:

Next, we'll log in to Userlike. You'll need your Userlike username and password for this. Once logged in, we are going to:
You'll be presented with a configuration form. We'll get to that in a minute.
Let's figure our your Callback URL first!
This part gets a little technical. But don't worry – we'll get through this.
Generally speaking, the Callback URL needs to follow this format:
https://acme.plan.io/projects/support/userlike_callback?key=abc123
The URL needs to be adapted to fit your particular Planio account though, so let's take a closer look:
https://acme.plan.io/projects/support is the full URL to the designated project where you activated Planio Help Desk. You can copy it from your browser's address bar when you're on the Overview tab of your project. acme.plan.io is your Planio domain and support is the project's Identifier./userlike_callback instructs Planio that this call is coming from Userlike, it does not need to be changed?key=abc123 is a secret key for authentication purposes. In Planio, please navigate to your avatar -> Administration -> Settings -> Incoming emails and find the key in the field labeled Incoming email WS API key. Now, replace abc123 in your URL with your actual key.That's it. Now, paste your URL in the corresponding field on Userlike and select one or two of the Automatic Tickets boxes:
Our recommendation is to select both checkboxes. Here's what it should look like:
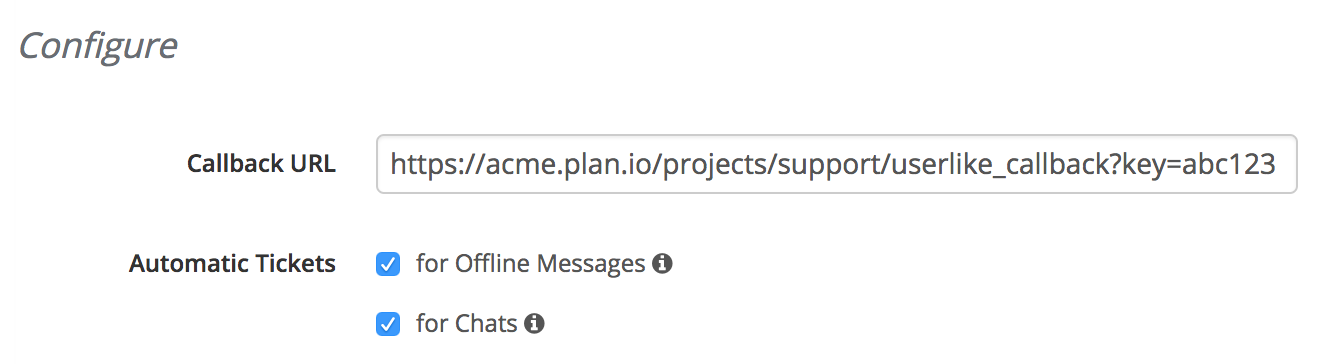
Please leave all other checkboxes unchecked and finally, click on Update settings.
And that's it! You can go ahead and try it out now. Any chats and/or messages from Userlike will show up as issues in Planio Help Desk.
Of course, we have some more advanced config options for you if you think building the URL above was fun!
You can add any of the following parameters to your Callback URL to further configure how Planio issues will be created. Please add each parameter as &key=value to your URL and replace key and value appropriately.
| Key | Value |
|---|---|
status_chat_meta |
The name of a Planio issue status to be set on the issue for chat logs. If you merely want to archive chat logs to have them available in your customer history and in search, you could select a Closed status here. |
category_chat_meta |
The name of a Planio issue category to be set on the issue for chat logs, for instance Userlike Chat. |
status_offline_message |
The name of a Planio issue status to be set on the issue for messages you've received in Userlike while offline. Use an Open status like New or In Progress here, you'll be also able to respond to messages right from within Planio Help Desk! |
category_offline_message |
The name of a Planio issue category to be set on the issue for offline messages, for instance Userlike Message. |
Here's a fully-fledged example:
https://acme.plan.io/projects/support/userlike_callback?key=abc123&status_chat_meta=Closed&category_chat_meta=Userlike%20Chat&status_offline_message=Open&category_offline_message=Userlike%20Message
(Line breaks are only there to make it more legible.)
This URL will instruct Planio to:
acme.plan.io,support,abc123,That's it! Have any questions? Get in touch with us – we'll be happy to help set up the Userlike integration with you!
Using SparkleShare is no longer officially supported. To sync files and folders with your desktop, we recommend to use Planio Storage.
Planio Storage lets you set up a dedicated folder within any Planio project that will be synchronized across your team. All team members can access files using the web or directly on their devices using the Planio Storage Sync Client.
Within any project, install Planio Storage by navigating to the Apps tab. Depending on your current Planio plan, you might have to add Planio Storage for a small monthly fee. Of course, you'll be able to try Planio Storage for free until your next plan renewal.
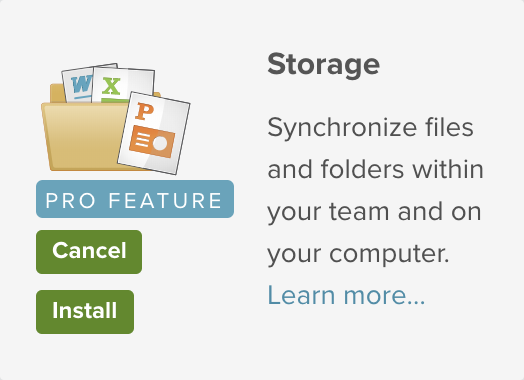
To sync your project's files and folders with your computer, download the appropriate client app first.
|
macOS Download (Version 2.6.3) |
Windows Download (Version 2.6.3) |
Linux Download (Version 2.3.4) |
Next, run the installer and enter your Planio domain, login and password. Planio Storage will allow you to sync everything from your Planio account or just the projects you select.
You can also specify the local folder where Planio Storage files should be placed.
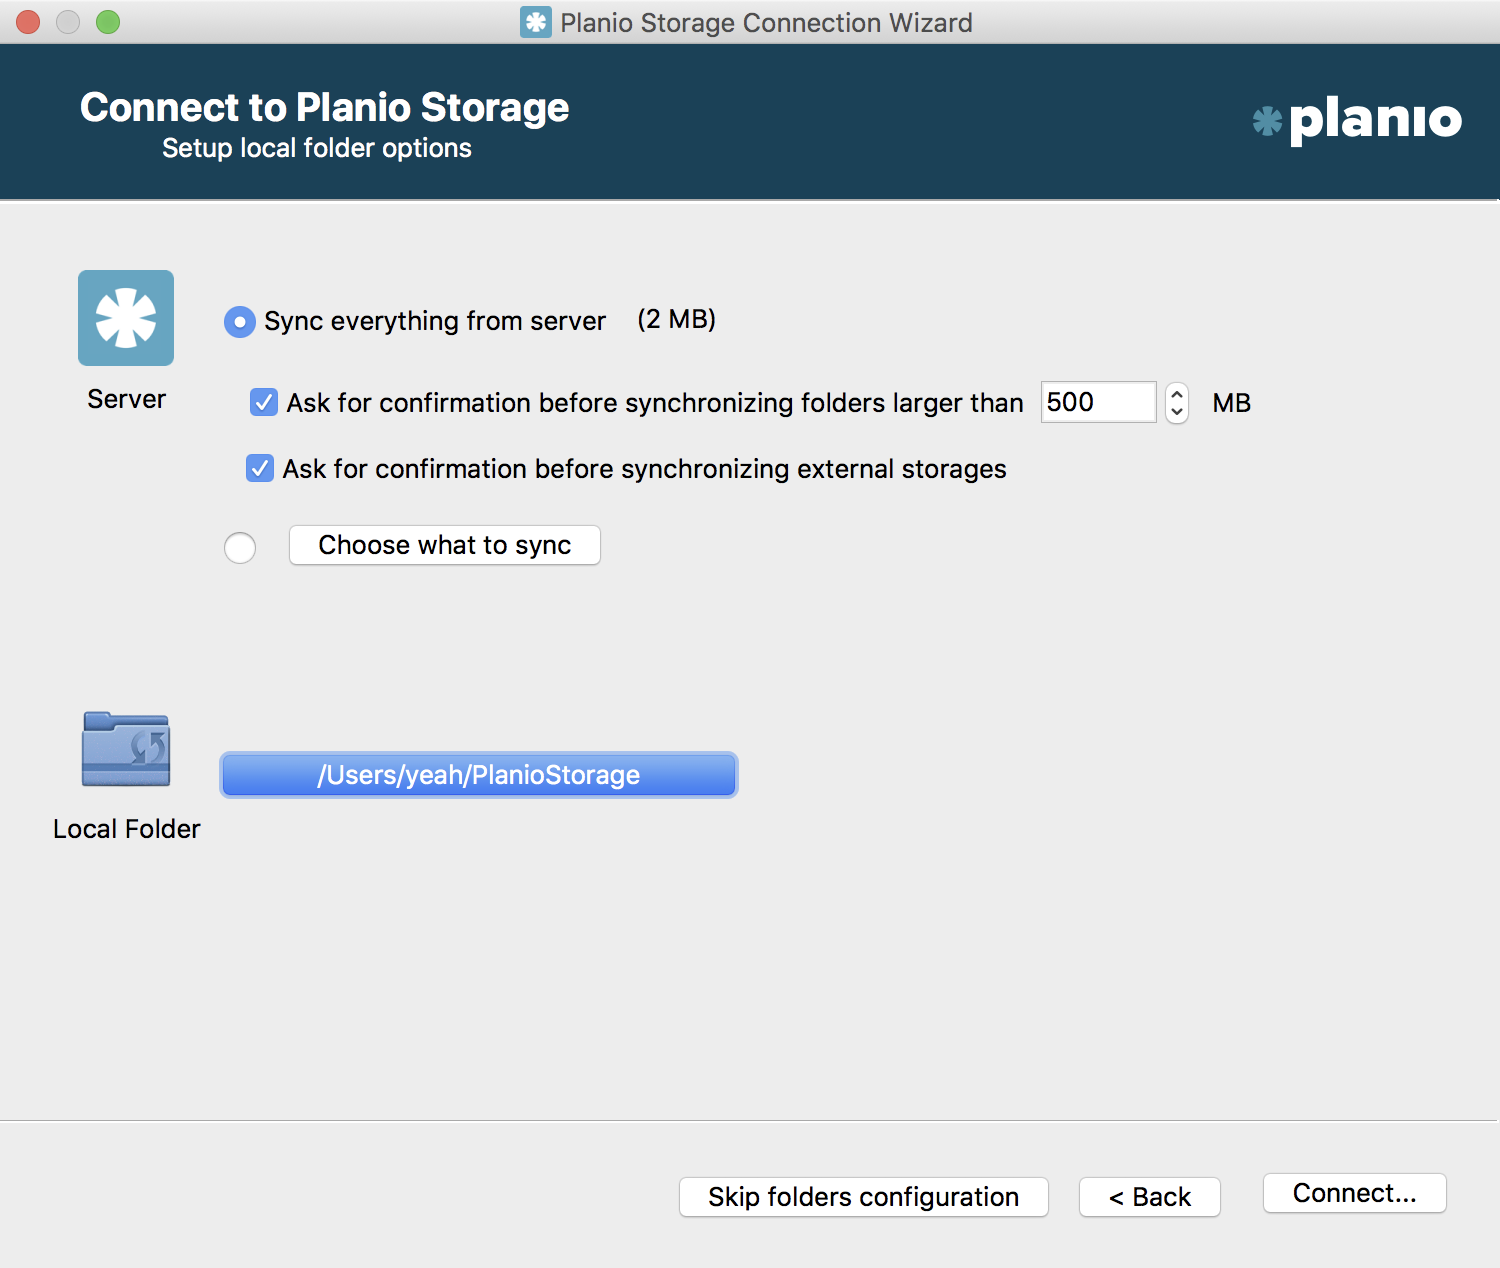
Handling files and folders inside the synced folders works like you're used to and every change will be synced with Planio. Should you be offline during a change, the sync will happen the next time your device is connected to the Internet.
In case you and a colleague edit the same file while offline or during syncs, Planio Storage will create a copy of the file and you'll be able to merge your changes.
You can manage files and folders right in Planio as well. Within your project, navigate to the Storage tab. Inside, you'll be able to upload any number of files from your computer by clicking on the Upload files button or simply by dragging them from your desktop into the browser window.
You can also create folders as you would on your computer by clicking New folder.
To visualize the files and folders in Planio Storage, you can either select Tree or Grid from the options menu at the top right.

In case you don't wish to synchronize everything but access Planio Storage directly while online, you can use WebDAV.
You can find a project's WebDAV URL in the Storage section's sidebar on the right. To connect, simply use your Planio login and password.
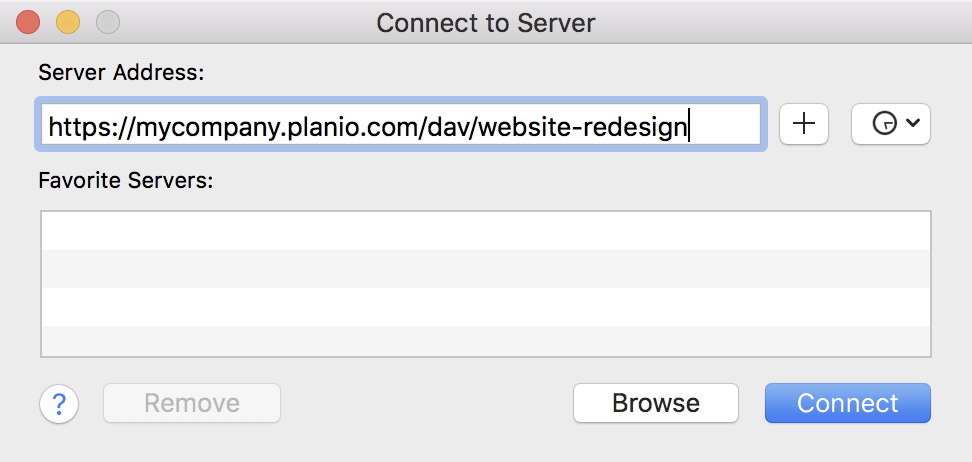
To configure who among your colleagues and clients should be able to view and edit files, head to your avatar -> Administration -> Roles and Permissions. Then, select a role. Within Permissions -> Storage, you'll be able to set permissions for the selected role.
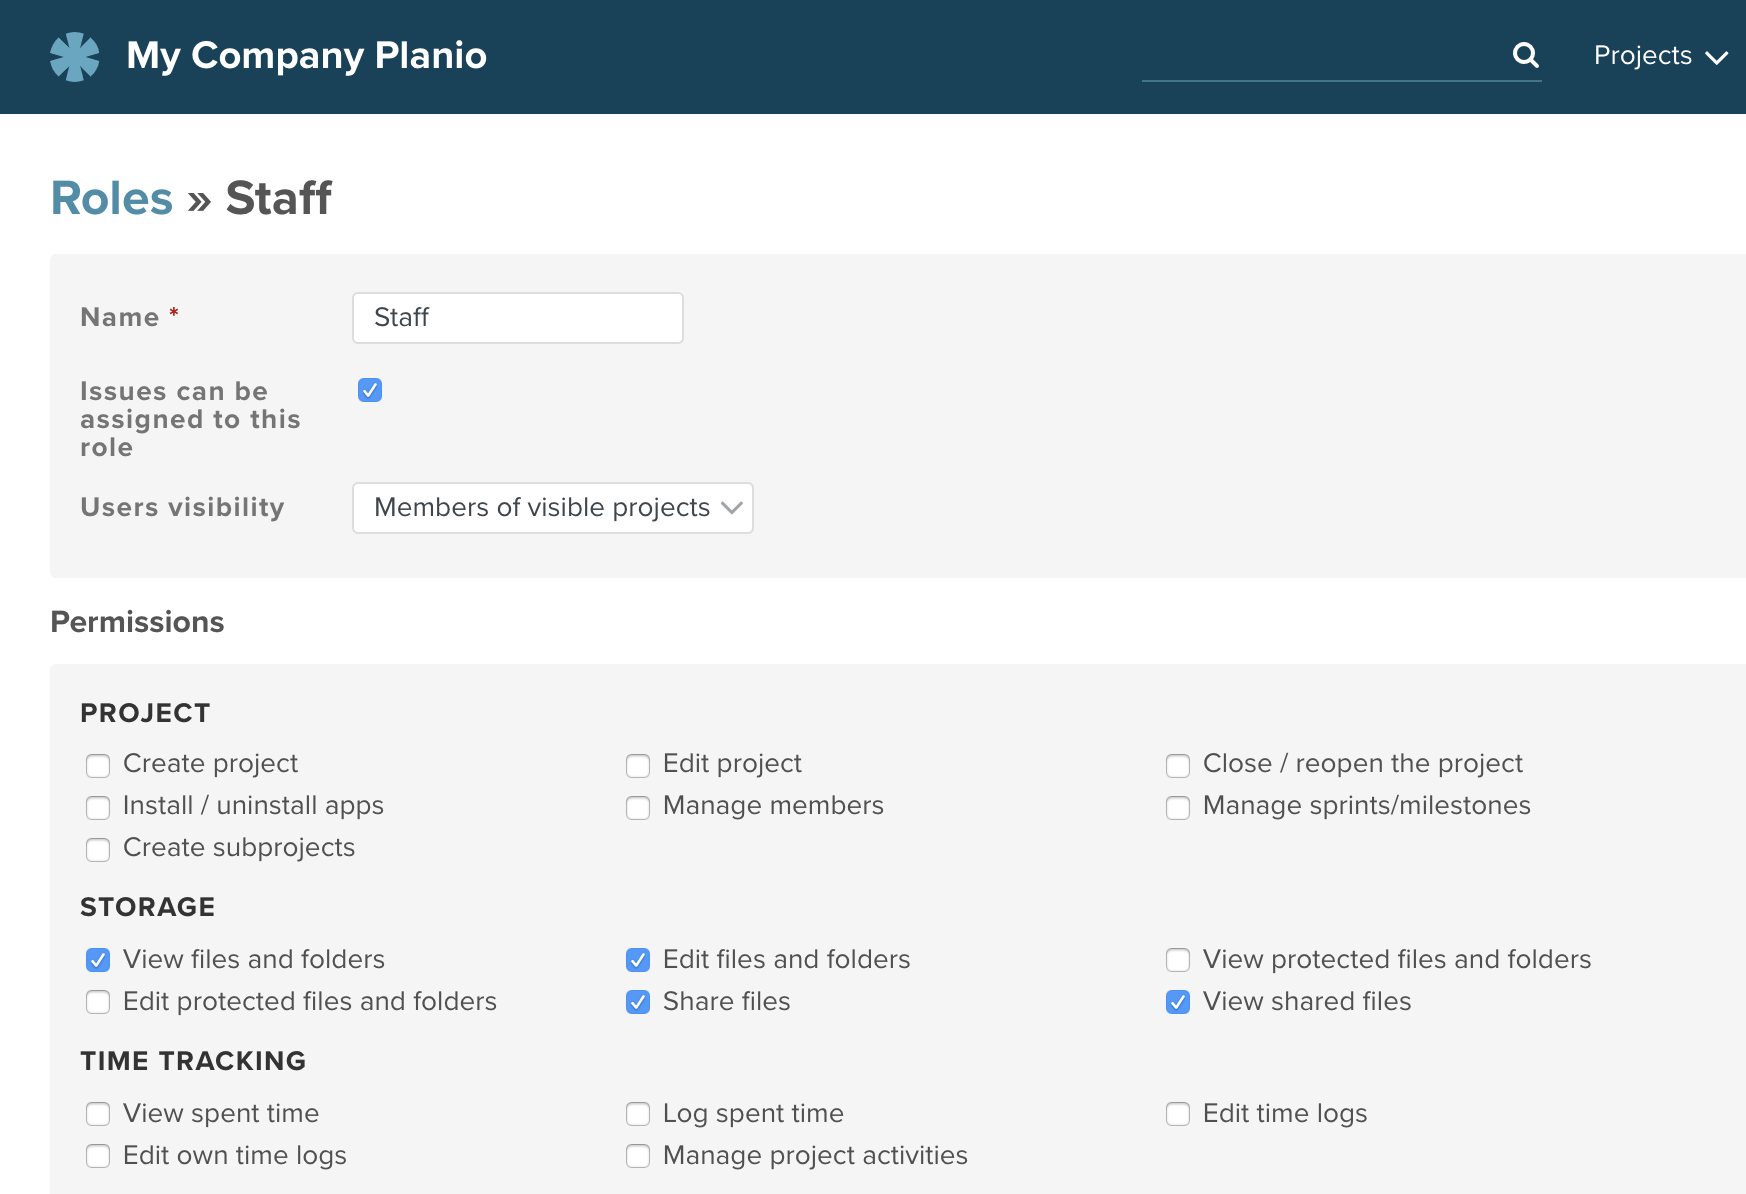
The following permissions are available:
| View files and folders | Enables users to access the Storage tab and browse files. |
| Edit files and folders | Lets users upload, edit, and delete files. |
| Edit protected files and folders | Enables users to protect files and folders. Protected items are hidden from other users unless they have the View protected files and folders permission. |
| View protected files and folders | Allows users to view and download protected files. They cannot edit, delete, or set files to unprotected. |
| Share files | Allows users to generate a sharing link for any file. |
| View shared files | Allows users to download files shared using a sharing link. |
Files and folders can be protected and thus hidden from other users. To protect a folder or file, click on the ... menu or right click the item. Then, select Protect.
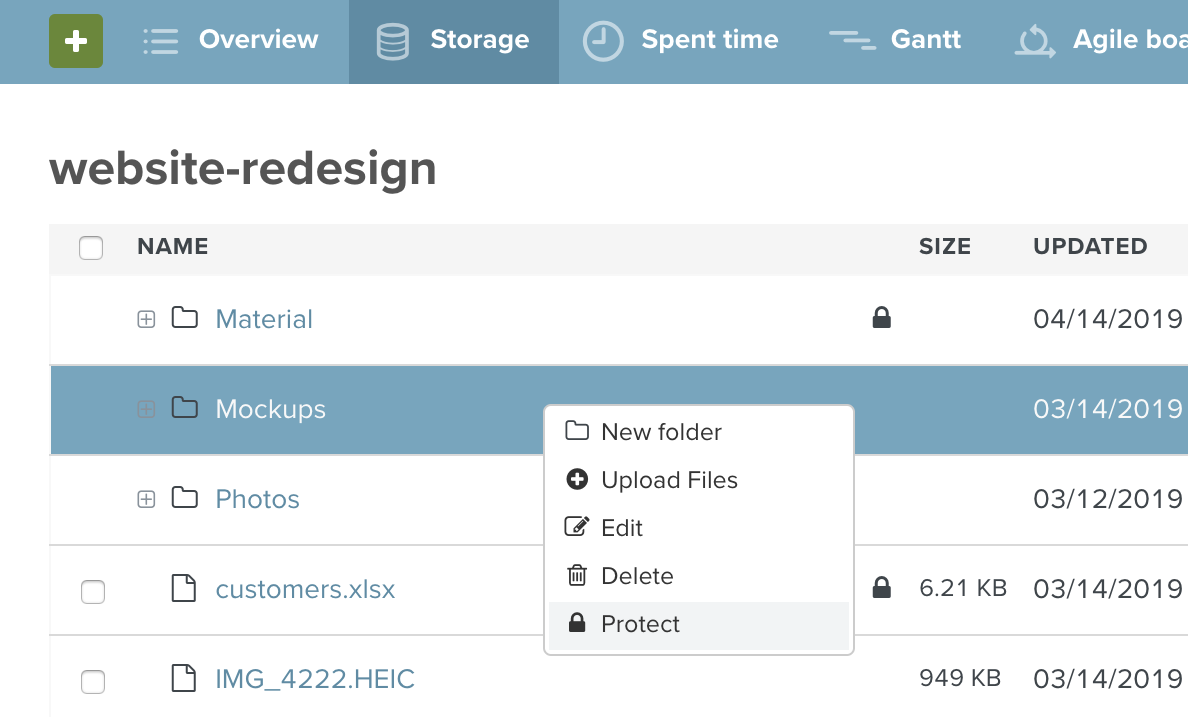
Protected files and folders are hidden from users who do not have the View protected files and folders permission. Users who do have the permission can view and download protected items, but they cannot edit or delete them.
To edit, delete, or unprotect protected files and folders, users need the Edit protected files and folders permission.
Single files can be shared with people outside of the project by generating a Sharing link. This is useful if you'd like to link to the file publicly or send a link to it in an email.
To share a file, click on the ... menu or right click the item. Then, select Share. You'll be able to copy the sharing link in the next step.
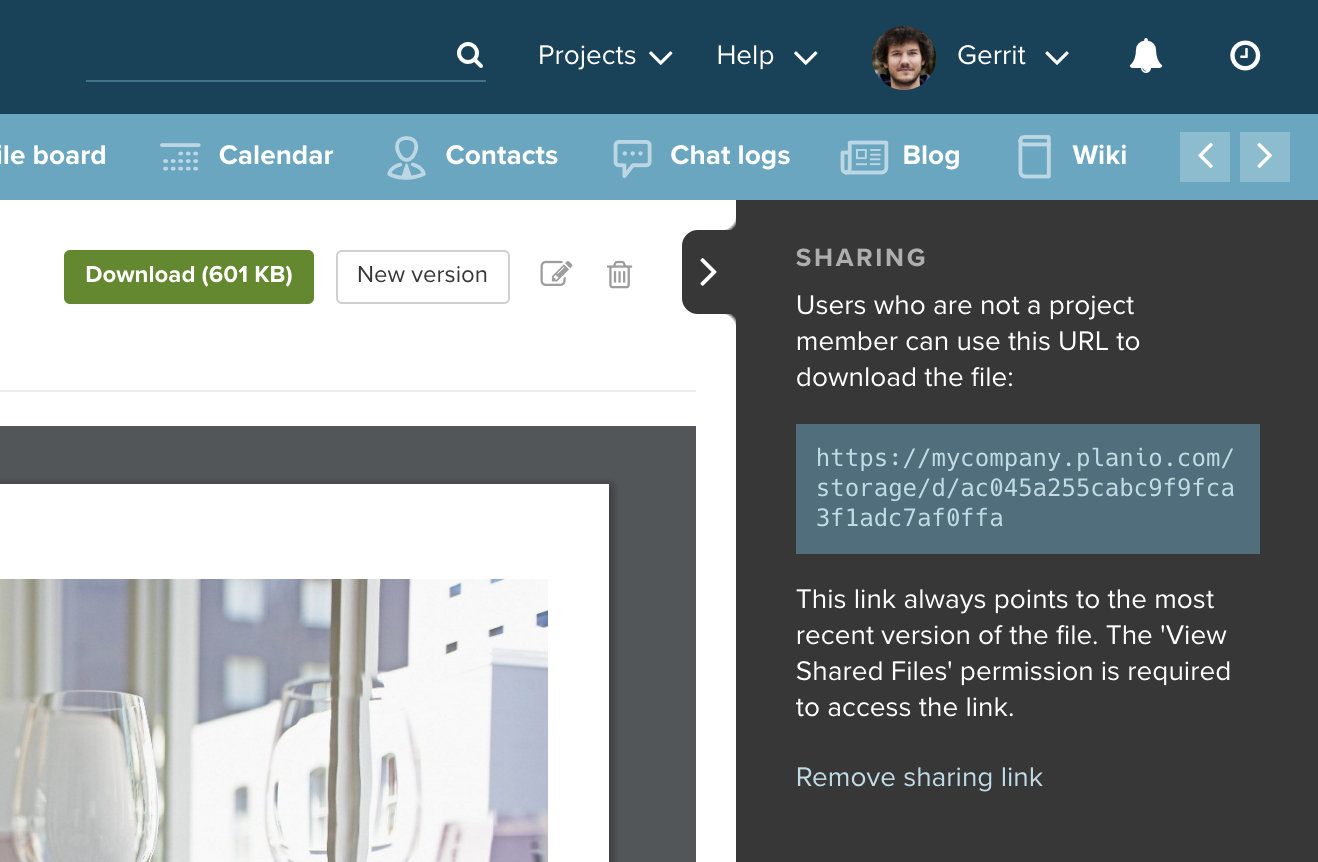
The link will always point to the latest version of the file–even if it has been updated after it was shared.
Sharing links can be accessed by anyone who has the View shared files permission. By configuring your Non-member and Anonymous roles, you can define if that extends to everyone who has an account in your Planio or even to people who are not logged in. Our guide Make Redmine Projects Public on Planio has more information about this.
You can create links in Planio Storage which point to files in different folders or even projects of your Planio account.
To create a link, click on the ... menu or right click the item. Then, select Create link. In the popup that appears, select the project and folder where the link should be created.
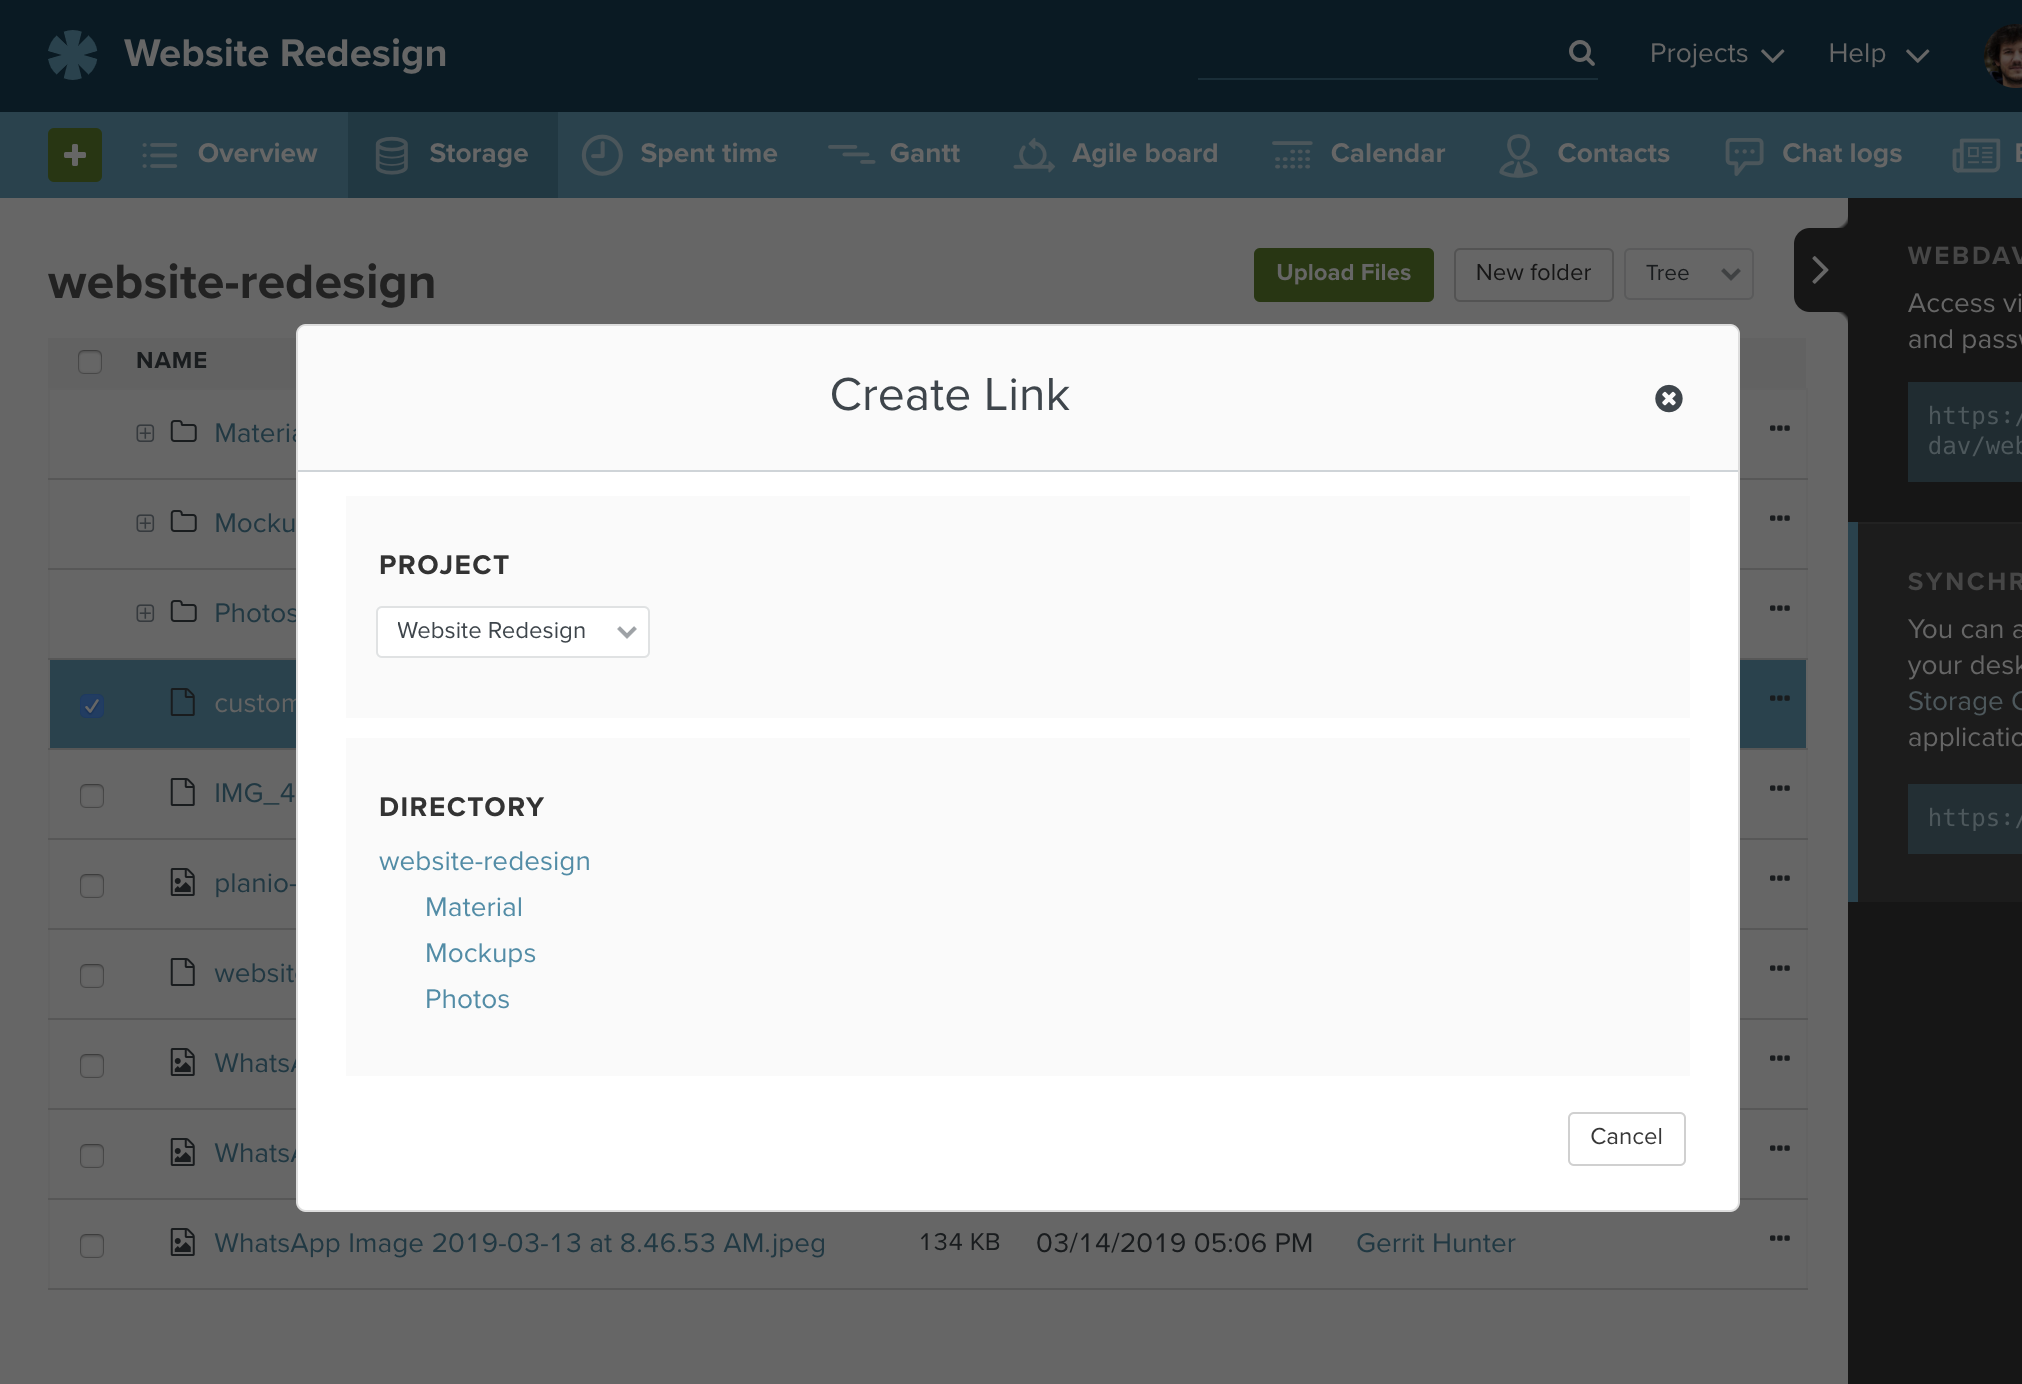
Links will always point to the latest version of the source file. If a source file is deleted, all links will disappear as well.
Users will always require permissions to view the source file as well in order to be able to view the link.
The Planio Storage desktop client uploads local changes and downloads remote changes. When a file has changed both in your local folder and on the Planio server between two synchronization runs, the client will be unable to resolve the situation on its own. Therefore, it will create a conflict file which contains your local version, download the remote version from Planio, and notify you that a conflict has occurred which needs attention.
Imagine there is a file called hello.txt in your synchronized folder. It has not changed for a while and contains the text "hello" both on your PC and remotely, on the Planio server. Now, nearly at the same time you update this file to say "local hello", the file on the Planio server gets updated to contain "planio hello" by someone else.
When attempting to upload your local changes, the desktop client will notice that the server version also has changed. It therefore stops the upload (since it would potentially overwrite somebody elses changes) and instead creates a conflict file holding your local changes. You will now have two files on your local machine:
hello.txt containing "planio hello"hello (conflicted copy 2020-06-03 012755).txt containing "local hello"As you can see, the file hello.txt represents the file as it is currently on the Planio server - it has the remote changes (and will continue to be updated with further remote changes when they happen), but your local adjustments have not been uploaded to the server. Instead, the conflicted copy file holds your local adjustments now.
The desktop client notifies you about this situation via system notifications, the system tray icon and a yellow unresolved conflicts badge in the account settings window. Clicking this badge shows a list that includes the unresolved conflicts and clicking any one of them opens an explorer window pointing at the relevant file.
To resolve such a conflict, open both files, compare the differences and copy your local changes from the conflicted copy file into the original file where applicable. In this example you might change hello.txt to say "local and planio hello" and delete the file with conflicted copy in its name. With that, the conflict is resolved.
This guide will bring you through exactly how we use Planio ourselves internally for product management. The reason is that everyone does product management slightly differently, so we didn’t want to give a “one-size-fits-all” guide. Instead, you’ll get some ideas from how we do it that you can adapt to your own situation.
Let’s take a second to consider the product management environment at Planio. We have a mature product that’s been around for over 8 years. Thousands of organizations worldwide use Planio on a daily basis. We’re constantly adding new features, refining existing ones, improving our codebase and fixing security issues as they arise.
But we have an interesting twist in our product management. Planio is based on open-source Redmine, so product decisions made by the open source community impact our product roadmap. In short, we maintain Planio as a long-lived fork of the Redmine project that remains compatible with Redmine.
In this guide, we’ll take an example of a product launch that we had last year. We rolled out an Android and iOS app for Planio. We’ll dig into how we used Planio as our product management tool.
Issues in Planio are the atomic unit for organization in Planio. You can think of them as work packages, user stories or tasks. In our case, a developer created an issue for individual stories. Then, he’d update the issue with notes based on his progress. He might link to related issues in the case of a specific bug. He often included references to any Git commits that were relevant to the issue.
Here’s what that looks like:

As you can see above, the beauty of Planio issues in this case is that you have a clear overview in one place. You can see any blockers that need to be resolved. You can jump right to any related information with a single click instead of trying to search for it.
For example, in this case, you can click on Revision 77fb4ea8, and you can dive right into the diff for the associated code:
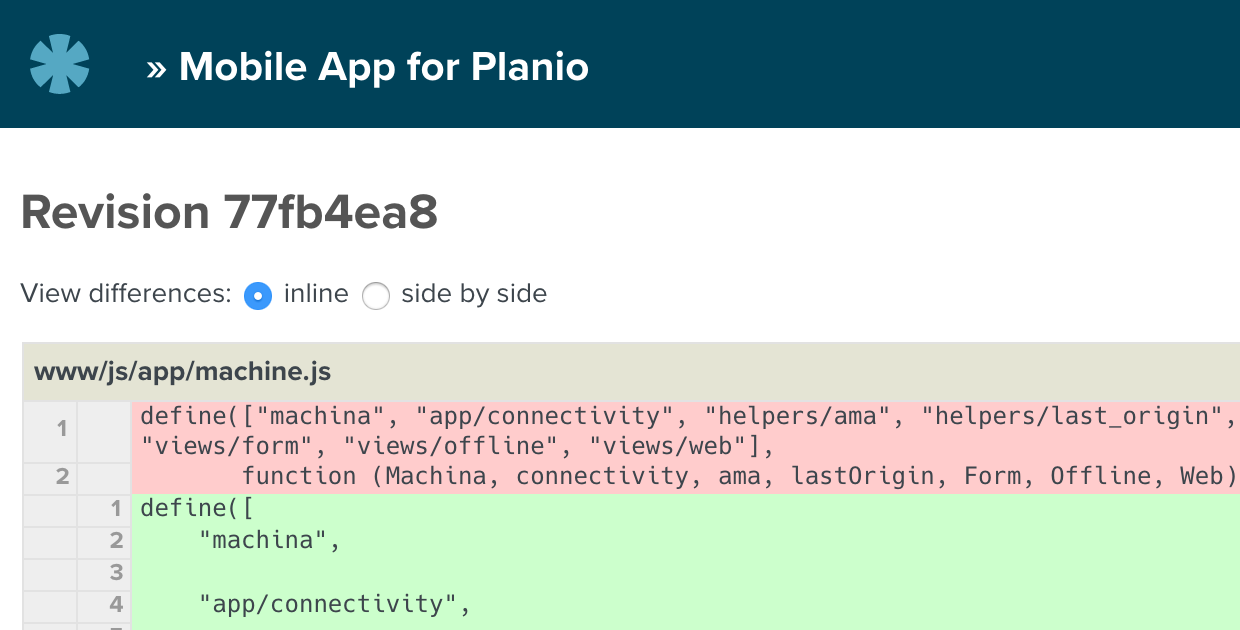
As a product manager, you don’t just operate at the task level. You need to be able to zoom out to see the bigger picture. Perhaps you need to give a report to the executives in the C-suite on product. Or you need to sit down with sales and give them insights into where the product is going over the next couple of sprints.
In our example product, we used Milestones as our project management approach. Our Milestones were target releases for the mobile app. Here’s an example of the v2.0 of the mobile app:
So, in the screenshot, you can see an overview of all the issues that go into the milestone. In this example, you can see that the majority of the issues are focused on solving bugs. You can see at a glance that this milestone is at 100% completion.
As a product manager, you’ll often be using an agile framework such as Scrum or Kanban. In the above project, we didn’t strictly follow a framework such as Scrum, but let’s go through the Agile approach you could use on such a project.
The Agile board will be your daily tool for visualizing progress and communicating the status of individual stories. You’ll have an overview of issues that haven’t been started yet, issues that are in progress and issues that are done. You can use swimlanes to break the board down by individual team members. Here’s an example:
The swimlanes are great for seeing whether one team member is overloaded with too much work.
In the Scrum approach, for example, you’ll often use burn-down charts to give you a sense of how well a team is performing on a particular sprint. Here’s an example of the burn-down chart for the milestone we looked at previously:
This chart gives you insights into how you’re doing. You can see that this sprint pretty much tracked the ideal burn-down rate. New issues were only added once, so there wasn’t much unexpected work added on. Based on that chart, we can say that the sprint went very well indeed!
So far, we’ve focused on how we use the task-level features in Planio for product management. The tactical task-level work is a big part of product management. You’ll spend a lot of time deciding which stories go into the next sprint, or you’ll be estimating story sizes and helping team members get through barriers and blockers to finish specific sprint items.
But there’s more to product management than Agile boards and issues. You’ll also need to spend time understanding the market. You’ll do competitor reviews. You’ll track feature requests. You’ll sit down to interview people as part of your research into your users.
Wikis and Planio Storage
In our experience, all these insights and findings get lost in a sea of Word docs, PowerPoint presentations, emails and scraps of paper. The problem is that your team won’t have a clear understanding of all this information, and you’ll find that you aren’t on the same page when discussing the product. You might have had a breakthrough from talking to customers, but if your team doesn’t understand that breakthrough, they might not understand the decisions you want to make on that basis.
At Planio we use the Wiki and Planio Storage for sharing strategic information.
Planio Storage is a synced folder on your desktop that you can use to store relevant files. For example, you could store a PowerPoint presentation that you gave to senior management, and everyone on your team will have access to it.
We use the wiki for storing more refined information, whereas Storage is more a collection of documents. For example, you could store your product vision, your key insights from user testing and your key ideas driving your product in your wiki.
Here’s an example from one of our wikis that contains insights from customer interviews we held at Planio:

The fact that this information is in the wiki in a structured format means that everyone in your organization from sales to customer support can find and learn from the insights and ideas of others. It’s also great when you’re onboarding new team members. They can learn much of the implicit knowledge of the organization by reading through the wiki.
Some organizations suffer from operations, product management and customer support being siloed functions within the organization. Customer service uses a help desk tool that is separate to operation’s task management tool which is separate to product management’s tools.
So, a customer sends an email requesting a custom feature that customer support forwards to operations that forwards to the product team, which adds it as a backlog item.
The glue holding all of this together ends up being email, and nobody can quite find out what exactly the customer wanted to achieve from that customization.
We use Planio to handle all of these functions, and we’ve found that it’s amazing to have all this information in one system.
Planio Help Desk
We use the Help Desk to handle customer support requests, and we can reference a specific customer request in a backlog item in the product project.
We can also quickly get insights from customer support that feed back into our product decisions. For example, we ask new trial accounts why they decided to try Planio and what they’re looking for in it. Here's what the email looks like:

We can use the filters on the issue page to quickly dig down and get a list of hundreds of responses to our “Quick question” email:
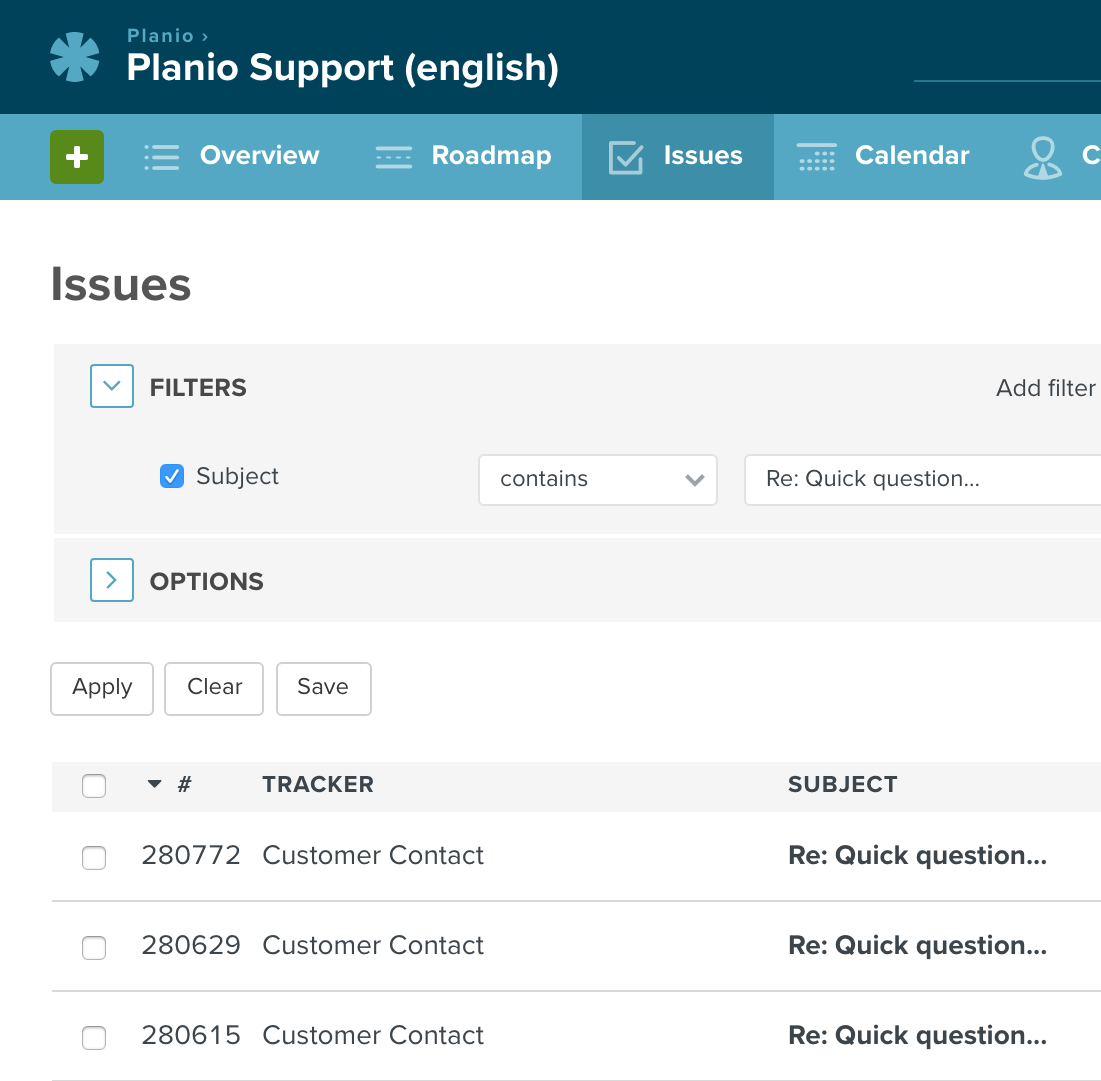
We also ask people why they canceled their Planio account. We’ve created a wiki page listing the reasons and tallying up the totals, so we know the biggest drivers from cancellations. We also link back to each email with the reason, so we can get some context around the cancellations.
We’ve found that having a tightly integrated system for product management, operations and customer support really reduces the loop between support and operational issues and resolving those via product improvements.
We hope you’ve found some insights into how we use Planio for product management that you can put into practice. You can also check out our specific guides on using the Agile board here or setting up the Help Desk here.
Redmine is the most popular open-source project management tool. You'll find out about the common use cases, why people use Redmine, approaches to issue tracking and project management features.
It's perfect for giving you or your team members a quick introduction to Redmine and what it can do for your team.
Redmine helps teams work together.
Redmine is primarily an issue tracker. An issue tracker is a to-do list that's focused on accountability and forward progress on issues, which can be tasks, bugs or requests.
Redmine also includes project management aspects. You can plan out milestones on Gantt charts. You can also use Agile project management techniques such as Scrum or Kanban via Redmine plugins.
A third aspect of Redmine is how you can share ideas. There's a blog for project updates. You can discuss ideas in a forum. You can create a wiki to store knowledge and document projects.
Redmine is an open-source project. Jean-Philippe Lang released the first version of Redmine in 2006. Since then, a community of open-source developers have expanded and improved upon Redmine. Every day people from around the world work to make Redmine even better.
Open source means you can download, use and re-write the source code. If you see something that is broken, you can contribute a fix or patch to solve the problem.
All of the developers at Planio have contributed to the Redmine core. You'll find more about the project at Redmine.org.
Planio is based on Redmine with many enhancements. For instance, Planio adds a Help Desk, Agile project management features, Git hosting and Team Chat. In addition, many organizations choose Planio for significant cost savings over hosting Redmine themselves. You can read more here about Redmine, Planio, and Open Source.
Hundreds of thousands of organizations worldwide use Redmine to get more done ranging from Fortune 500 organizations right down to individual freelancers.
Redmine and email work well together. That means your clients can continue using email, but you can manage the emails as issues inside of Redmine. You can also create custom roles for your clients, so they can get involved in the discussions in Redmine. This involvement will help reduce conflict and help you work more efficiently with them. We've written more about how you can improve client relationship management with Redmine: Client Relationship Management: Avoiding the Black Box Problem
It’s very chaotic trying to start a business out of nothing. That’s why many startups use Redmine to organize their efforts. Redmine is a good choice because you can use it to handle software development and you can also handle incoming customer support tickets.
Redmine is uniquely suited for software development. It’s highly integrated with Git and Subversion. The wiki is often used to document software projects. You can even update Redmine issues from the command line using Git commit messages if you set up Redmine correctly or use Planio.
You’ll find that open source projects often use Redmine as a way to organize the project. The Ruby programming language is one very high profile project that uses Redmine as its bug tracker.
Redmine is a favorite for universities as a way of letting students and researchers organize their projects. Examples include The Philipp University of Marburg, which uses Planio as hosted Redmine to organize research projects.
Redmine lets you make certain aspects of your projects public, while keeping other aspects private, which is great for universities that want to involve the public in research projects.
To-do lists get out of hand, and they’re hard to share with others. Issue tracking in Redmine brings teamwork to to-do lists. Redmine lets you have a powerful workflow for getting tasks done and reviewing work. You can discuss problems and find solutions with others.
The wiki lets you create documentation for software, work practices and more. You can store important files in one place.
You have an idea? The forums let you discuss it publicly with your team members. You make announcements via the blog.
Redmine is accessible anywhere you have an Internet connection.
Issue tracking is core to Redmine. Most of your day-to-day work in Redmine will revolve around creating, updating and closing issues. You'll find more about issues here: Issue Tracking in Redmine
Redmine offers much more than just issue tracking. It also lets you track the progress of your projects, monitor how much time tasks are taking and visualize the end date.
There’s three different ways to track and manage projects in Redmine.
You can divide up your project into various milestones. You can then see how far along each chunk is. You can also dig down into which tasks are holding up reaching a particular milestone, and you can also see the time spent on the milestone.
This will let you visualize the different aspects. An issue will only appear on the Gantt chart if you enter a start and finish date for that issue.
This doesn’t come with Redmine core, but you can add it via plugins. A good example is the Redmine Agile plugin. We include this plugin by default at Planio. It lets you use agile techniques or the scrum framework. The issues will then appear on a Kanban-style board. You can drag-n-drop the issues around depending on their status. You'll find more in this guide on agile project management.
This guide explains how to set up Eclipse to use Planio's Git repositories using EGit. Both Eclipse and EGit are free and can be downloaded from eclipse.org.
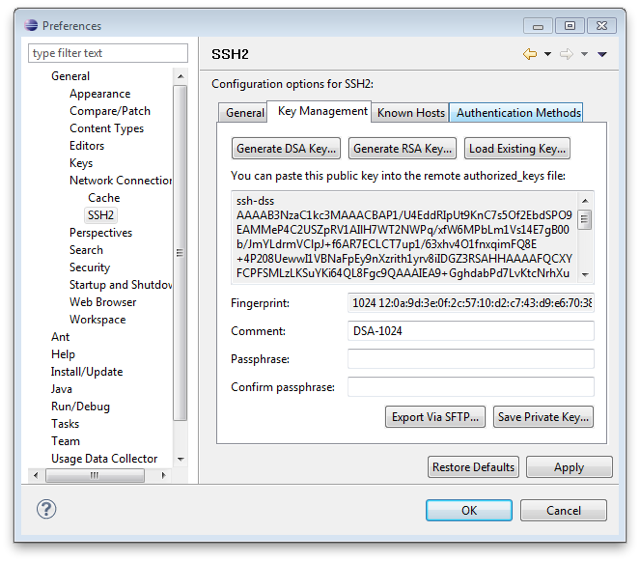
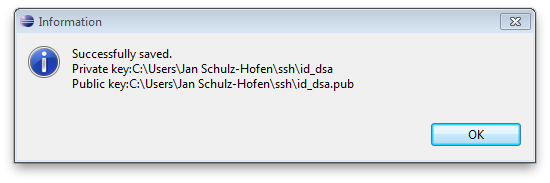
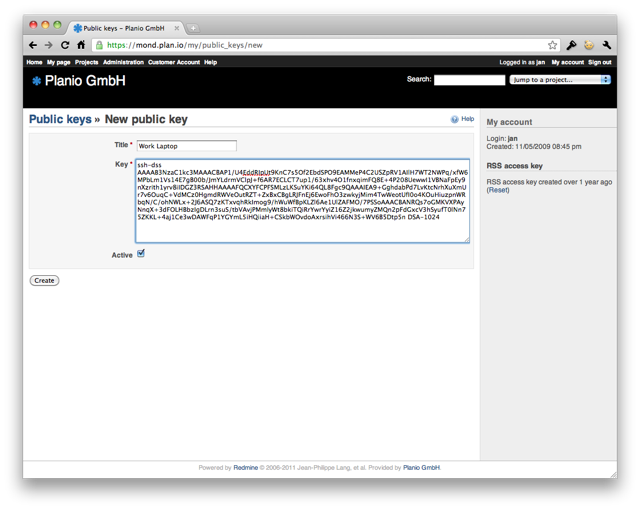
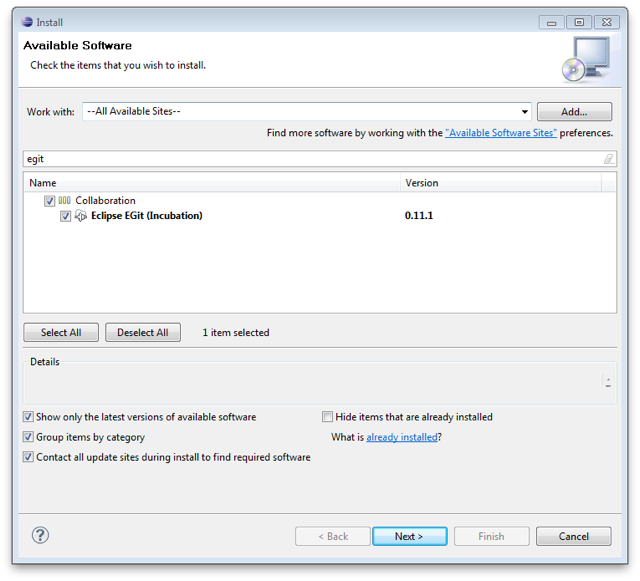

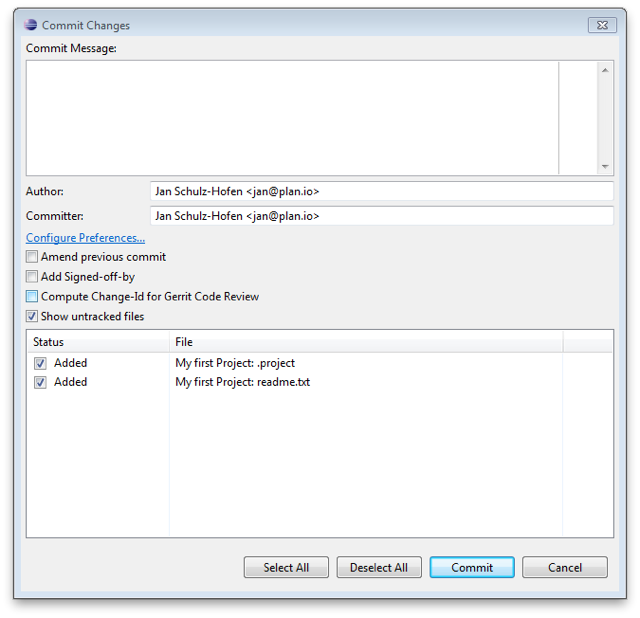
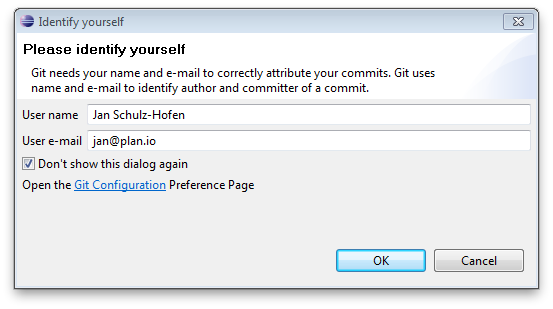
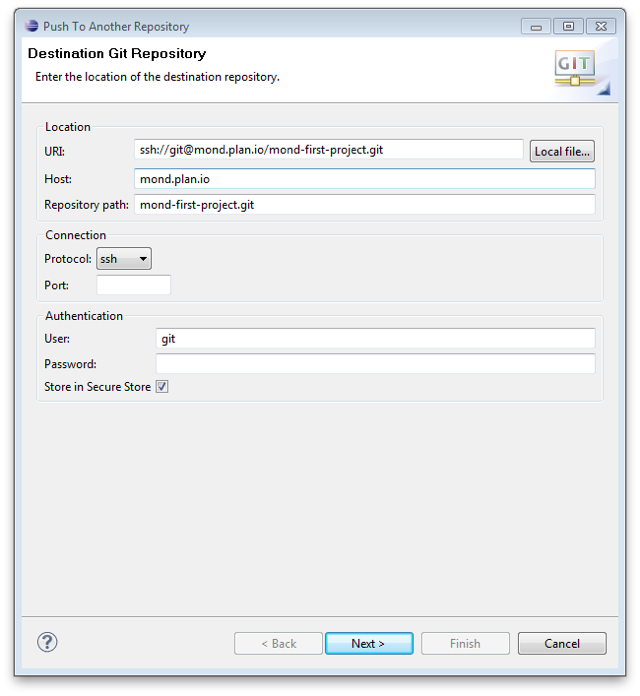
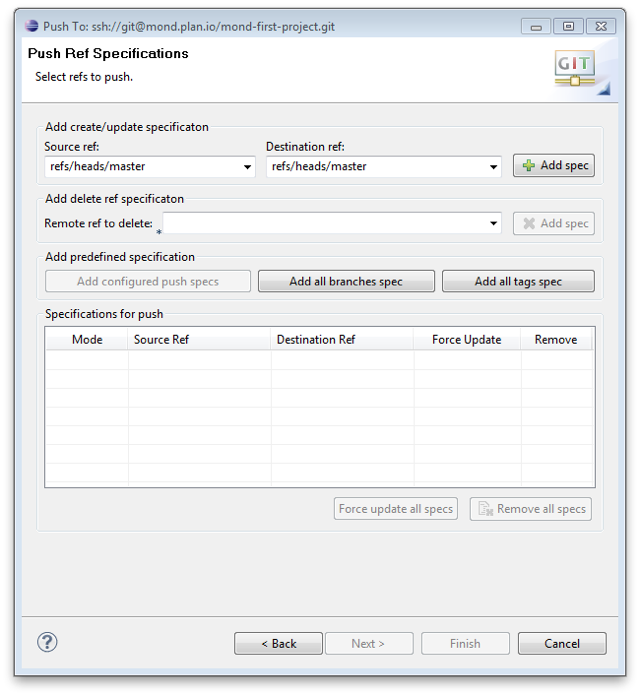
Team Chat lets you quickly make decisions together with your team in real time from your phone or computer.
You'll also have a real-time feed of the latest updates on your project on any device, and you'll be able to ping any team member when you need to talk to them.
Log into your Planio account and select the project for which you want to enable team chat.
Go to Apps in the navigation bar and make sure Team Chat is installed. It’s an optional extra, so you might have to upgrade to use it.
Once installed, you’ll see a chat tab in the bottom-right of the screen. You can start chatting here.

You'll also find Chat Logs in the navigation bar. Click on it, and you’ll see a history of all chat messages. On the right, you’ll see a sidebar with chat credentials. You’ll have to enter your account password to see the Server password.
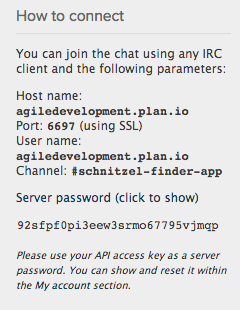
You’ll need these credentials to set up chat on mobile devices and desktop IRC clients.
Choose your platform below:
 |
 |
| Colloquy for iOS | AndroIRC for Android |
 |
 |
| Colloquy for Mac | Pidgin for Windows |
As you might know, Planio comes with a powerful REST API which covers almost all aspects of Planio.
This guide will show you how to use OAuth 2 for authorizing access to this API.
If you were working with the Redmine API before, you know that in order to use it, you had to generate an API key and use that to make authorized API calls.
This approach, while relatively easy to work with, has a few drawbacks:
OAuth 2 defines a mechanism to restrict applications to a certain scope. Further, users need to explicitly grant access to an application before it may act on their behalf. When doing so, they will be informed about the scope, that is, what data the application is going to have access to. In the same way, a user may later decide to revert this decision and revoke access for an application at any time.
Let's look a minimal example for you to try out.
In order to use OAuth with Planio, you have to create an Application first. This will generate a unique identifier for your API client, as well as a secret. Both will be used to authenticate your application when it's communicating with Planio.
Go to Your Avatar → Administration → Applications and click New Application.
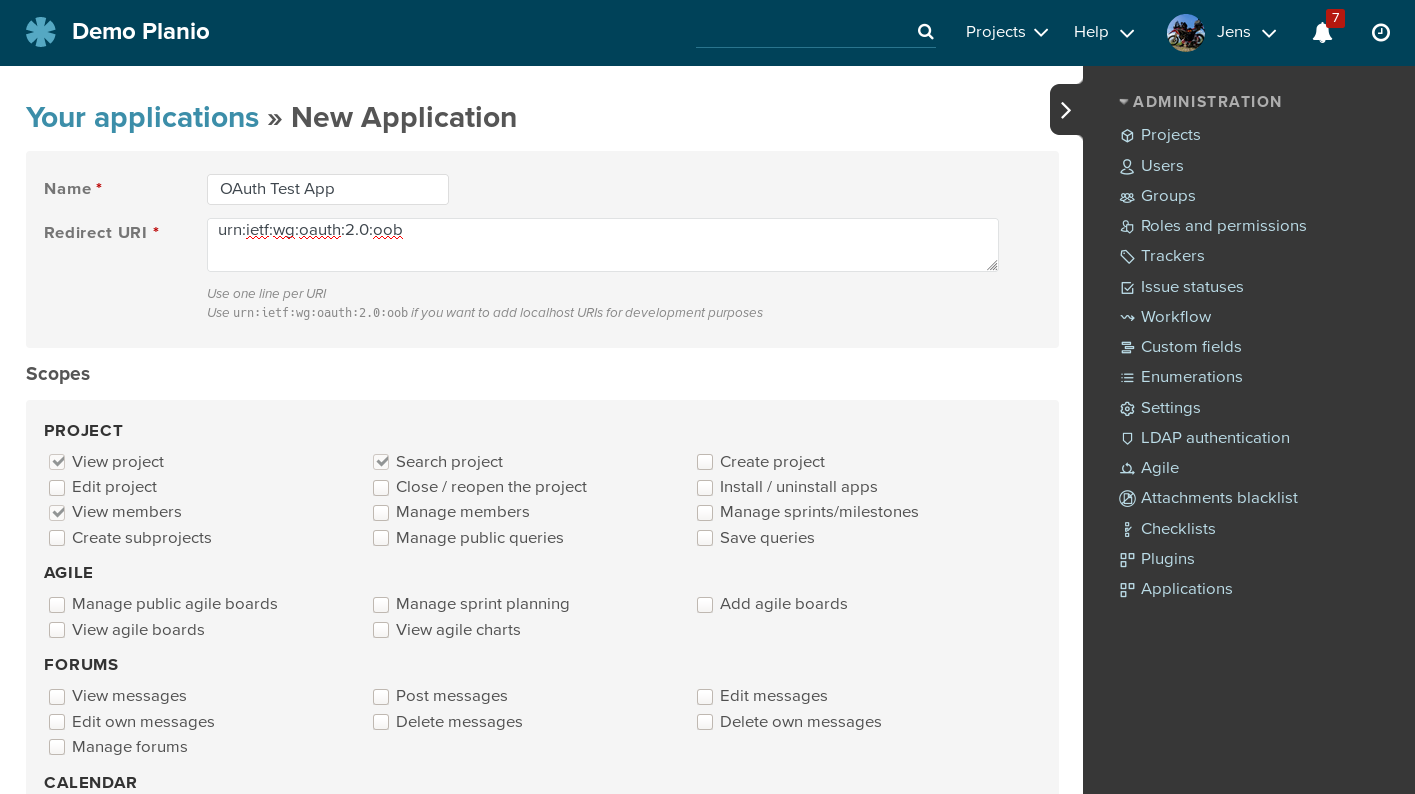
You may enter any descriptive Name for your application. This will be shown later to users when they are about to authorize your app.
The Redirect URI is the location where Planio will redirect a user's
browser to after they granted access to your application. The redirect will
carry a code query parameter which holds an authorization code that's needed
to retrieve the actuall access token later.
For now, enter urn:ietf:wg:oauth:2.0:oob as the Redirect URI. This
special value tells Planio that this application is not reachable over the
web. Instead, the authorization code will be simply displayed to the user for
manual transfer to the client application requesting access.
Below, in the Scopes section, you decide what your application will be allowed to do. Don't be too generous here, and restrict the set of granted permissions to the minimum necessary. For now, just select the Add issues permission and hit Save below.
You will be redirected to a page that lists the details you just entered, along with the application's Application Id and Secret.
We'll be using the Ruby language and the OAuth2 Gem for this.
Of the various OAuth Flows that exist, Planio currently supports the most commonly used Authorization Code flow. Please refer to the OAuth 2 spec for more technical details. Any applications you create are considered confidential in the sense of the spec, which means that the application secret may not be disclosed. If you require support for a public application (for example a mobile app or an application running exclusively in the browser), please contact us.
require 'oauth2'

client_id     = '...' # your application id
client_secret = '...' # your application's secret
redirect_uri  = '...' # your application's redirect uri
site          = "https://your-domain.plan.io/" # your planio account's URL

client = OAuth2::Client.new(client_id, client_secret, site: site)
If you were building a real application, you would now send your user to some URL where they are prompted to grant access. Usually you don't have to construct these URLs yourself, but your OAuth 2 client library will do it for you:
client.auth_code.authorize_url(redirect_uri: redirect_uri, scope: 'add_issues')
# => https://your-domain.plan.io/oauth/authorize?response_type=code&client_id=...&redirect_uri=...
As scope, list all permissions you are planning to use. You cannot request
any permissions that have not been selected when the application was registered in Planio, but
you can choose to select less. Here, we only request the add_issues permission in order to be able to add issues.
Open this URL in your browser and you will be prompted for authorization, listing the permissions you are applying for.

Click Authorize, and take note of the Authorization code. If you had entered a real Redirect URI earlier, you would have been redirected to that URI now, with the authorization code as query parameter.
With the authorization code you can now request an access token from your Planio account like this:
code = '...' # the authorization code from above
token = client.auth_code.get_token(code, redirect_uri: redirect_uri)
# => <#OAuth2::AccessToken ...>
If at this point you get an error, it is most likely that the code, which is only valid for a short time, already has expired.
If everything worked out, you may now use the token to do requests against Planio's REST API.
JSON.parse token.get('/users/current.json').body
This will give you some basic information about the user you are acting as. Of course at this point you can stop using the OAuth 2 client and use any other HTTP client to query Planio's API. Let's try with RestClient:
# get the actual token string from the oauth lib
token_value = token.token
# compile the issue data
payload = { issue: { subject: "Hello world" } }
# specify the token in the Authorization HTTP header
headers = { Authorization: "Bearer #{token_value}"}
RestClient.post "https://your-domain.plan.io/projects/some-project/issues.json", payload, headers
# => <RestClient::Response 201 "{\"issue\":{\"...">
And that's it! You successfully created an issue with authorization obtained via OAuth 2.
As the developer of an OAuth 2 client application it is your responsibility to keep the application secret as well as any auth and refresh tokens you obtain safe - any unintended disclosure may lead to unauthorized access to your users' data.
Click on Your Avatar → My Account → Authorized Applications in order to see the list of applications that currently have access to your account.
Clicking Revoke will invalidate any access or refresh token that the application might still possess and remove it from the list.